Requirements
Before installing the ServiceNow Adapter, make sure the following requirements are met:
-
Installed and properly configured Open iT Core Server connected to the Open iT Shared Software Assets Directory (SSAD)
- Coordinate with your Open iT Account Manager or the Open iT Support Team at support@openit.com to get your Open iT SSAD access credentials.
- The Core Server requires an internet connection to access the SSAD.
noteSSAD access can be configured during Core Server installation or manually set up and activated after installation.
-
Open iT Core Client(s) connected to an Open iT Core Server or a coexistent Open iT Core setup
-
Installed and properly configured Open iT Analysis Server
warningThe ServiceNow Adapter must be installed on the server running the Analysis Server.
noteWe recommend configuring the User Properties mapping in the Analysis Server's Mapping Sources page to make sure that the report displays the user information.
-
For the OpeniT LicenseAnalyzer, available and properly loaded Open iT data types in the Analysis Server:
-
For the OpeniT LicenseMonitor, available license status data in the Analysis Server
-
Open iT license with a valid
SERVICENOWkey -
ServiceNow login credentials with the following roles:
- For the OpeniT LicenseAnalyzer:
- sam_eng_app_integrator
- sam_user (minimum required role to access SAM tables)
- query_range_role
- x_opeit_openit_la.openit_integrator
- snc_basic_auth_api_access (required only when using basic authentication)
- For the OpeniT LicenseMonitor:
- x_opeit_openit_lm.user
- snc_basic_auth_api_access (required only when using basic authentication)
- For the OpeniT LicenseAnalyzer:
-
Valid URI of the ServiceNow instance
warningDetermine the appropriate Authentication Method for connecting to the ServiceNow instance.
If using OAuth 2.0, follow the steps in Configuring Application Registry in the ServiceNow Instance if you will use only one Open iT store application. If you plan to use both Open iT store applications, follow the steps in Configuring Application Registries with the Same Credentials instead.
Additional Requirements for Cloud Data Support
In addition to the requirements listed above, the following data types must be available and properly loaded in the Analysis Server to enable Autodesk and Bentley Cloud data integration, reporting, and insights:
- (89) Total License Use Licenseevents
- (97) OLAP Freeze Raw Hourly
- (139) License Subscription Inventory v2.0
- (140) License Product Assignment v2.0
- (146) License Seat Usage
- (154) OLAP Licenseevents Raw Hourly
Version Compatibility
The ServiceNow Adapter must be installed with a compatible version of the ServiceNow store applications.
| Adapter Version | Supported Store Application Version | Note |
|---|---|---|
| Version 10.3 |
| Requires active Open iT SSAD connection |
| Versions 1.x to 10.2.x | OpeniT LicenseAnalyzer version 1 | Does not support:
|
ServiceNow Adapter version 10.3 (and later) is required to all new deployments using the OpeniT LicenseAnalyzer version 2 and OpeniT LicenseMonitor.
Configuring Application Registry in the ServiceNow Instance
When using the OAuth 2.0 authentication method for API communication, you need to create an application registry in the ServiceNow instance.
Before proceeding, make sure that the Application scope is set to an Open iT application (e.g., OpeniT LicenseAnalyzer or OpeniT LicenseMonitor).
-
Log in to the ServiceNow instance with an Administrator account.
-
In the upper-left corner of the page, click All.
-
In the filter option, type
Application Registryto filter the displayed items. -
Go to System OAuth > Application Registry to open the list of application registries.
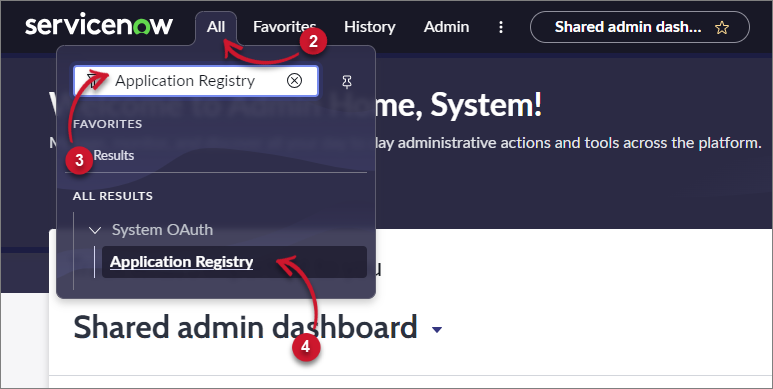 Navigate to Application Registry
-
In the upper-right corner of the page, click New.
-
Click New Inbound Integration Experience.
-
Click New integration.
-
For the application connection type, select OAuth - Authorization code grant.
-
Set a unique Name, for example,
LicenseAnalyzer Registry. -
Set the Redirect URLs to
https://<INSTANCE>.service-now.com/, where<INSTANCE>is the name of your ServiceNow instance. -
Under Scope validation settings in Auth scope, disable the Allow access only to APIs in selected scope setting.
-
Take note of the Client ID and Client Secret that will be used upon installation of the ServiceNow Adapter.
-
Leave all other default values, then click Save.
If the Assign auth scope prompt appears, click Skip for now.
Configuring Application Registries with the Same Credentials
When using OAuth 2.0 authentication for both OpeniT LicenseAnalyzer and OpeniT LicenseMonitor, it is recommended to use a single set of credentials for both applications to simplify maintenance.
Before proceeding, make sure that the Application scope is set to an Open iT application (e.g., OpeniT LicenseAnalyzer or OpeniT LicenseMonitor).
-
Create the first application registry by following the steps in Configuring Application Registry in the ServiceNow Instance.
-
After creating the first application registry, switch the Application scope to the other Open iT application that will use the same credentials.
-
In the upper-left corner of the page, click All.
-
In the filter option, type
Application Registryto filter the displayed items. -
Go to System OAuth > Application Registry to open the list of application registries.
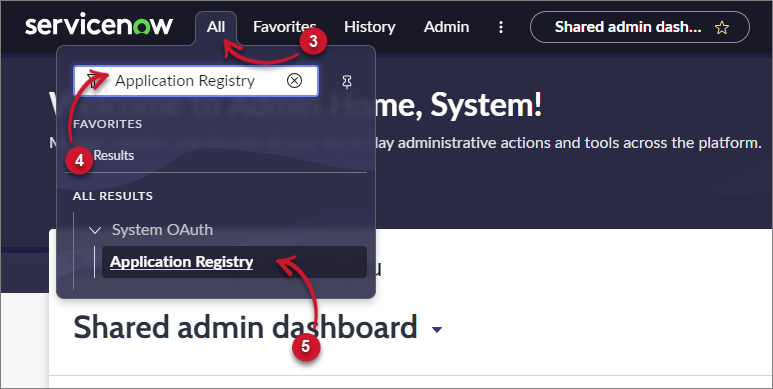 Navigate to Application Registry
-
In the upper-right corner of the page, click New.
-
Click Connect to an OAuth Provider (simplified).
-
Set a unique Name. For example, use
LicenseMonitor Registryif the first application registry was named LicenseAnalyzer Registry (or vice versa). -
Enter the Client ID and Client Secret from the first application registry.
-
Set the Token URL. Click the lock button to enable the field and enter
https://<INSTANCE>.service-now.com/oauth_token.do.Replace
<INSTANCE>with the name of your ServiceNow instance then click the lock button again to lock the field. -
Click Submit.
This will redirect you to the list of application registries.
-
Click on the name of the newly added application registry to open its details page.
Make sure that the Application field is set to the correct Open iT application.
-
Take note of the Client ID and Client Secret that will be used upon installation of the ServiceNow Adapter.
To copy the Client Secret, click the Toggle Password Visibility button to show the plain-text version of the client secret. Copy and save it together with the Client ID.
If you've accomplished the steps above after installing the ServiceNow Adapter, test the connection to the ServiceNow instance for both applications to verify the credentials.