Autodesk Cloud
Introduction
Open iT supports Autodesk usage reporting by collecting data from the Autodesk Admin Portal. This will produce the following aggregated data types used for historical reporting:
- (137) License Token Individual Usage
- (138) License Token Total Usage
- (139) License Subscription Inventory v2.0
- (140) License Product Assignment v2.0
- (146) License Seat Usage
Autodesk Cloud Support Architecture
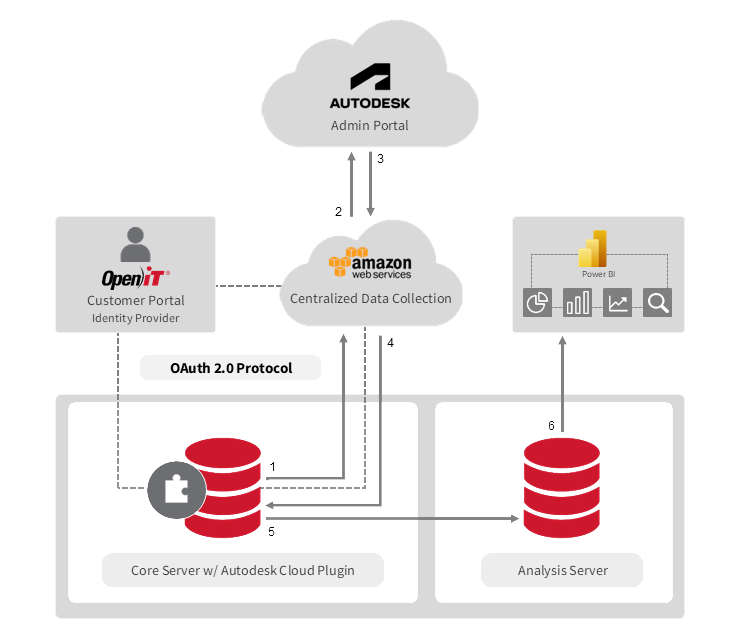
To initiate data collection, account credentials are configured in the Open iT Core Server and authenticated via OAuth 2.0 through the Open iT Customer Portal (Identity Provider). The AWS Centralized Data Collection Service then connects to the Autodesk Admin Portal to collect license metrics using these credentials.
Once authenticated, the service gathers data periodically, converts it into the Open iT format, and securely transfers it to the Core Server. The Core Server processes this data and sends it to the SQL database on the Analysis Server for further aggregation and reporting. The Autodesk data can then be visualized in Open iT’s reporting services or integrated with third-party BI tools like Power BI.
The following sections will guide you in setting up data collection account, configuring cloud data collection, verifying data collection through the Dagster UI, and troubleshooting issues in data collection.
Requirements
- Account with at least secondary admin privileges to the Autodesk Portal, which is https://manage.autodesk.com/ by default
- Installed Autodesk Cloud plugin
- Registered account in the Open iT Customer Portal
- Configured Open iT customer account to CBCS. This is done by the Open iT CBCS Administrator upon customer's request. To request configuration, please send an email to cbcs@openit.com with the following details:
- Company name
- Email address of the registered account in the Open iT Customer Portal
- Open iT Core Server time zone
Proxy Configuration Requirements
If the Core Server is configured to use a proxy server, make sure that the following URLs are exempted from the proxy configuration. These exemptions allow the required Open iT components to securely access and retrieve data from cloud-based collection services.
| Access | Description | URLs |
|---|---|---|
| Core Server Access | This is used when requesting or refreshing Core Server access via openit_oauth.exe. |
|
| Autodesk Portal Access | This is used when requesting Autodesk Portal access via openit_autodeskoauth.exe. |
|
| Amazon Web Services (AWS) Access | This is required for AWS-related data access. |
|
Make sure these URLs are allowed for outbound access and are not blocked or intercepted by the proxy, firewall, or SSL inspection rules.
Setting Up Data Collection Account
This provides instructions on setting up an Autodesk account for data collection from the Autodesk portal for Named User Subscription and Flex.
Inviting Email to Autodesk
To invite an email specifically for data collection purposes, follow the instructions below:
-
Provide an email address that will be used for data collection from the Autodesk Cloud Portal.
noteMake sure that the email address is not configured for Single Sign-On (SSO), as Open iT does not support this functionality for the data collection service. If your organization's default email domain is configured for SSO, please use a different email domain. Consult your IT department for assistance.
-
Go to the Autodesk's official website and sign in to your existing Autodesk Administrator account.
noteThe email address used for data collection should differ from the one associated with your existing Autodesk Administrator account. Make sure you use a separate email address specifically for data collection purposes.
 Sign in
 -
In the top-right corner of the page, click the icon, then click Account.
 Navigating to Account page
 -
In the Account page, navigate to User Management, then select By User on the left side.
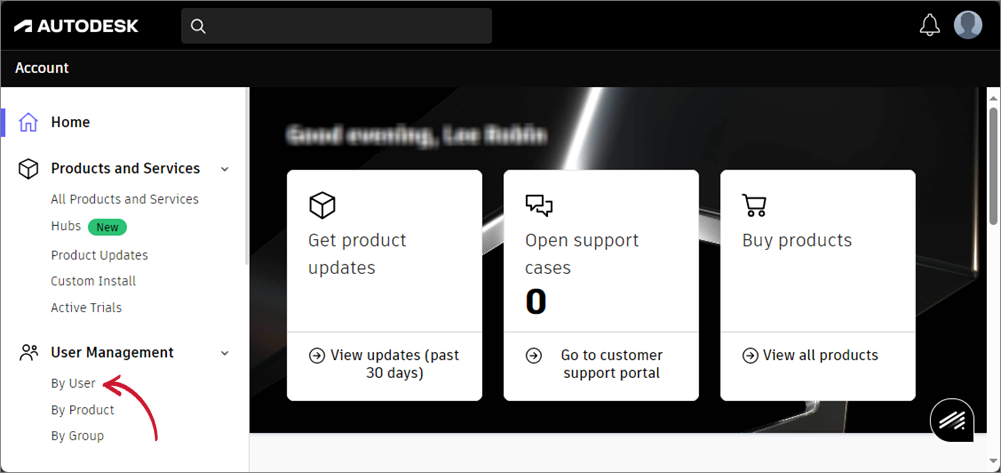 Navigating to User Management
 -
Click Invite users in the top-right corner of the page.
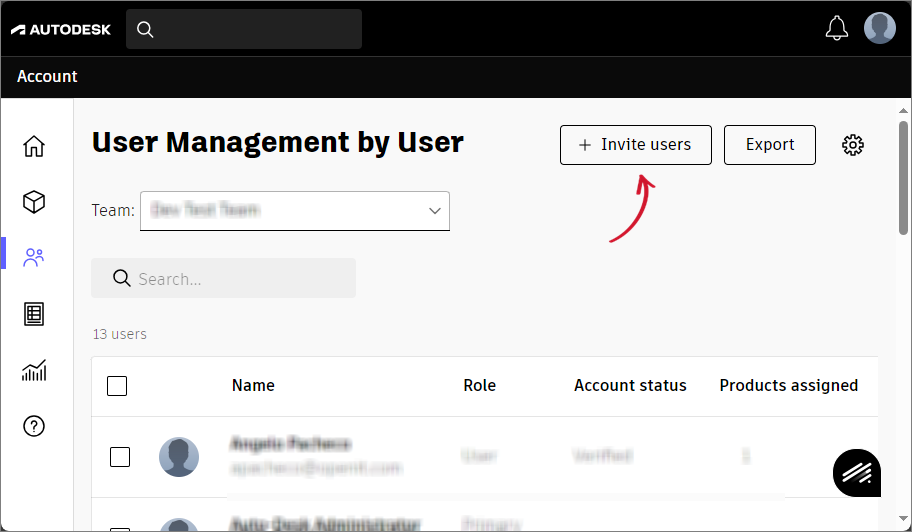 Inviting User
 -
Enter the user's first name, last name, and the provided email address for data collection. Once done, click Send invite. A confirmation message will appear indicating that the email invitation was successfully sent.
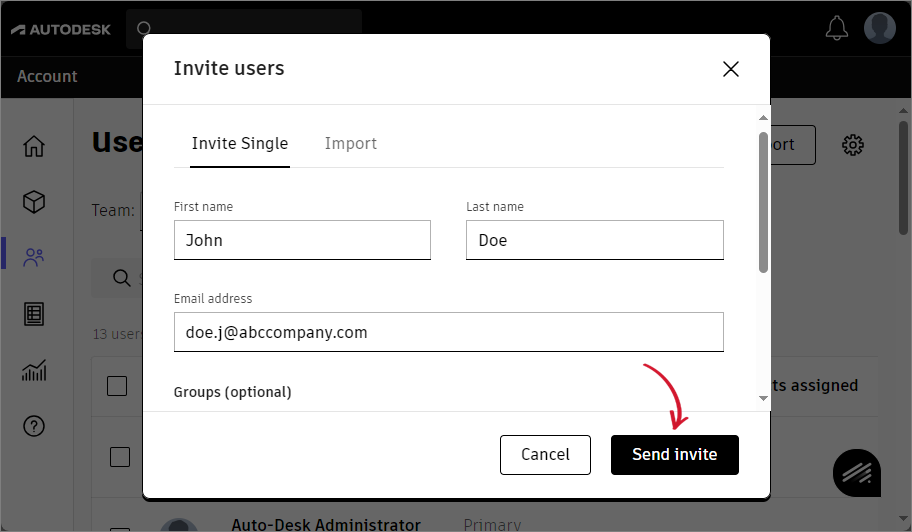 Entering User Informationnote
After the invite is sent, the invited user will be listed on the User Management by User page with a status of Invited shown in the Account status column, indicating that the user still needs to accept the invitation.
Click Done to close the window.
noteMake sure that the data collection email is added in all the teams where usage data needs to be collected. If the email is not included to a particular team, the usage data for that team will not be collected.
To add the email to a team, select the relevant team name from the Team dropdown in the upper-left part of the User Management by User page. Then, invite the data collection email to join that team.
-
Open the invitation sent to the email and follow the instructions in setting up the new email account.
Assigning Secondary Admin Role
To export usage data from the Autodesk Portal, the email address used for data collection must have a secondary admin role. Follow these steps to assign the secondary admin role:
-
Find the user associated with the provided email address for data collection. Use the search box to filter users. Once found, click the at the end of the user row.
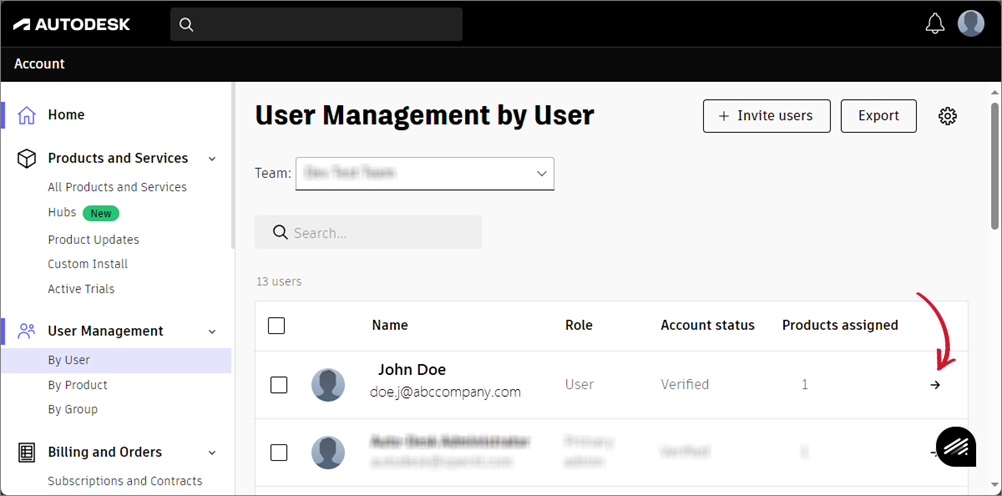 Search User
 -
Click Change role below the name of the user.
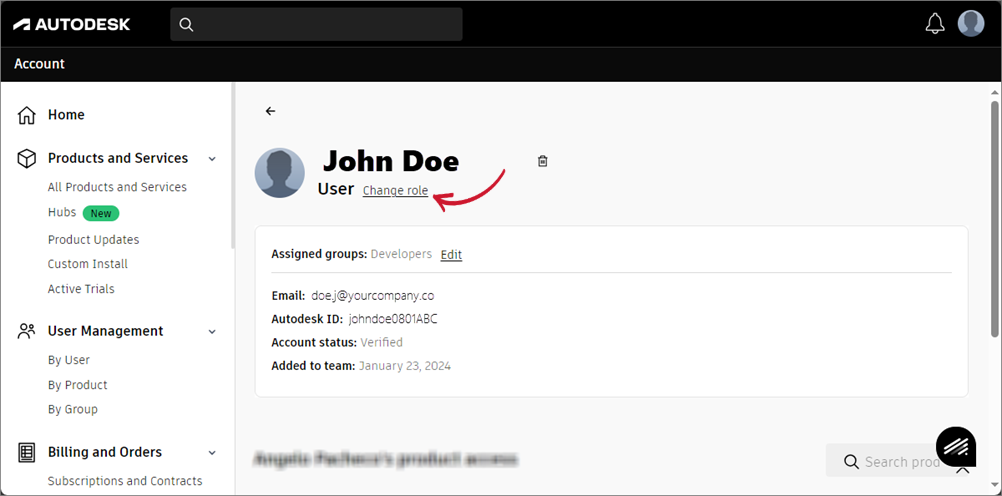 Change Role
 -
Select Secondary admin, then click the Save button.
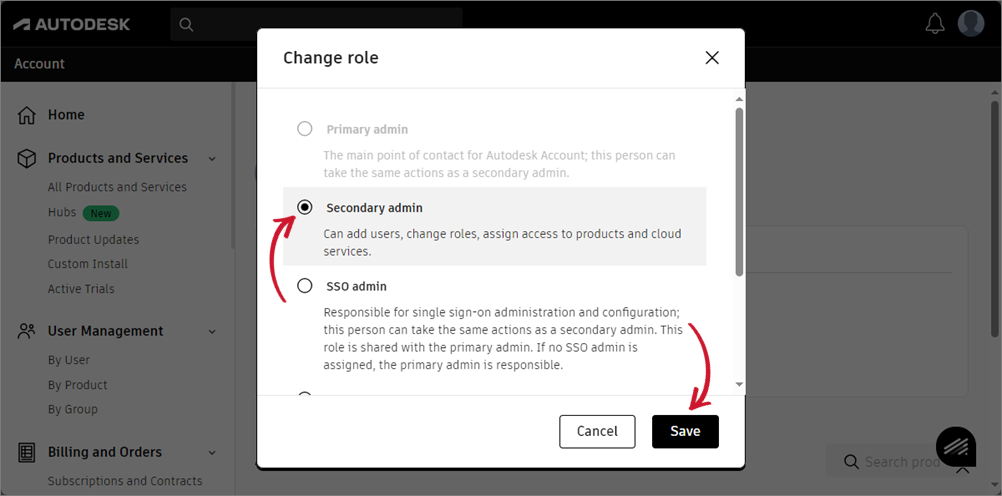 Select Secondary adminnote
Make sure that the invited account is assigned a Secondary Admin role for all associated teams within the Autodesk portal.
To assign a secondary admin role to the data collection account in other teams, select the relevant team from the Team dropdown in the upper-left part of the User Management by User page. Then, follow step 1 again to assign the data collection account to the secondary admin role for that team.
Configuring Cloud Data Collection
This section guides you in configuring data collection in the Autodesk Admin Portal. The configuration process is divided into three main steps: initiating OAuth authentication, authenticating to the Autodesk Portal, and configuring Dagster Job schedules.
Initiating OAuth Authentication
If your Customer Portal account hasn't been configured for the Open iT Cloud-based Collection Service (CBCS), new customers should contact their Open iT Project Manager for assistance, while existing customers can reach out to the Open iT Support Team at support@openit.com for further support.
To initiate OAuth authentication process:
-
Open a command prompt with Administrator level privileges.
-
Go to the Autodesk Cloud Plugin directory, which is by default
C:\Program Files\OpeniT\Autodesk Cloud Plugin, run the command:Command Syntaxcd <plugin_dir>Examplecd C:\Program Files\OpeniT\Autodesk Cloud Plugin -
To initiate the OAuth authentication process, run the command:
Command Syntaxopenit_oauthAfter running the command, you will be redirected to a web browser page for OAuth authentication.
-
To authorize the access request, click the YES, ALLOW button.
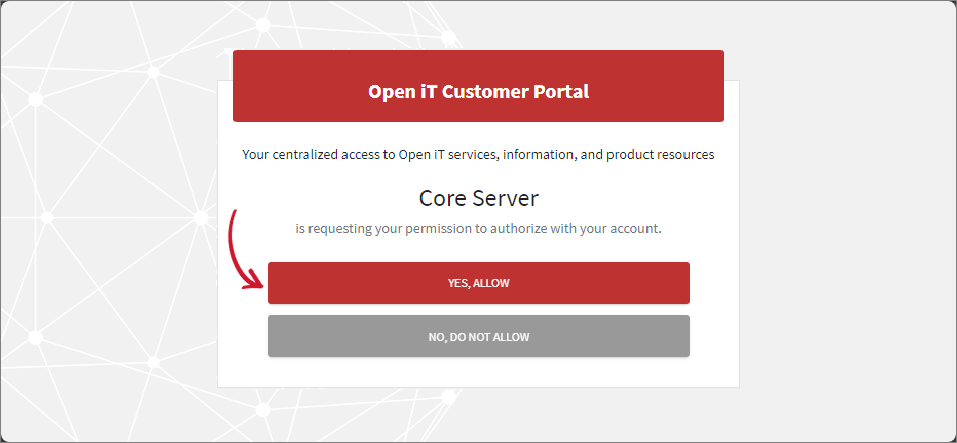 Allow Permission
After successful authentication, you will see a confirmation message indicating that the process has been completed.
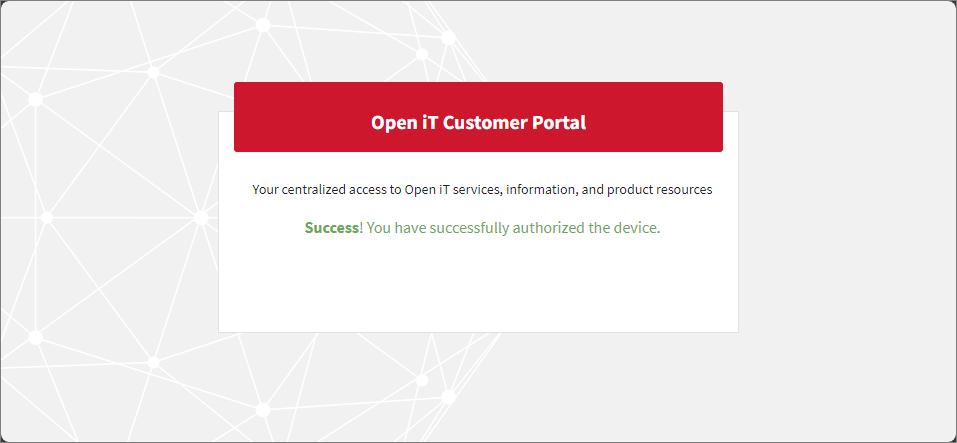 Successful Authentication
Authenticating to the Autodesk Portal
To enable usage data collection, authenticate to the Autodesk Portal using your Secondary Admin account. Follow these steps to complete the authentication process:
-
Run the following command:
Command Syntaxopenit_autodeskoauth.exeThis command will launch your default web browser and redirect you to the Autodesk authentication page.
-
Sign in using your Secondary Admin account on the Autodesk Portal.
 Sign in Autodesk Account
You will be redirected to the Authorize Application page after you sign in.
-
Click the Allow button to approve the requested permission.
 Allow Requested Permission
Once authentication is successful, a confirmation message will be displayed, indicating that the process is complete. You may now close the browser tab.
 Successful Authentication
 -
Go back to the console and wait for the command to exit without errors.
When the data collection is newly configured, the usage data collected from the Autodesk portal will be available in the Core Server within 1 to 3 days. Data transfer to the Core Server is scheduled daily at 11 PM Local time.
Configuring Dagster Job Schedules
Dagster, a data orchestration tool, enables you to control over job scheduling and execution timing. By customizing the environment variables, you can align job execution with the desired timezone and schedule to ensure daily synchronization across data collection jobs.
Follow the steps to configure the schedule and timezone of the Dagster job schedules responsible for collecting and loading data.
-
Go to the Dagster work directory, which is by default in
C:\ProgramData\OpeniT\Data\var\dagster\work. -
In this directory, create a file named
.env. -
Open the
.envfile and add the following key-value pairs:Schedule Configuration SyntaxOPENIT_CBCS_CRON=<schedule_cron>
OPENIT_TIMEZONE=<iana_timezone>where:
Parameter Description <schedule_cron>Use this to specify the cron expression that defines when the job will run. A cron expression consists of five fields:
* * * * *- (minute, hour, day of month, month, day of week)
Each asterisk (*) is a wildcard, representing every value for that field. For example,0 12 * * *means the job runs daily at 12:00 PM.<iana_timezone>Use this to specify the IANA Timezone name (e.g., America/New_York,Europe/London). This value is case-sensitive.Dagster Job Schedule Configuration ParametersExample:
ExampleOPENIT_CBCS_CRON=0 12 * * *
OPENIT_TIMEZONE=Africa/Porto-NovoIn this example:
-
OPENIT_CBCS_CRON=0 12 * * *: This cron expression schedules the task to run daily at 12:00 PM (noon). The cron expression consists of five space-separated fields:Field Value Description Minute 0At the 0th minute Hour 12At 12 PM Day of Month *Every day of the month Month *Every month Day of Week *Every day of the week Dagster Job Schedule Cron Expression
-
OPENIT_TIMEZONE=Africa/Porto-Novo: Sets the timezone to Africa/Porto-Novo, ensuring the job runs at the correct local time.
-
-
After entering the required variables, save the
.envfile. -
Restart the OpeniTDagsterAutodesk service via Task Manager.
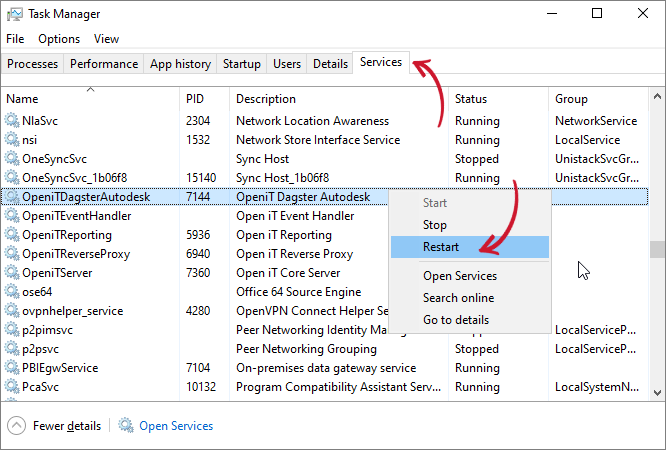 Restart Dagster Service
 -
After restarting the service, open your preferred web browser and navigate to the Dagster UI at http://localhost:45203 — this is the default endpoint for the Dagster Web Interface. Refresh the page to ensure the updated configurations are loaded.
If the .env file is not found, the system will fall back to following default values:
OPENIT_CBCS_CRON=0 23 * * *— the job will run daily at 11:00 PM.OPENIT_TIMEZONE=tz— the timezone will default to the local timezone of the machine running Dagster.
Mapping Email-to-Subgroup
If you want Sub Group data to appear in your Analysis Server reports, you can enable it by setting up an email-to-subgroup mapping using email-to-subgroup.map.
-
Access your Open iT Analyzer Server web interface.
-
On the Open iT Analyzer Server, go to Administration > Mapping Sources.
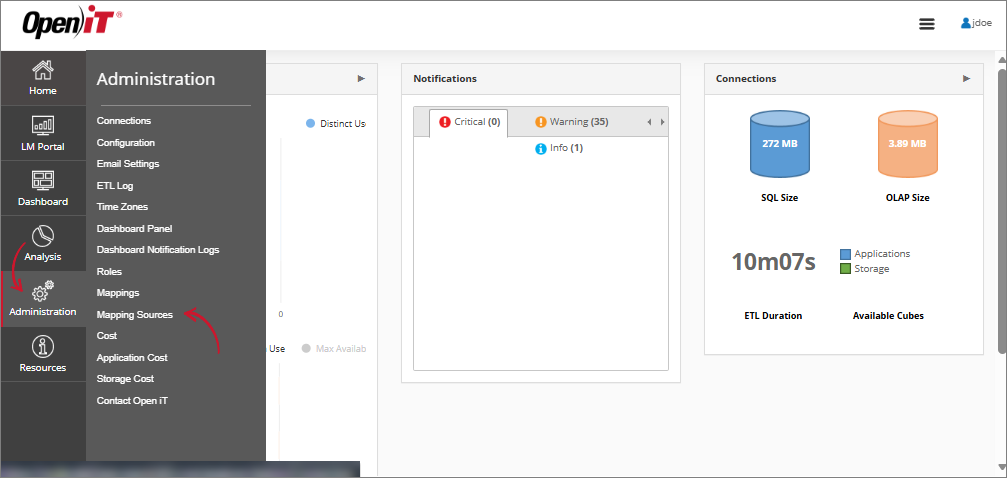 Go to Mapping Sources
 -
Under the Sources table, click New Mapping Source.
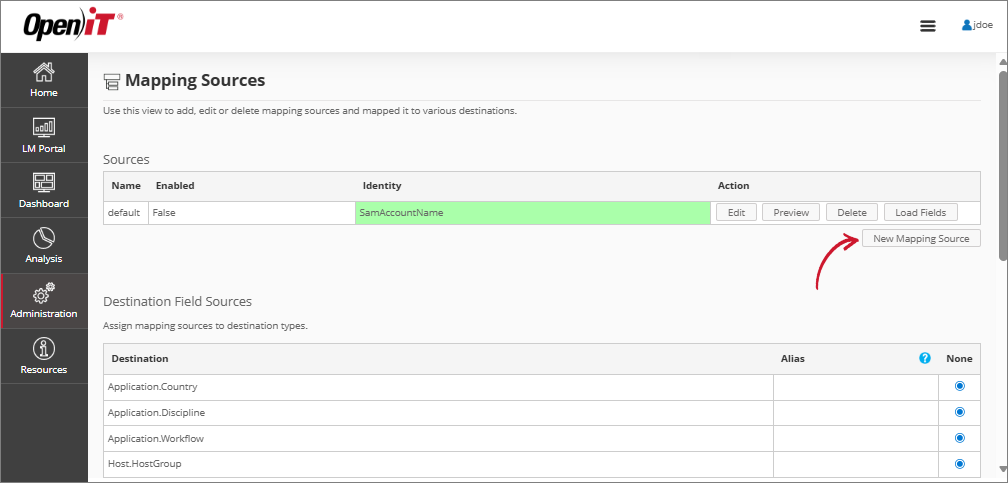 Click New Mapping Source
 -
Configure the mapping source details:
- Name:
email-to-subgroup - Enabled: True
- Kind: MultiMap
- FilePath:
C:\Program Files\OpeniT\Core\Configuration\email-to-subgroup.map
Click Save.
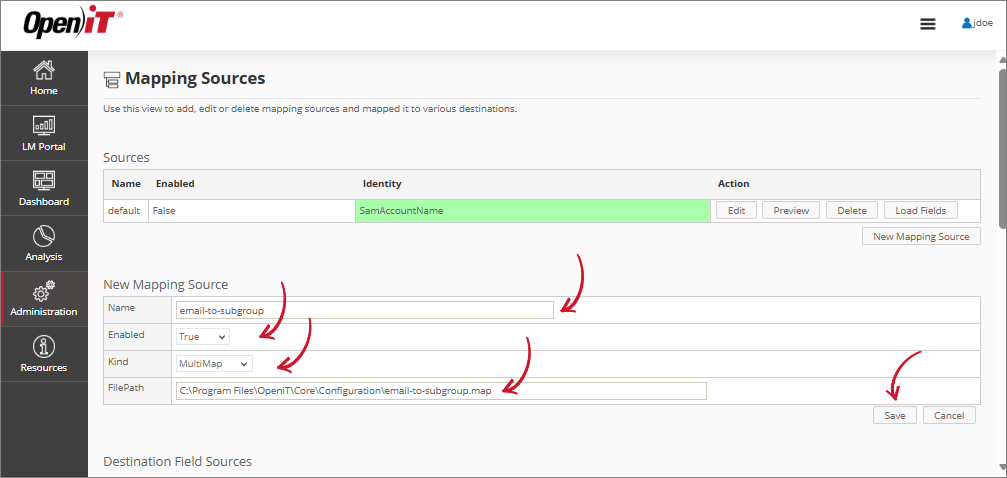 Configure the Mapping Source
A notification message appears at the top of the page, and the mapping sources list should refresh automatically.
- Name:
-
Under the Destination Field Sources table, locate the User.Department row. Select the radio button under the
email-to-subgroupcolumn, then choose group from the dropdown beside it.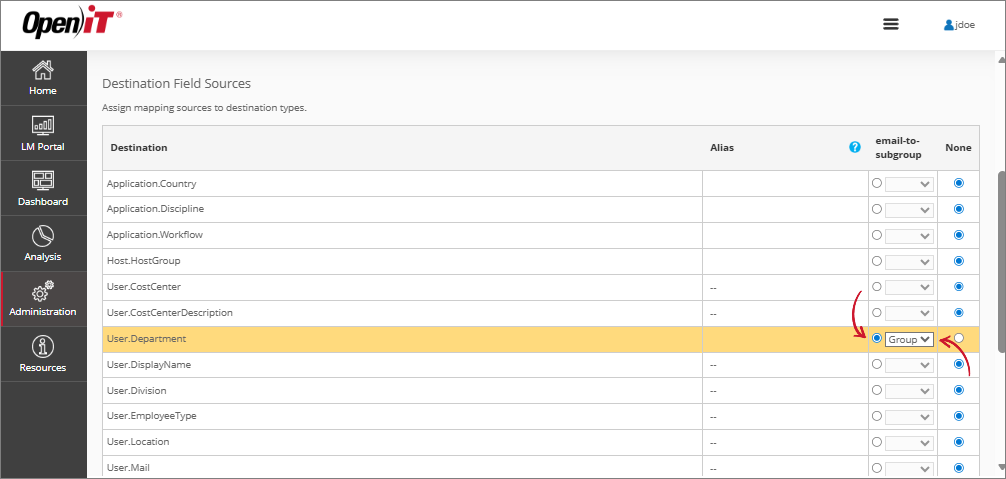 Assign Mapping Source
 -
Click Save Configuration.
 Save Configuration
Verifying Data Collection through the Dagster UI
Dagster, as the orchestration tool, plays a key role in managing and monitoring the data collection process in the Core Server. To verify the status of the data collection process through Dagster UI, follow the instructions below.
Accessing the Dagster UI and Verifying Latest Run
-
Open a web browser and navigate to the Dagster instance URL,
http://localhost:45203, which is the default endpoint. -
Upon loading the Dagster UI, check the Latest run at the top of the window. Make sure the Latest run is up-to-date and displays the most recent collection as expected, based on the schedule (daily at 6 AM UTC). This confirms that the system is collecting data as expected.
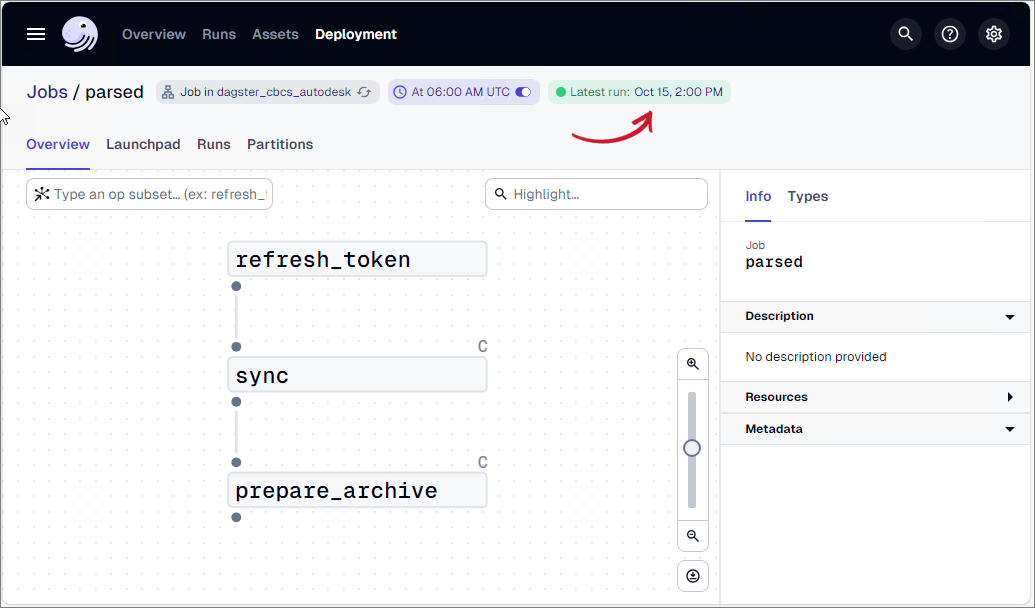 Check Latest run
If the Latest run is not current or up-to-date, it may indicate that the data collection process has failed or been delayed, and further investigation is required.
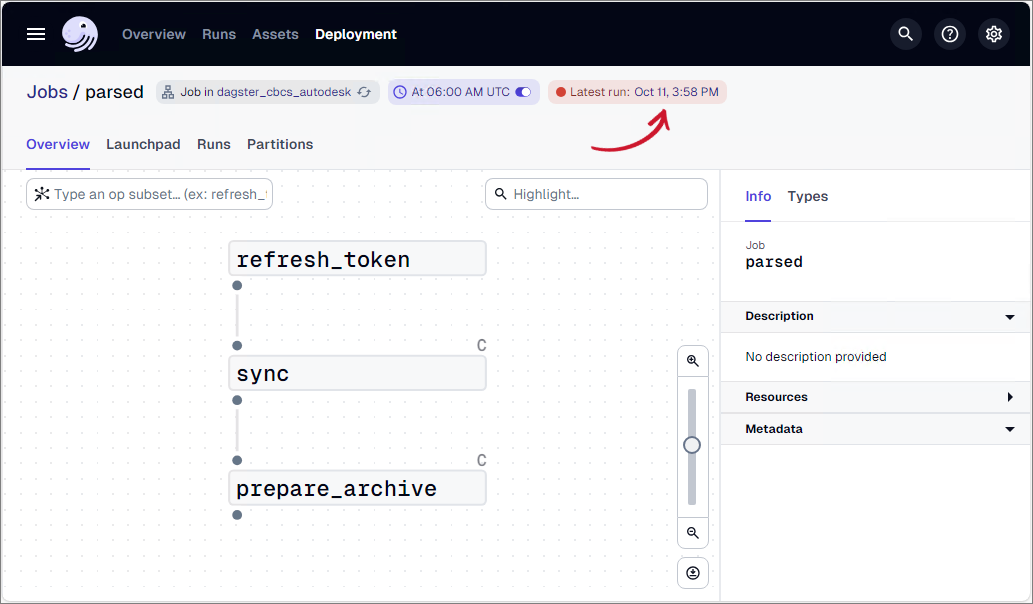 Failed run
Verifying Run Status
To determine the status of data collection jobs:
-
Open a web browser and navigate to the Dagster instance URL,
http://localhost:45203, which is the default endpoint. -
Navigate to the Runs tab in the Dagster UI. Check the Status column for the latest jobs. All jobs should display Success. If a job is unsuccessful, it will display a Failure status.
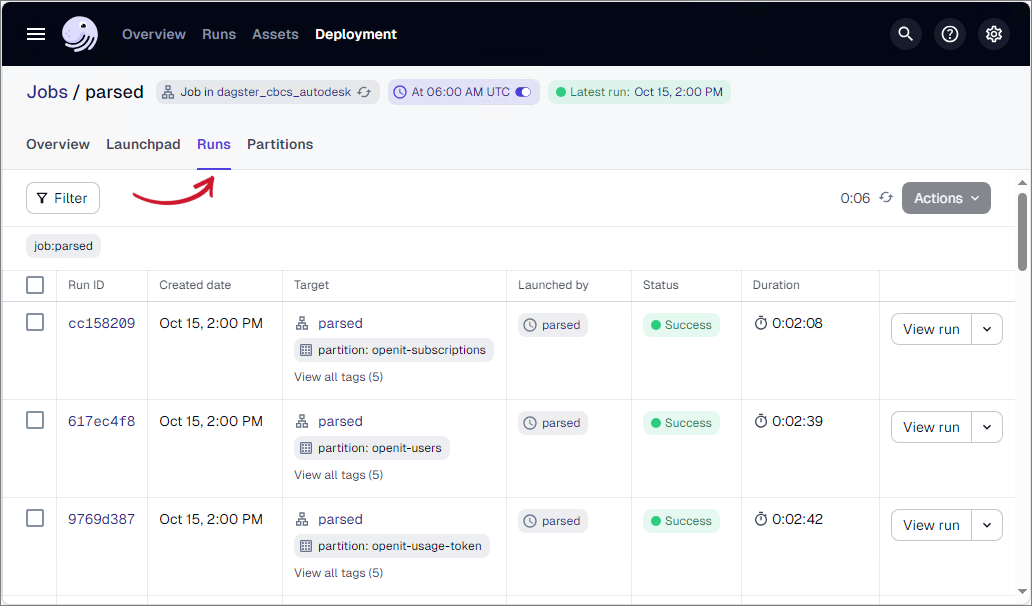
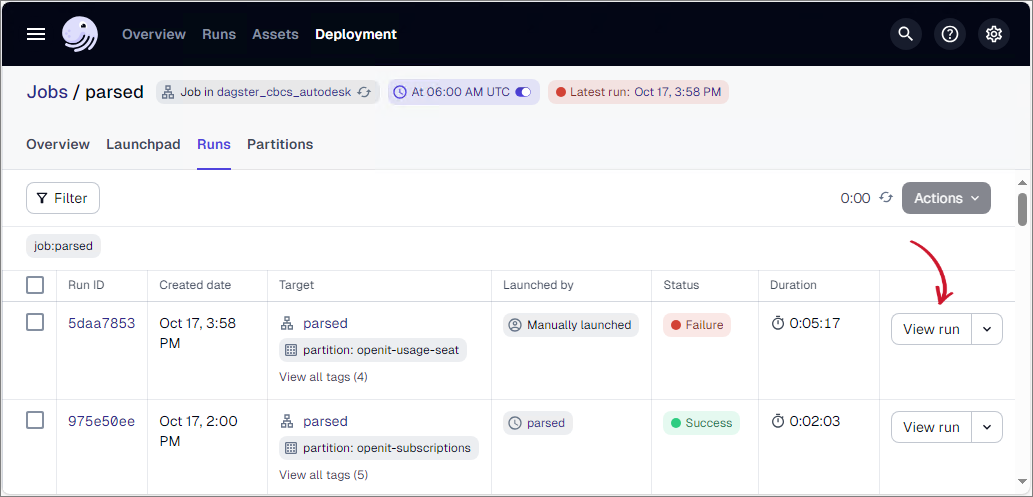
If a job has failed, you can check the error details by clicking View run in the last column for further investigation.
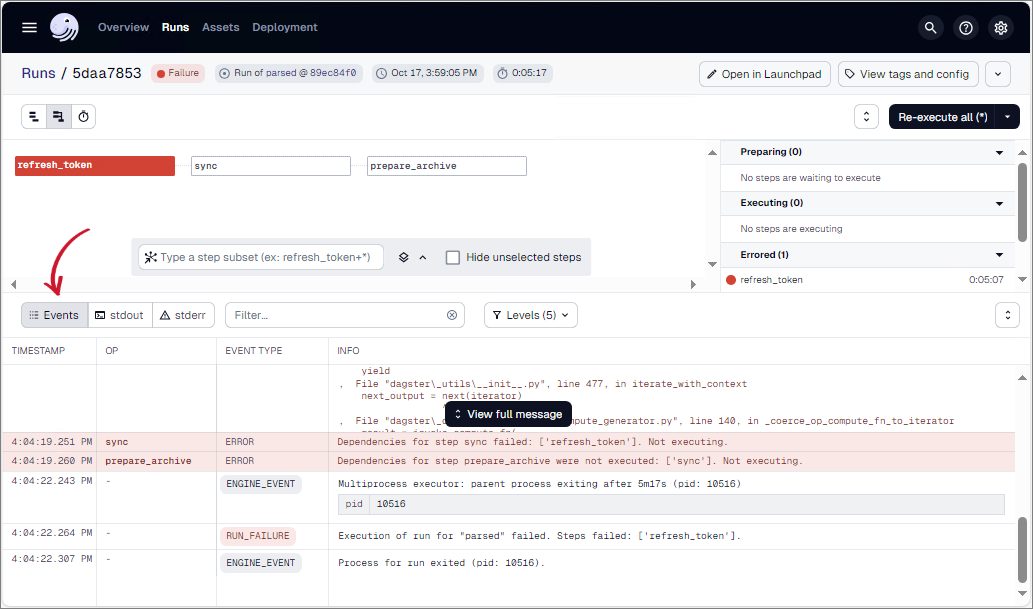
Upon clicking, it will redirect you to the Runs page. You can check the error details under the Events tab.
To re-execute the failed jobs, navigate back to the Jobs page. In the Runs tab, click the dropdown next to View run in the last column of the failed job. Select Re-execute from the options to rerun the failed job.
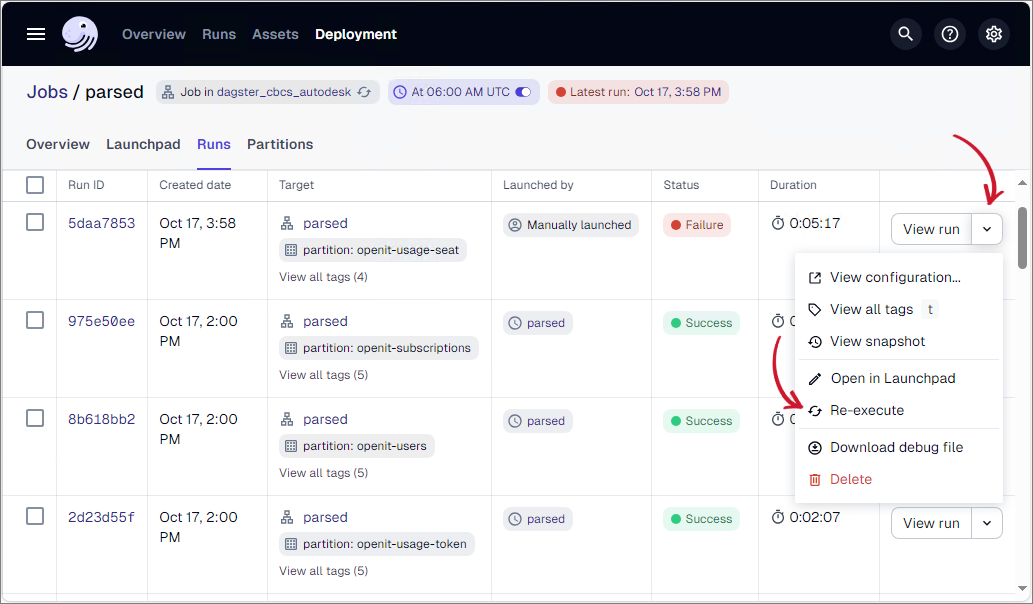
Re-executing the job will trigger the same collection process again. Make sure that the job successfully completes in the next run.
Troubleshooting
This section guides you in troubleshooting issues encountered in data collection.
Resolving Missing or Outdated Data
If reports show missing or outdated data, you may need to manually trigger a run for the relevant dataset:
-
Open a web browser and navigate to the Dagster instance URL,
http://localhost:45203, which is the default endpoint. -
Go to the Launchpad tab in the Dagster UI.
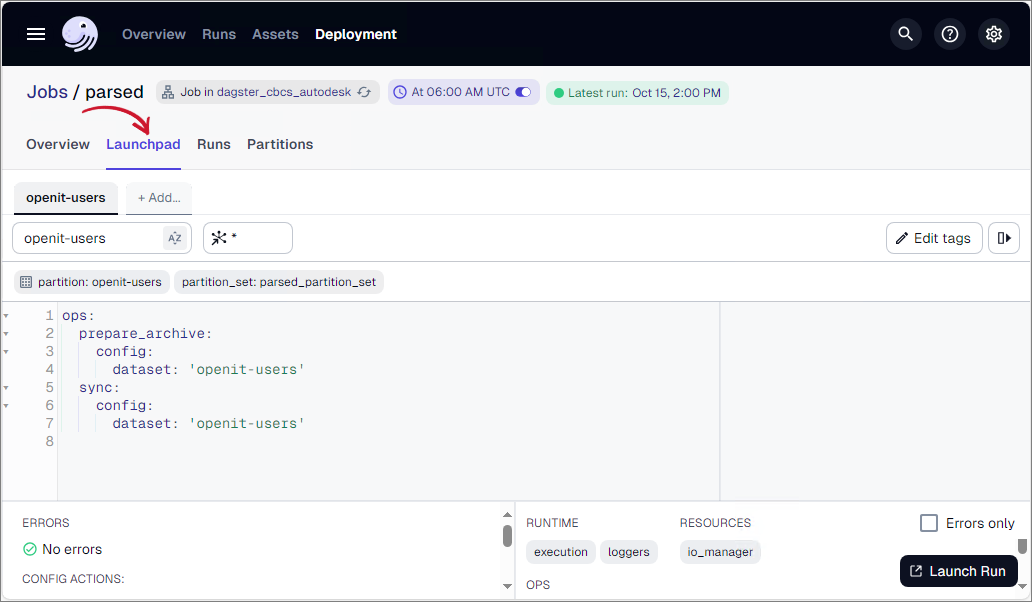 Navigate to Launchpad tab
 -
Click the Dataset field, then select the specific dataset associated with the missing or outdated data in your report from the dropdown.
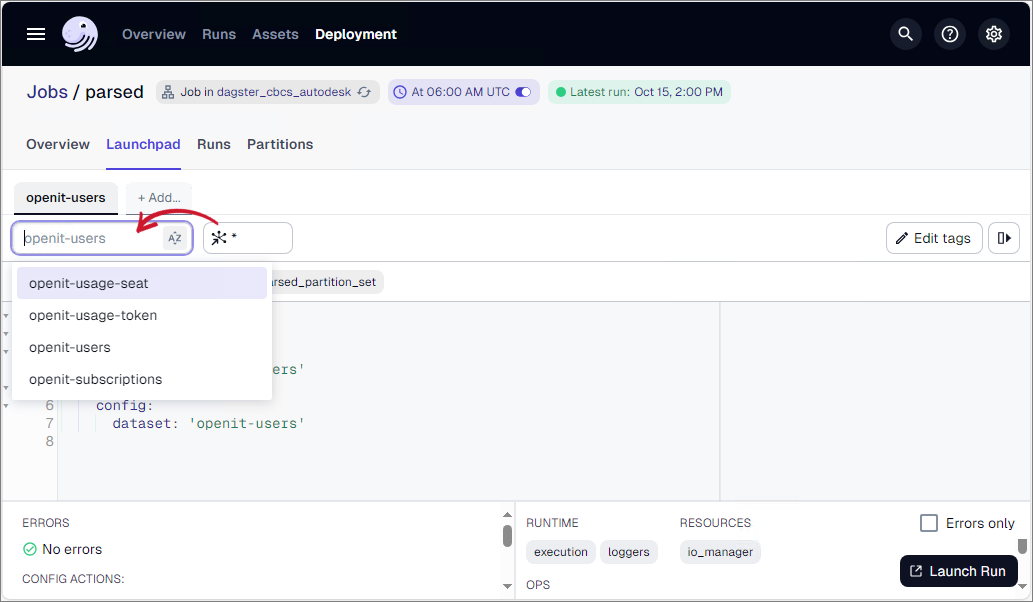 Select Dataset
To determine which dataset to select for manual execution, refer to the table below. Each dataset is linked to a specific data type used in Autodesk reporting:
Dataset Archive Associated Data Type openit-usage-seat CBCSAutodeskSeat.license.record openit-usage-token CBCSAutodeskToken.license.record openit-usage-token-adjustments CBCSAutodeskToken.license.record openit-usage-token-cloud CBCSAutodeskToken.license.record openit-usage-token-desktop CBCSAutodeskToken.license.record openit-usage-token-adjustments-raw CBCSAutodeskTokenAdjustments.license.raw --- openit-users CBCSAutodeskUsers.license.record openit-subscriptions CBCSAutodeskSubscriptions.license.record Autodesk Dataset Reference
For example, if there is missing or outdated data related to Autodesk Seat License Record (Data Type 146), you should select the
openit-usage-seatdataset. -
Click the Launch Run button to manually start a data collection process for the selected dataset.
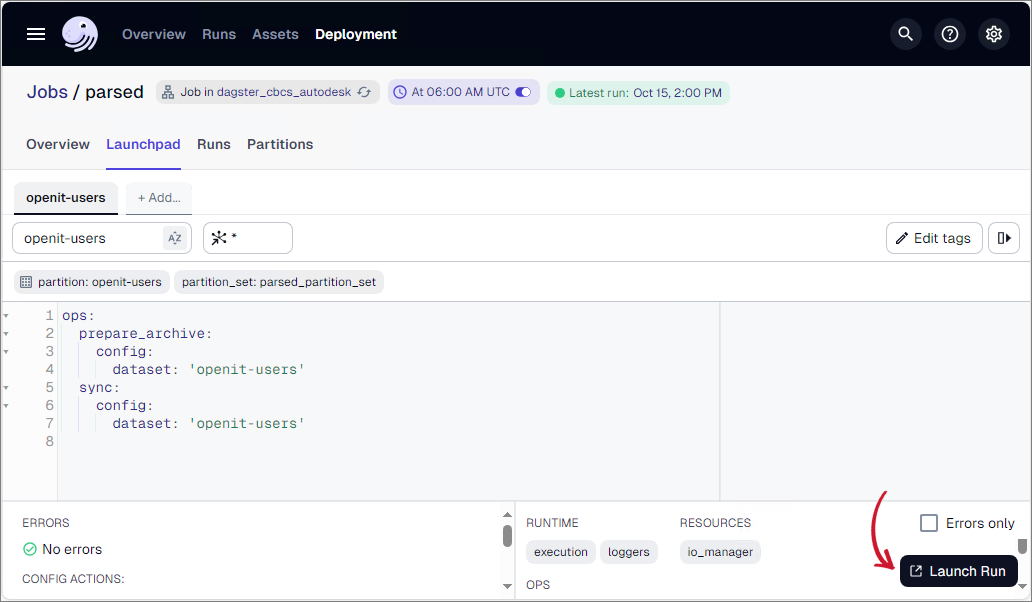 Launch Run
If you encounter more complex errors or issues that are not covered in this documentation, feel free to reach out to the Open iT Support Team at support@openit.com for further assistance.