MIDAS
Introduction
Open iT supports MIDAS usage reporting starting Open iT version 10.3.
Open iT supports MIDAS usage by polling the license servers at regular intervals to get the current status of its license use and availability.
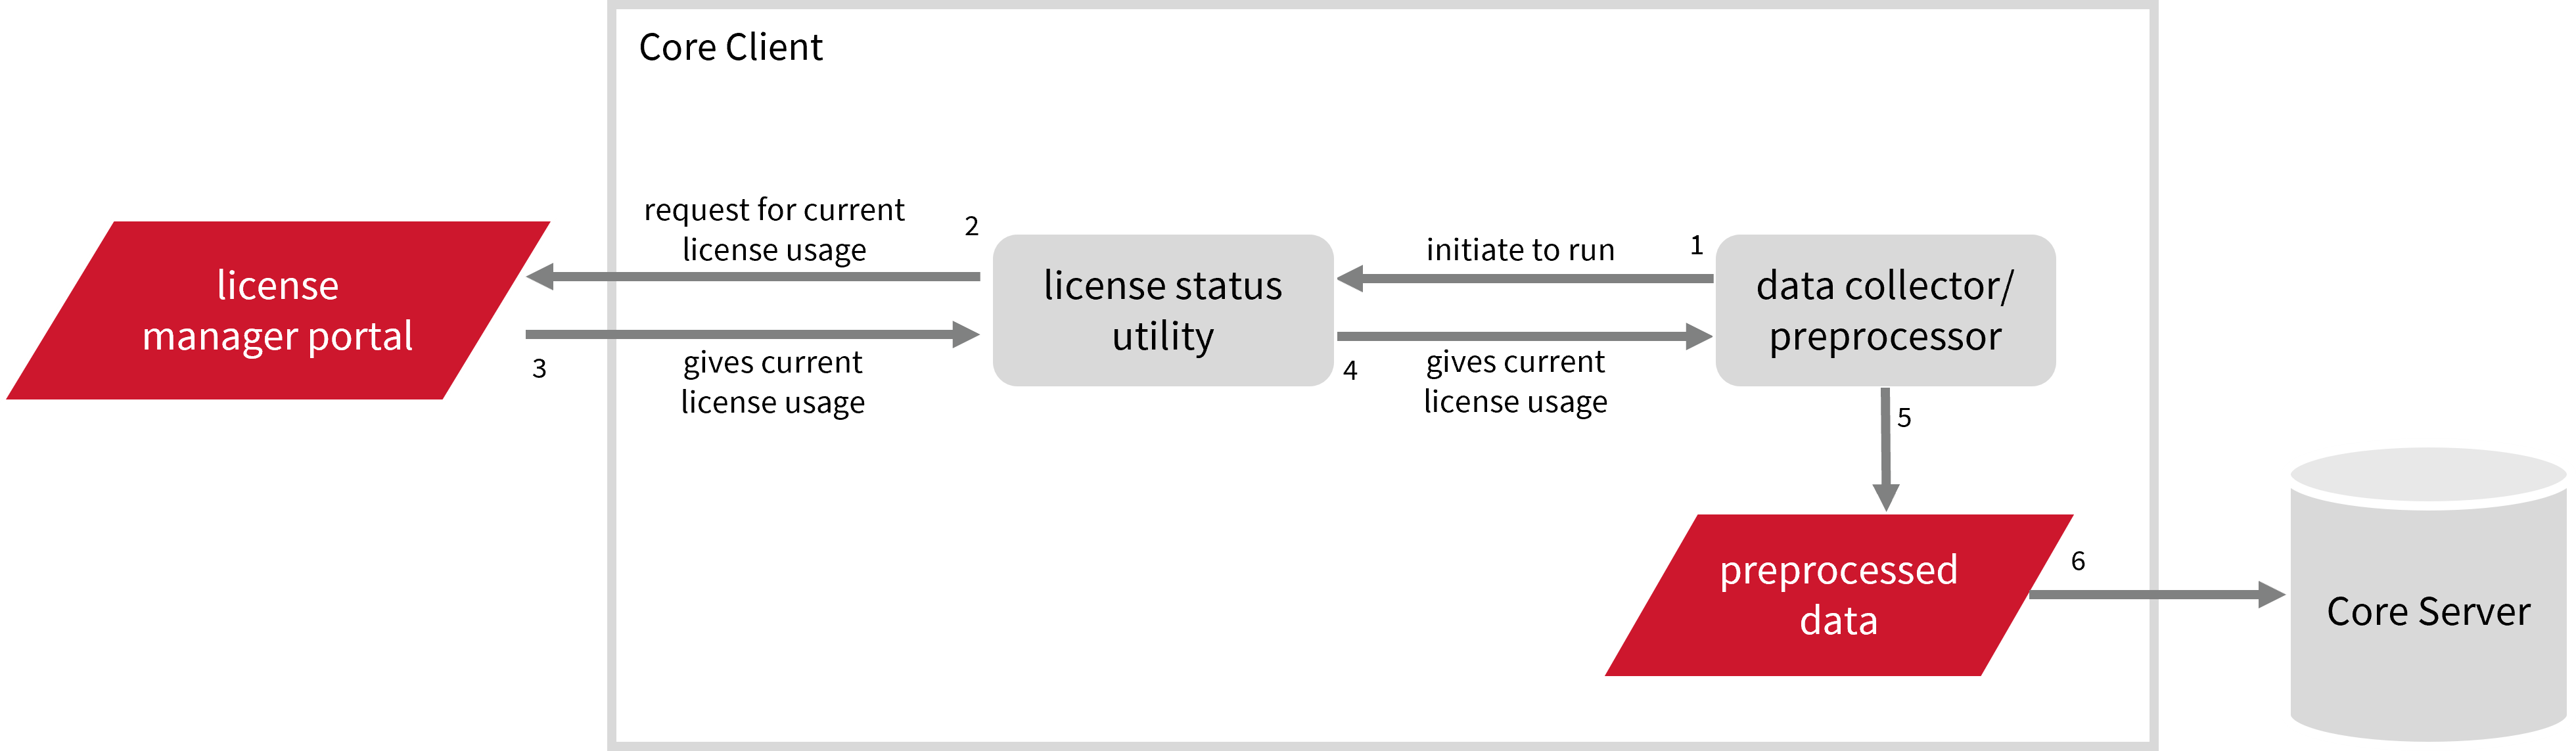
For this collection, the data source is through an API. The data collector/preprocessor initiates the license status utility every hour using a 5-minute sample interval, triggering the data collection process. The license status utility requests the current license usage data from the license manager portal. After the license manager portal provides the requested data, the license status utility passes this information to the data collector/preprocessor. The data collector/preprocessor processes the data, preparing it for transmission. Finally, the preprocessed data is sent to the Core Server at five minutes past every hour (HH:05), according to the client's timezone, for further storage, completing the license usage data collection and processing.
This will produce the following aggregated data types used for historical reporting:
- (49) Host User License Use
- (93) OLAP Raw Hourly
- (94) OLAP User Concurrency
- (95) Usergroup License Use v3.0
- (102) OLAP Total Use
The following sections will guide you in setting up the necessary configuration to collect and send the required data to the server.
Apply the configurations shown in the Open iT Core Client.
Requirements
- An Open iT Core Client connected to an Open iT Core Server or a coexistent Open iT Core setup
- Activated LicenseAnalyzer collection and license poller
- Non-SSO MIDAS account with administrator access to the MIDAS Portal, which is https://members.midasuser.com/en/login by default.
Setting up MIDAS Account(s)
These are the required steps to set up data collection from the MIDAS portal.
- Windows
- Unix
-
Open a command prompt with Administrator level privileges.
-
Go to the bin directory, which is by default in
C:\Program Files\OpeniT\Core\bin, run the command:Command Syntaxcd <bin_dir>Examplecd C:\Program Files\OpeniT\Core\bin -
Set the username and password, run the command:
Command Syntaxgenlicutil2 midas --confignoteIf you need to collect data from more than one MIDAS account, use the
--accountparameter when running this command. This allows you to create separate credentials for each account.Command Syntaxgenlicutil2 midas --config --account <account_name>where
<account_name>is the name of the account you want to use for data collection.Examplegenlicutil2 midas --config --account acct1 -
Type in the username (or email) when prompted.
Example: Entering UsernameEnter username to use: john_doe@example.comThen press Enter.
-
Type in the password when prompted.
Enter password: **********Then press Enter.
Open iT saves the hashed MIDAS credential file, MIDAS, in the OpeniT directory, which is by default in C:\ProgramData\OpeniT. When you use the --account parameter, Open iT appends the account name to the credential file (for example, MIDAS_acct1). This allows each MIDAS account to maintain its own credentials within the same directory.
-
Go to the bin directory, which is by default in
/opt/openit/bin, run the command:Command Syntaxcd <bin_dir>Examplecd /opt/openit/bin -
Set the username and password, run the command:
Command Syntax./genlicutil2 midas --confignoteIf you need to collect data from more than one MIDAS account, use the
--accountparameter when running this command. This allows you to create separate credentials for each account.Command Syntax./genlicutil2 midas --config --account <account_name>where
<account_name>is the name of the account you want to use for data collection.Example./genlicutil2 midas --config --account acct1 -
Type in the username (or email) when prompted.
Example: Entering UsernameEnter username to use: john_doe@example.comThen press Enter.
-
Type in the password when prompted.
Enter password: **********Then press Enter.
Open iT saves the hashed MIDAS credential file, MIDAS, in the openit directory, which is by default in /var/tmp/OpeniT. When you use the --account parameter, Open iT appends the account name to the credential file (for example, MIDAS_acct1). This allows each MIDAS account to maintain its own credentials within the same directory.
Optional Parameters
| Parameter | Description |
|---|---|
--account <account_name> | Use this to specify the account you want to use for data collection. |
--debug | Use this to turn on debug logging. |
-h, --help | Use this to display help text. |
Configuring Data Collection
These are the required steps to activate the collection of usage data.
- Windows
- Unix
-
Go to the Components directory, which is by default in
C:\Program Files\OpeniT\Core\Configuration\Components, and back up thelicpoll.xmlconfiguration file. -
Open a command prompt with Administrator level privileges.
-
Go to the bin directory, which is by default in
C:\Program Files\OpeniT\Core\bin, run the command:Command Syntaxcd <bin_dir>Examplecd C:\Program Files\OpeniT\Core\bin -
Once in the directory, copy the object node
genericlicense-sampleand rename it to your desired name. In this example, we will usegenericlicense-midas. Run the command:Command Syntaxopenit_confinit -c "licpoll.license-types.genericlicense-sample=>licpoll.license-types.genericlicense-midas"warningElement names cannot contain parentheses
(or)because they are not valid for XML element names. -
Activate the collection of MIDAS data, run the command:
Command Syntaxopenit_confinit -c "licpoll.license-types.genericlicense-midas.active=true" -
Set the status command, run the command:
Command Syntaxopenit_confinit -c "licpoll.license-types.genericlicense-midas.status-command=<bin_dir>\genlicutil2.exe"where
<bin_dir>is the path to the bin directory, which is by default inC:\Program Files\OpeniT\Core\bin.Exampleopenit_confinit -c "licpoll.license-types.genericlicense-midas.status-command=C:\Program Files\OpeniT\Core\bin\genlicutil2.exe"Alternatively, you can use the
${OpeniT.directories.bin}variable to reference the bin directory dynamically:Alternative Commandopenit_confinit -c "licpoll.license-types.genericlicense-midas.status-command=${OpeniT.directories.bin}/genlicutil2.exe" -
Set the arguments to the status command, run the command:
Command Syntaxopenit_confinit -c "licpoll.license-types.genericlicense-midas.status-command.arguments=midas"noteIf you have multiple MIDAS accounts, repeat the configuration steps to create additional object nodes for each account. Use a unique name for every node (for example,
genericlicense-midas1,genericlicense-midas2, and so on) and specify the corresponding account in the status-command arguments.Example for acct1openit_confinit -c "licpoll.license-types.genericlicense-midas1.status-command.arguments=MIDAS --account acct1"This ensures that Open iT collects data separately for each configured MIDAS account.
-
Run the following command to update the configuration files:
Exampleopenit_confbuilder --clientMake sure no errors are encountered.
Advanced Configuration
Refer to the MIDAS Data Collection Configuration table to learn more about MIDAS configuration in licpoll.xml.
| Object Name | Accepted Value | Description |
|---|---|---|
| active | Boolean (true or false) | Setting this to true activates MIDAS usage data collection. |
| type | String (i.e., GenericLicense) | The license manager type. |
| interval | Timespan (e.g., P30S, P5M, P1H) | The span of time between each polling round (it is recommended to set a value no less than P1M). |
| offset | Timespan (e.g., P30S, P5M, P1H) | The span of time the aligned poll time decided by interval is shifted. |
| product-name | String (e.g., %host%;midas) | This object is defined if a vendor license name other than the default %host%;midas will be used. |
| license-server | String (e.g., WIN-HOST01) | The license server name. |
| status-command | FileName (i.e., ${OpeniT.directories.bin}/genlicutil2.exe) | The binary used to obtain status from the license manager. |
| status-command.arguments | String (e.g., midas) | The arguments used for the status command. |
-
Go to the Components directory, which is by default in
/var/opt/openit/etc/Components, and back up thelicpoll.xmlconfiguration file. -
Go to the bin directory, which is by default in
/opt/openit/bin, run the command:Command Syntaxcd <bin_dir>Examplecd /opt/openit/bin -
Once in the directory, copy the object node
genericlicense-sampleand rename it to your desired name. In this example, we will usegenericlicense-midas. Run the command:Command Syntax./openit_confinit -r /var/opt/openit/ -d /var/opt/openit/etc/ -c "licpoll.license-types.genericlicense-sample=>licpoll.license-types.genericlicense-midas"warningElement names cannot contain parentheses
(or)because they are not valid for XML element names. -
Activate the collection of MIDAS data, run the command:
Command Syntax./openit_confinit -r /var/opt/openit/ -d /var/opt/openit/etc/ -c "licpoll.license-types.genericlicense-midas.active=true" -
Set the status command, run the command:
Command Syntax./openit_confinit -r /var/opt/openit/ -d /var/opt/openit/etc/ -c "licpoll.license-types.genericlicense-midas.status-command=<bin_dir>/genlicutil2"where
<bin_dir>is the path to the bin directory, which is by default in/opt/openit/bin.Example./openit_confinit -r /var/opt/openit/ -d /var/opt/openit/etc/ -c "licpoll.license-types.genericlicense-midas.status-command=/opt/openit/bin/genlicutil2" -
Set the arguments to the status command, run the command:
Command Syntax./openit_confinit -r /var/opt/openit/ -d /var/opt/openit/etc/ -c "licpoll.license-types.genericlicense-midas.status-command.arguments=midas"noteIf you have multiple MIDAS accounts, repeat the configuration steps to create additional object nodes for each account. Use a unique name for every node (for example,
genericlicense-midas1,genericlicense-midas2, and so on) and specify the corresponding account in the status-command arguments.Example for acct1./openit_confinit -r /var/opt/openit/ -d /var/opt/openit/etc/ -c "licpoll.license-types.genericlicense-midas1.status-command.arguments=MIDAS --account acct1"This ensures that Open iT collects data separately for each configured MIDAS account.
-
Run the following command to update the configuration files:
Example./openit_confbuilder --clientMake sure no errors are encountered.
Advanced Configuration
Refer to the MIDAS Data Collection Configuration table to learn more about MIDAS configuration in licpoll.xml.
| Object Name | Accepted Value | Description |
|---|---|---|
| active | Boolean (true or false) | Setting this to true activates MIDAS usage data collection. |
| type | String (i.e., GenericLicense) | The license manager type. |
| interval | Timespan (e.g., P30S, P5M, P1H) | The span of time between each polling round (it is recommended to set a value no less than P1M). |
| offset | Timespan (e.g., P30S, P5M, P1H) | The span of time the aligned poll time decided by interval is shifted. |
| product-name | String (e.g., %host%;midas) | This object is defined if a vendor license name other than the default %host%;midas will be used. |
| license-server | String (e.g., host01) | The license server name. |
| status-command | FileName (i.e., ${OpeniT.directories.bin}/genlicutil2) | The binary used to obtain status from the license manager. |
| status-command.arguments | String (e.g., midas) | The arguments used for the status command. |
Verifying Data Collection
After configuration, you can verify that the data is collected by following these steps:
- Windows
- Unix
-
Open a command prompt with Administrator level privileges.
-
Go to the bin directory, which is by default in
C:\Program Files\OpeniT\Core\bin, run the command:Command Syntaxcd <bin_dir>Examplecd C:\Program Files\OpeniT\Core\bin -
Run the command:
Command Syntaxopenit_licpoll -# 1 -
Verify that the temp directory, which is by default in
C:\ProgramData\OpeniT\Data\temp, contains a LicPoll directory containing.dataandstatus-*.logfiles. -
Verify that the .token file exists in the OpeniT directory, which is by default in
C:\ProgramData\OpeniT.
-
Go to the bin directory, which is by default in
/opt/openit/bin, run the command:Command Syntaxcd <bin_dir>Examplecd /opt/openit/bin -
Run the command:
Command Syntax./openit_licpoll -# 1 -
Verify that the temp directory, which is by default in
/var/opt/openit/temp/, contains a LicPoll directory containing.dataandstatus-*.logfiles. -
Verify that the .token file exists in the OpeniT directory, which is by default in
/var/tmp/OpeniT.
Sample Reports
Historical Reports
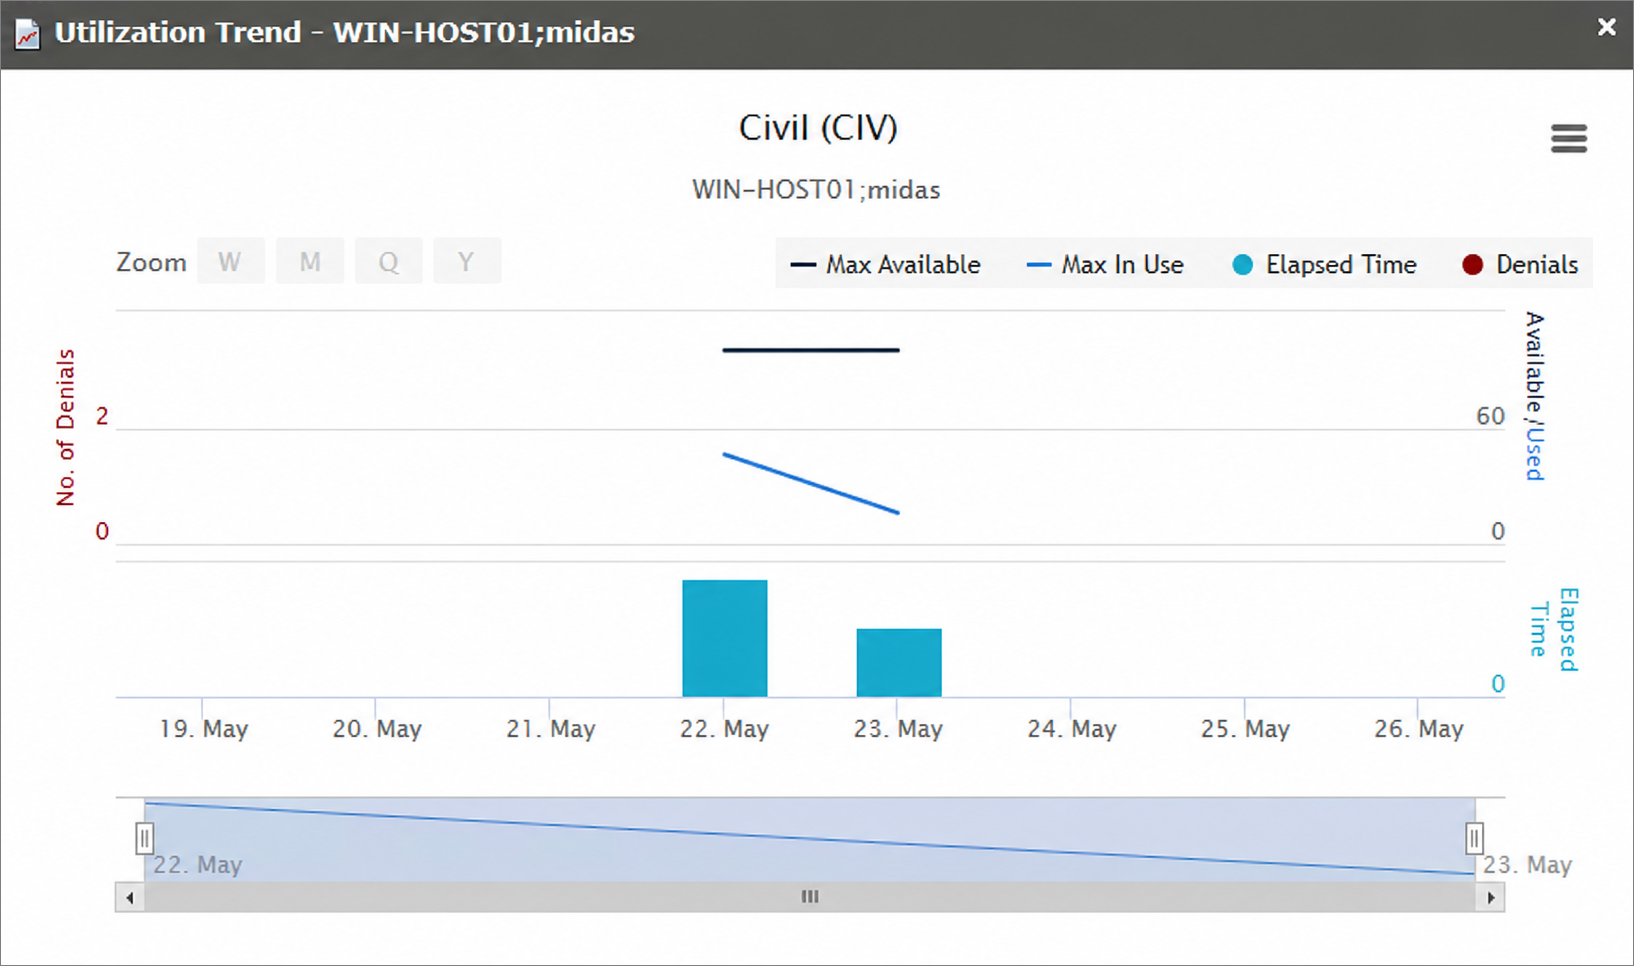
Utilization Trend
This sample report provides a visual representation of license activity for the selected application. It helps users and administrators quickly understand how licenses are being used, when peak demand occurs, and whether any access issues (such as denials) are happening.
It offers several key benefits:
- Centralized Visibility – provides a clear view of license usage, availability, and denials in a single interface.
- Optimized License Allocation – helps ensure you are not over-purchasing licenses you don't need or under-provisioning.
- Cost Savings – identifies opportunities to downgrade or redistribute licenses, reducing unnecessary expenses.
- Usage Trends & Capacity Planning – shows peak usage patterns, allowing better forecasting for future needs.
- Avoiding Service Disruptions – helps prevent situations where users cannot access software due to reaching the license limit.
- Compliance & Audit Readiness – provides a usage record to ensure compliance with vendor agreements and avoid penalties.
- Performance & Productivity Insights – helps assess whether certain teams or departments are under-utilizing or over-utilizing software.
- Historical and Real-Time Analysis – combines near real-time monitoring with historical trend analysis, enabling both immediate decision-making and long-term planning.
Real-time Report
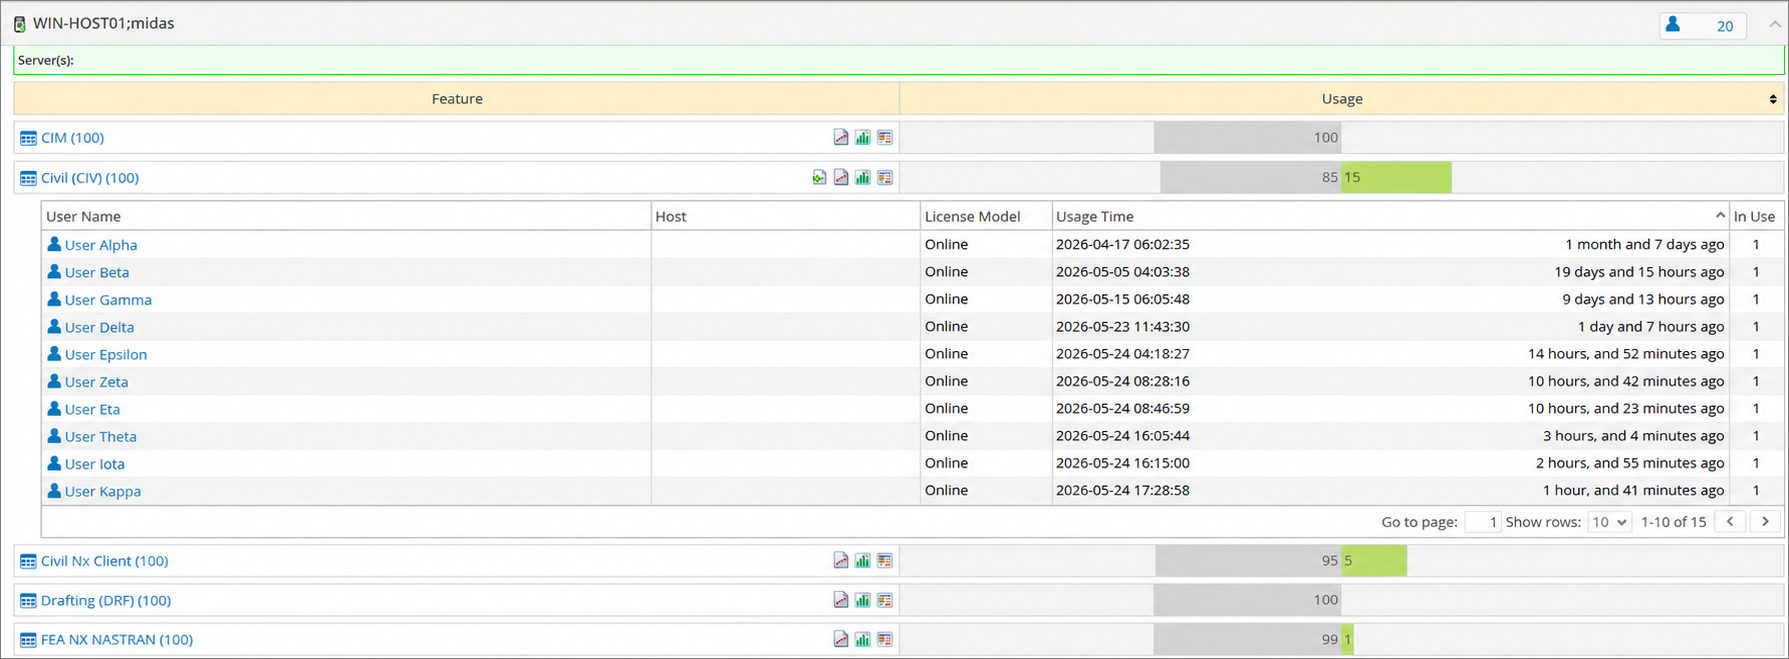
This sample report shows a drilled-down feature view of the online licenses in use and the licenses available.