Accessing the Interface
The Open iT Insight interface provides an intuitive environment for interacting with the AI assistant. This interface enables you to ask questions, retrieve reports, and perform license analysis through simple prompts. Beyond interacting with the assistant, you can also manage the conversations to save valuable exchanges, renaming for easy reference, or removing sessions that are no longer needed.
This guide will walk you through the following:
Accessing the Insight Interface
-
Access the Core Server Web Interface.
-
Click the Navigation Bar on the upper right side of the page, then select Insight.
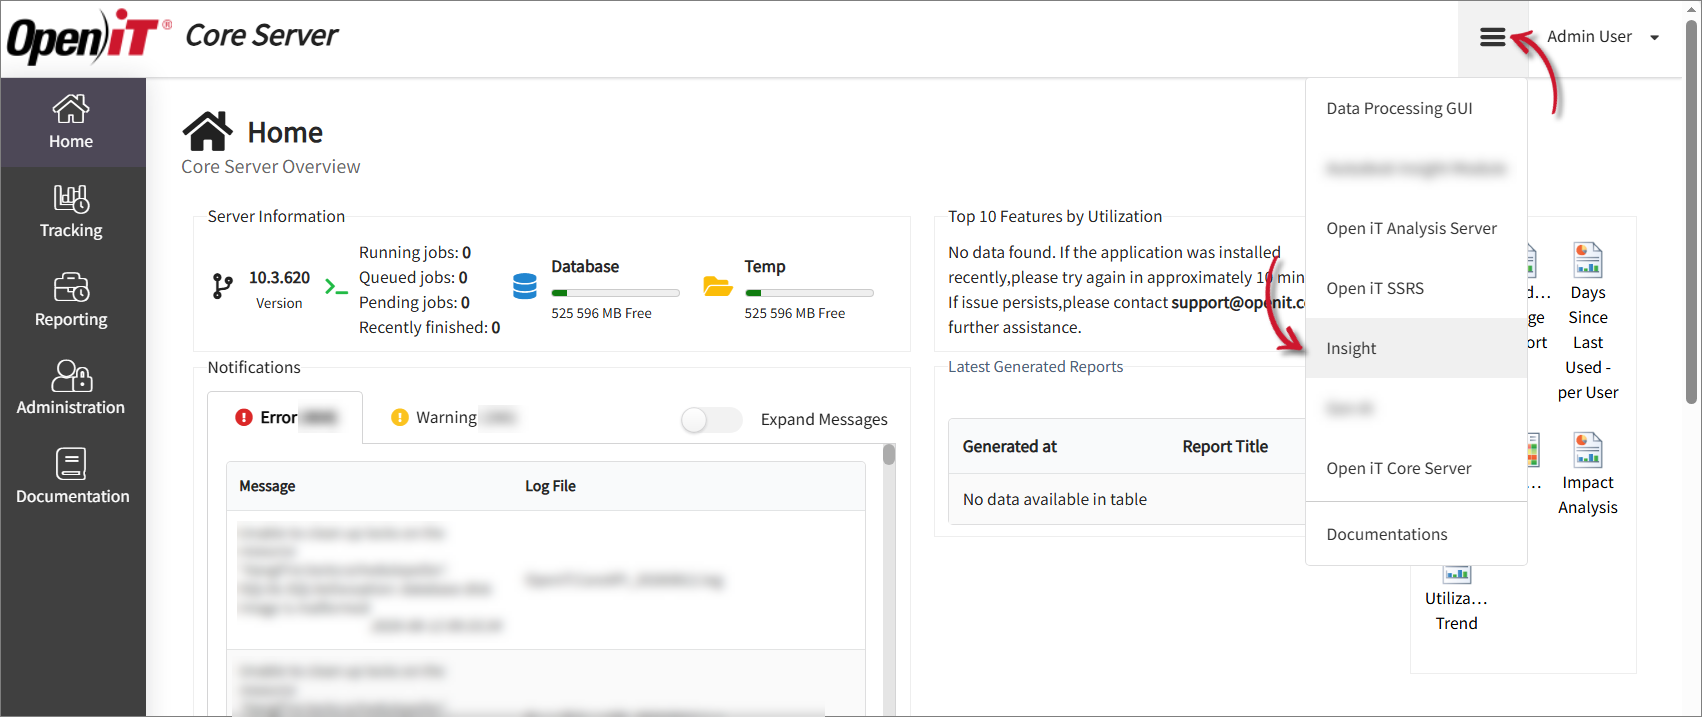
- The Open iT Insight interface will be loaded.
Parts of the Interface
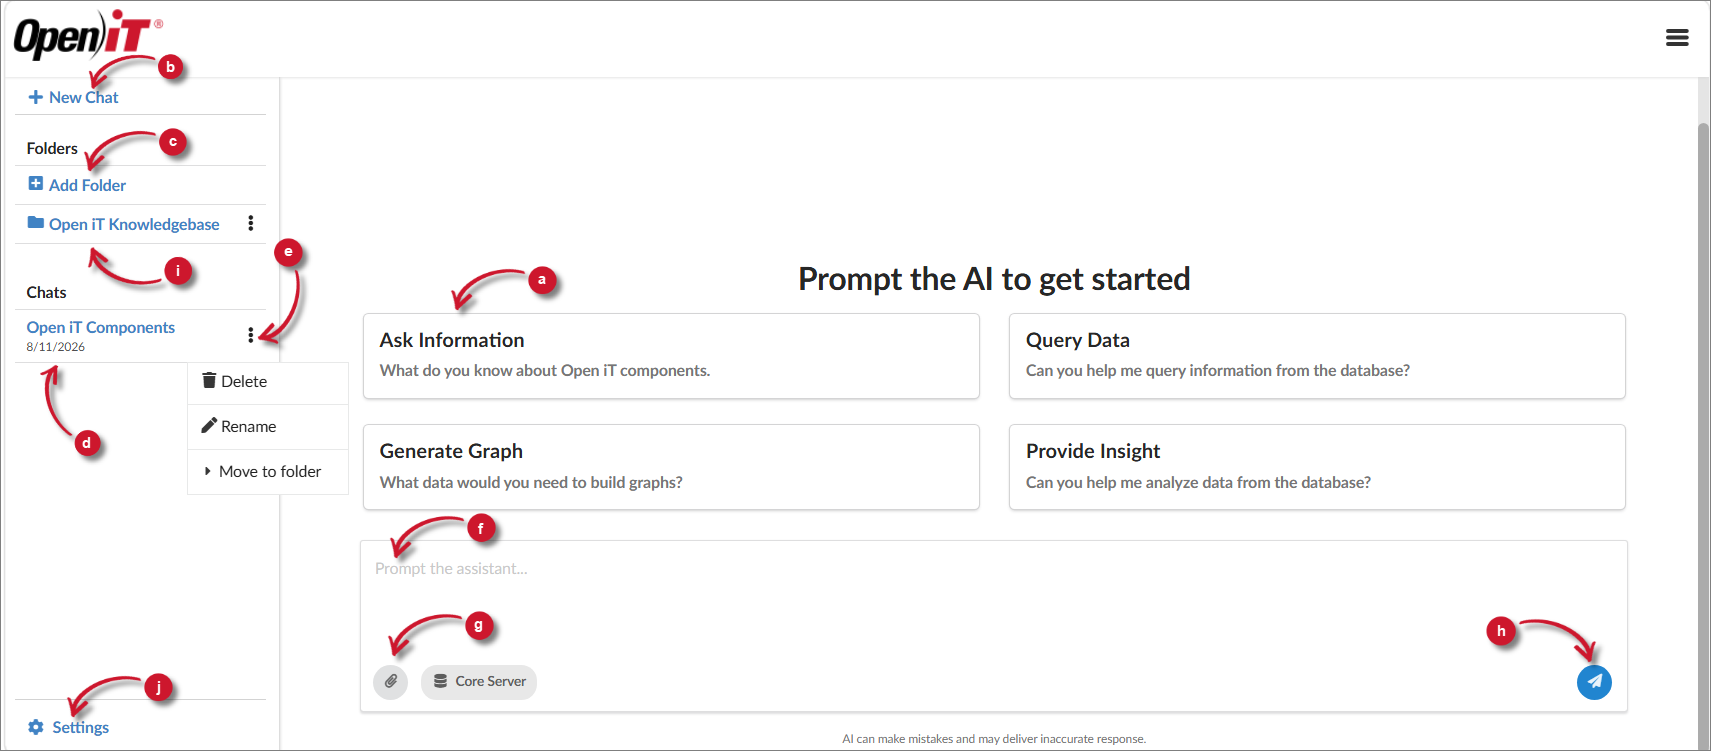
This section outlines the key components of the interface where you can engage with the AI assistant. These are the following:
| Interface Part | Function |
|---|---|
| a. Suggested Prompts | These are quick-start tiles that help you begin a conversation. Clicking a tile auto-fills the prompt field with a sample question for the AI assistant. |
| b. New Chat Button | Starts a fresh conversation with AI. |
| c. Add Folder | Organize your chats into categories. |
| d. Saved Conversations List | Displays your recent or saved conversations by title and date. These are persistent sessions you can revisit or manage. |
| e. Conversation Options | Opens management actions for each conversation, including:
|
| f. Prompt Input Field | The field where you type questions or commands in natural language. |
| g. Attachment Button | Enables you to upload files that the AI can use for analysis or context. |
| h. Send Button | Submits your typed prompt to the AI assistant. |
| i. Folder | Displays a folder used to organize related conversations. Select a folder to view the conversations stored within it. |
| j. Settings | Opens the settings page for configuring insight settings such as configuring database for Open iT Insight, configuring Analysis Server connection, and configuring Open iT Insight credentials. |
Managing Conversations
The interface offers tools to organize and maintain your interaction history with the AI. These include creating, sharing, renaming, and deleting conversations.
Starting a New Conversation
To start a new conversation with the AI assistant:
-
Click + New Chat located in the upper-right corner of the page.
-
Enter your question, request, or command in the Prompt Input Field
noteTo learn more about prompts and supported actions, visit Open iT Insight Capabilities.
-
(Optional) Click the Attachment button to upload a file that can provide additional context or be used for analysis.
-
Click the Send button to submit your prompt.
-
Wait for the AI to generate a response.
The response may include documentation, charts, reports, or explanations depending on your request.
The Open iT Insight may occasionally produce inaccurate or incomplete responses. Always verify critical output.
Sharing Conversation
To share an existing conversation within your organization:
-
In the Saved Conversations List on the right side of the interface, select the conversation you want to share.
-
Click the Share button located above the conversation list.
-
In the share dialog, click the Copy button to copy the conversation link to your clipboard.
You can now paste the link into an email, chat, or document for collaboration or reference.
Shared conversation links are only accessible to users within your organization who are authorized to use the Open iT Insight. External users or unauthorized individuals will not be able to access the shared content.
Creating a Folder
- Click Add Folder in the right panel.
- Enter a name for the folder.
- Click Create to save the folder.
Moving a Conversation to a Folder
- In the Saved Conversations List, locate the conversation you want to organize.
- Click the options icon.
- Select Move to folder.
- Choose the target folder from the list or you can create a new folder.
Renaming Conversation
To rename a saved conversation for easier identification:
- In the Saved Conversation List, locate the conversation you want to rename, and click the options icon.
- Select Rename from the dropdown menu.
- In the dialog box that appears, type the new name for the conversation.
- Click the Rename button to apply and save your changes.
Deleting Conversation
To permanently remove a saved conversation:
- In the Saved Conversation List, locate the conversation you want to delete, and click the options icon.
- Select Delete from the dropdown menu.
- In the confirmation dialog box that appears, click the Delete button to proceed.
This action is irreversible. Deleted conversations cannot be recovered, so make sure any important information is saved before deletion.