License Management
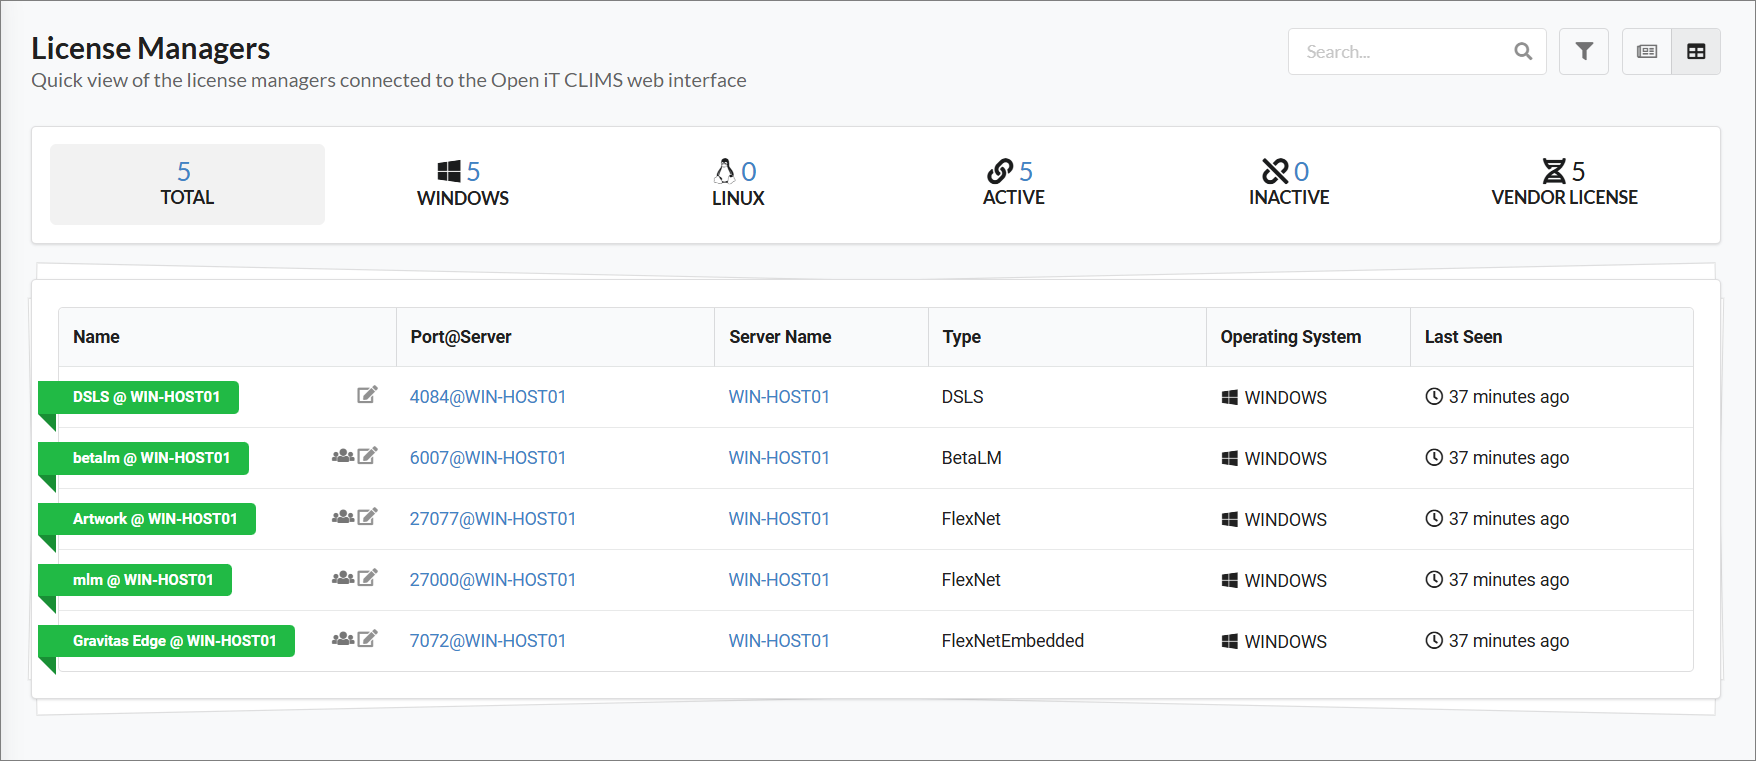
The License Managers or Manage page displays a quick rundown of the license managers connected to the CLIMS Server.
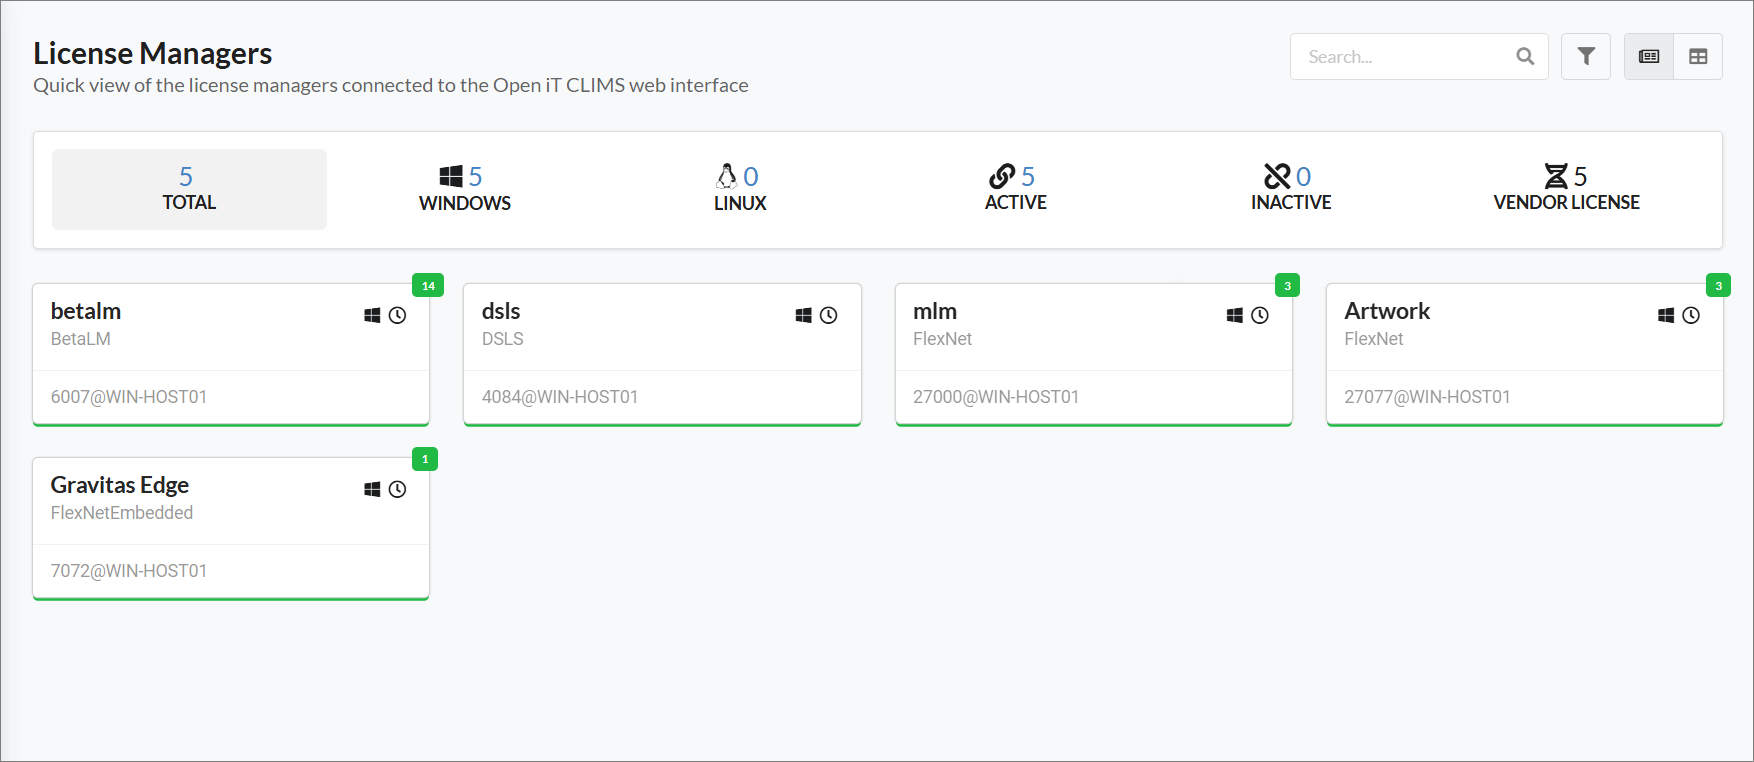
This page shows the vendors detected on the clients and their status are categorized as follow:
- Green - the vendor daemon is up; the client is connected to the server
- Yellow - the files are not updated for more than two (2) hours
- Red - the vendor daemon stopped; the client can either be disconnected or connected to the server
- Gray - the vendor daemon is up (last known); client is disconnected to the server
Switch between the card and table views by clicking on their corresponding button beside the filter icon.
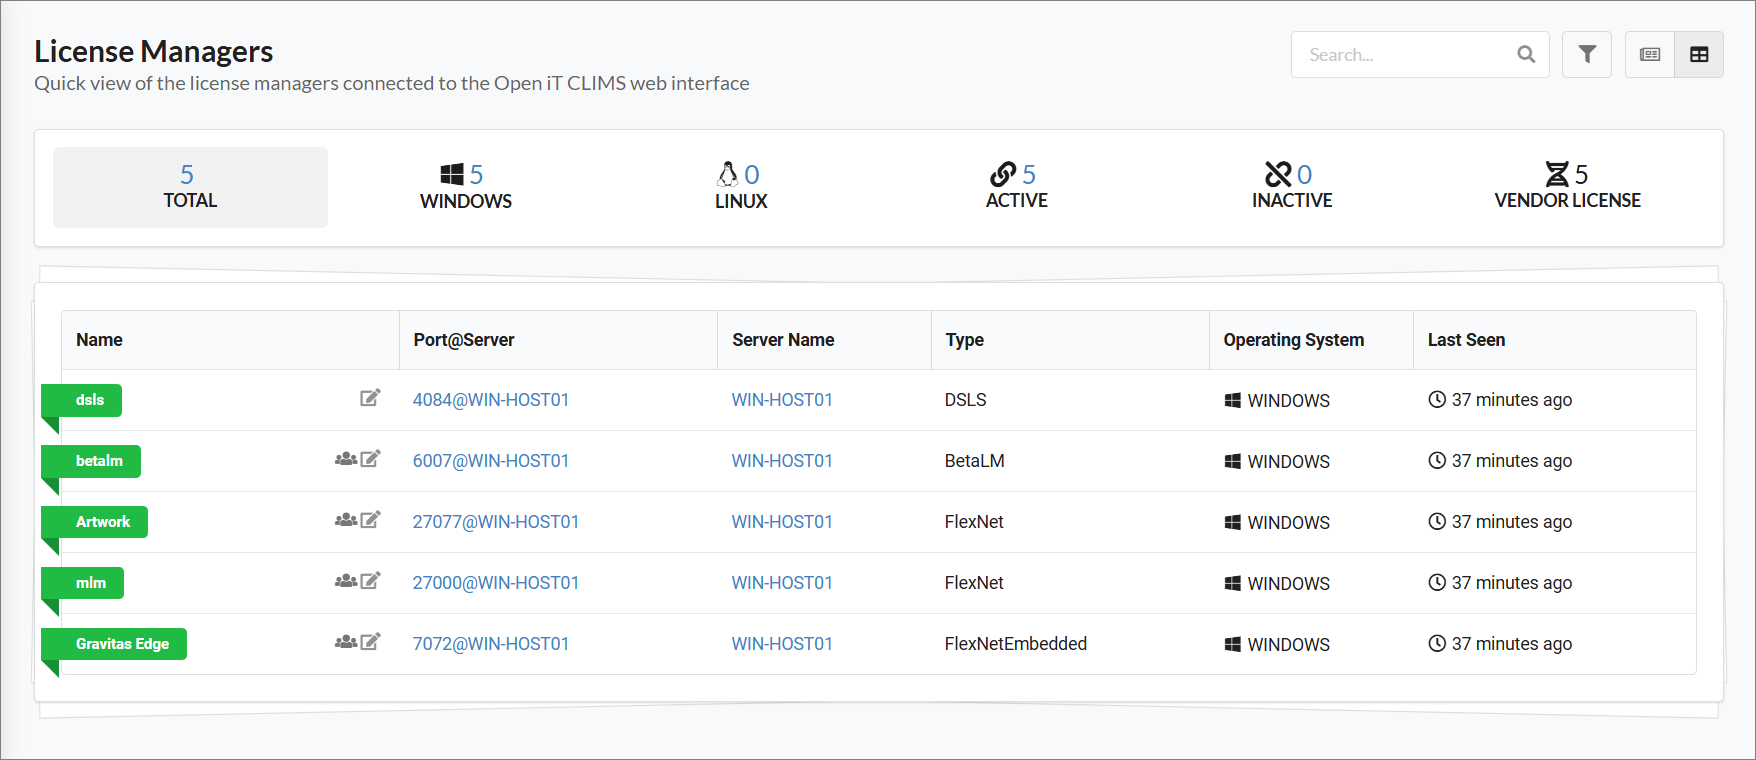
Click on a vendor item or card to open its Vendor Daemon page.
The Vendor Daemon page shows more information about the selected vendor and caters functionalities ranging from issuing remote commands to working with license and options files.
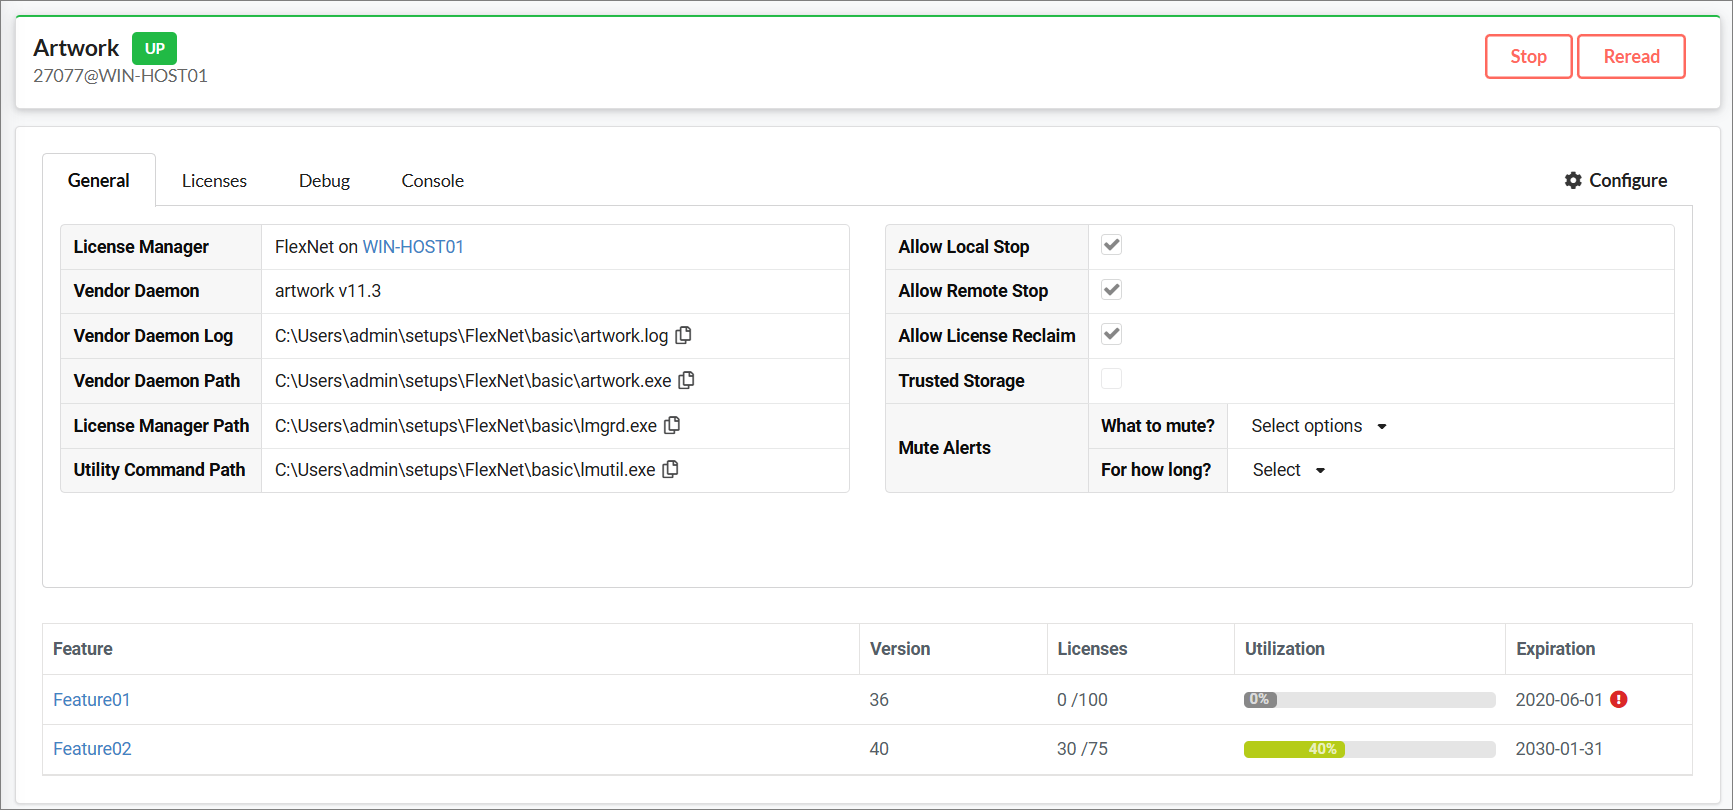
Stop, Start, and Reread a Vendor Daemon
-
From the Manage page, select the preferred vendor.
-
Click the command button you want to run.
 Vendor Daemon Overview Bar
Start Triad Machine(s)
CLIMS only supports DSLS, FlexNet, LM-X, and RLM for triad setup detection.
-
From the Manage page, select the preferred vendor.
-
Click warning icon beside the License Manager details.
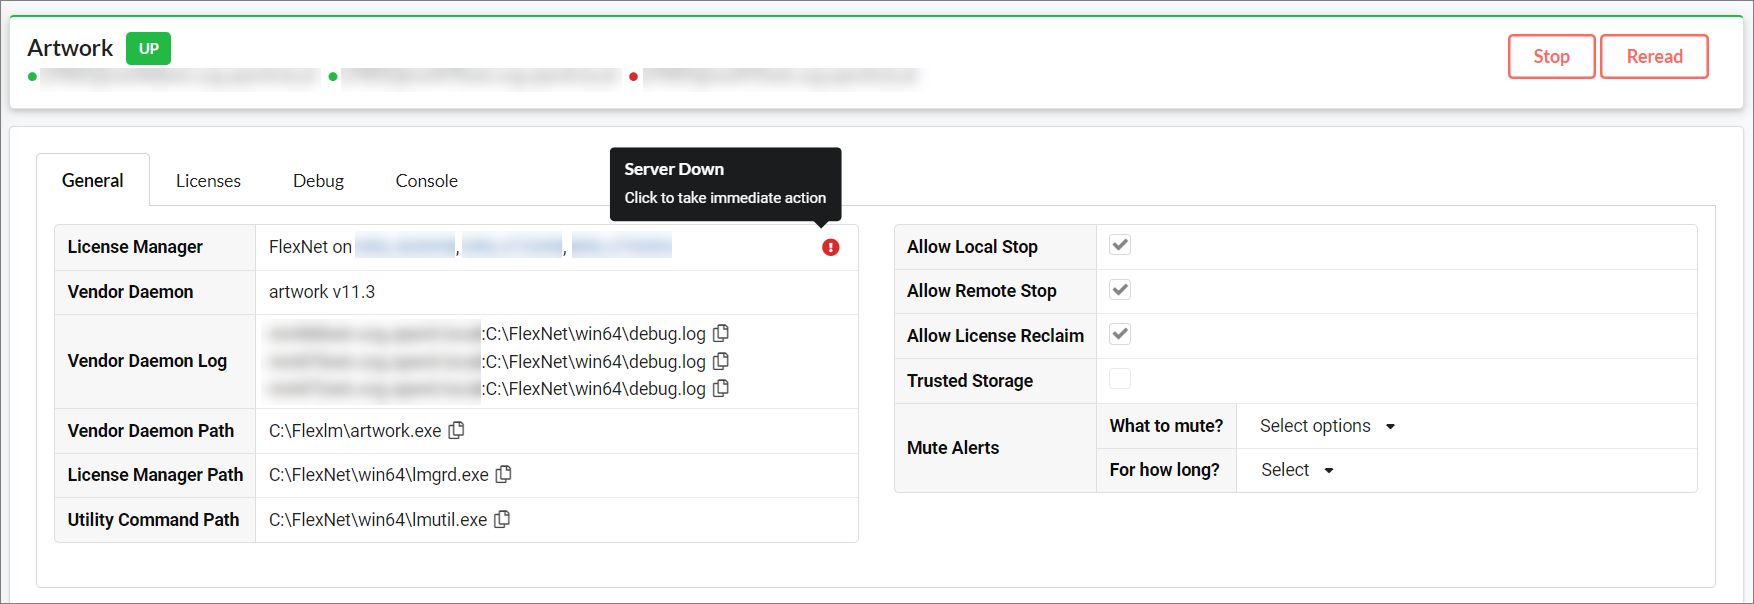 Triad Setup: Server Down
-
Select the server(s) to start.
-
Click Start.
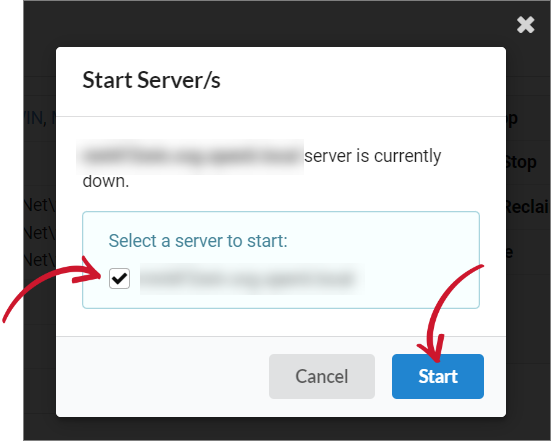 Triad Setup: Start Server(s)
Revoke License of a Specific User
-
From the Manage page, select the preferred vendor.
-
On the Feature table, select the preferred feature.
-
Click Revoke for the selected user.
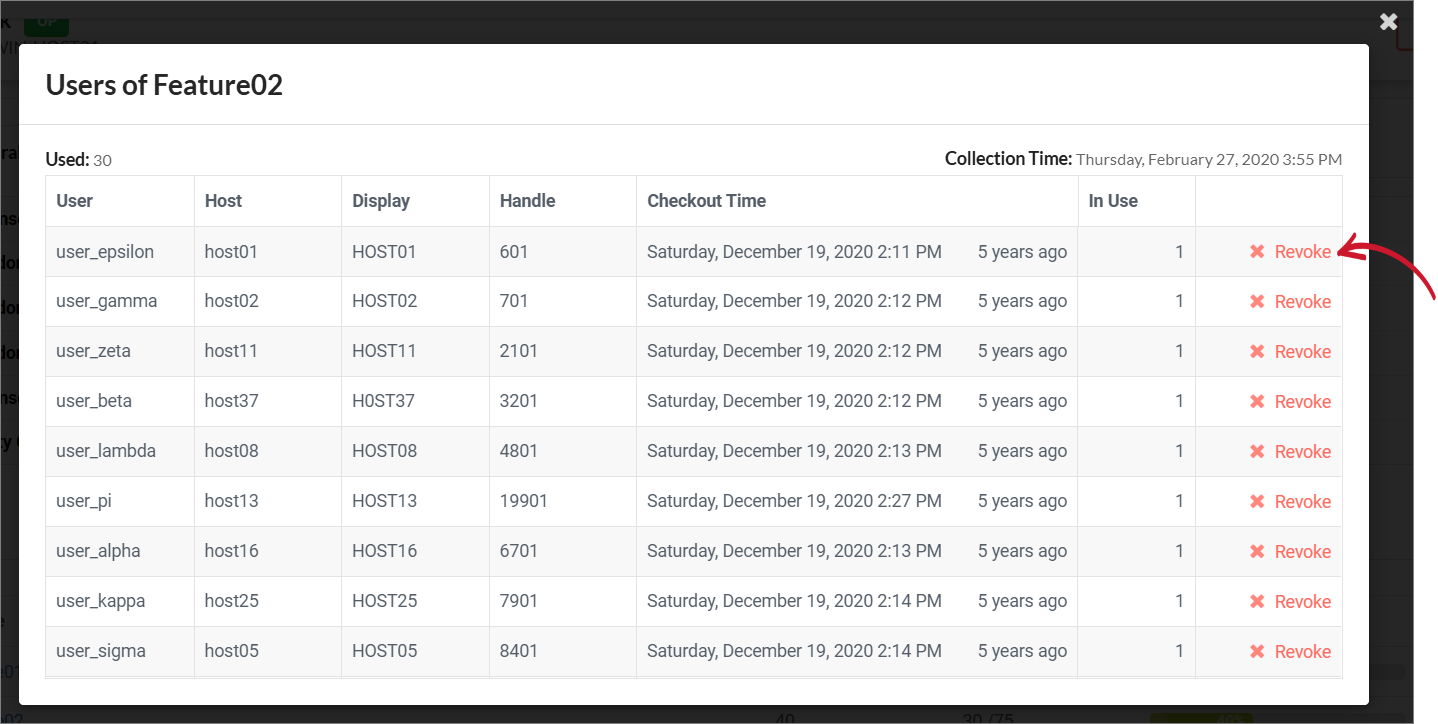 Feature Table: Revoking License
Update a License or Options File
-
From the Manage page, select the preferred vendor.
-
Go to the Licenses tab.
-
Click on the license or options file you want to work on.
-
Use the built-in text editor to update the file.
Use the Compare tab if you want to see the file differences between the local and working copies of the license/options file.
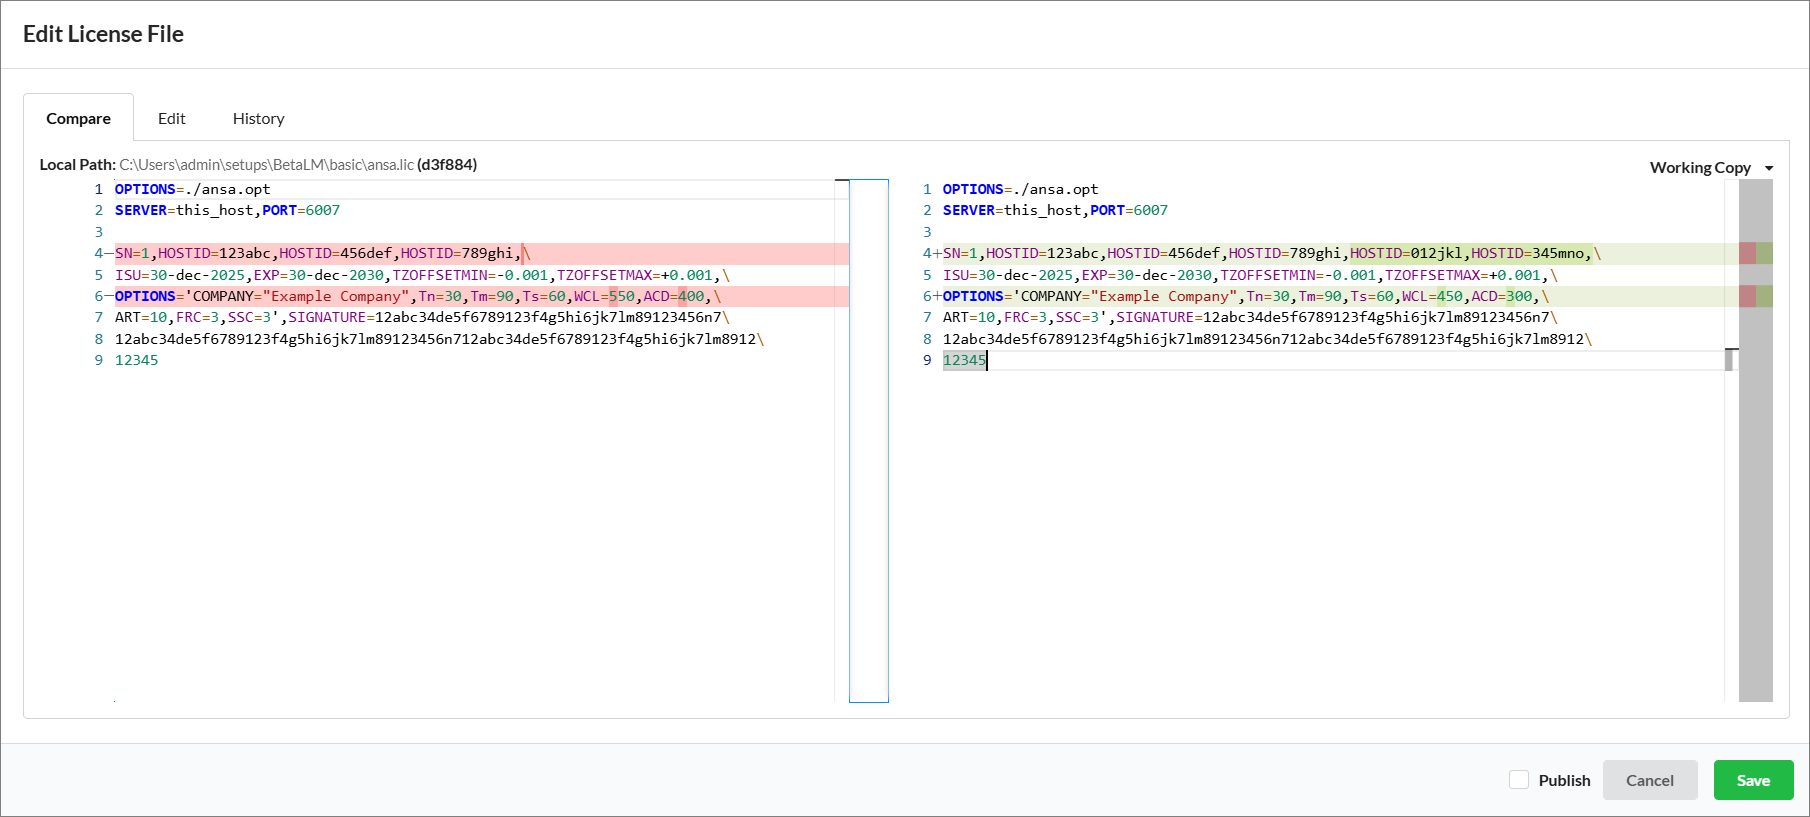 Text Editor: Compare Tab
Use the Edit tab if you prefer to view only the working copy.
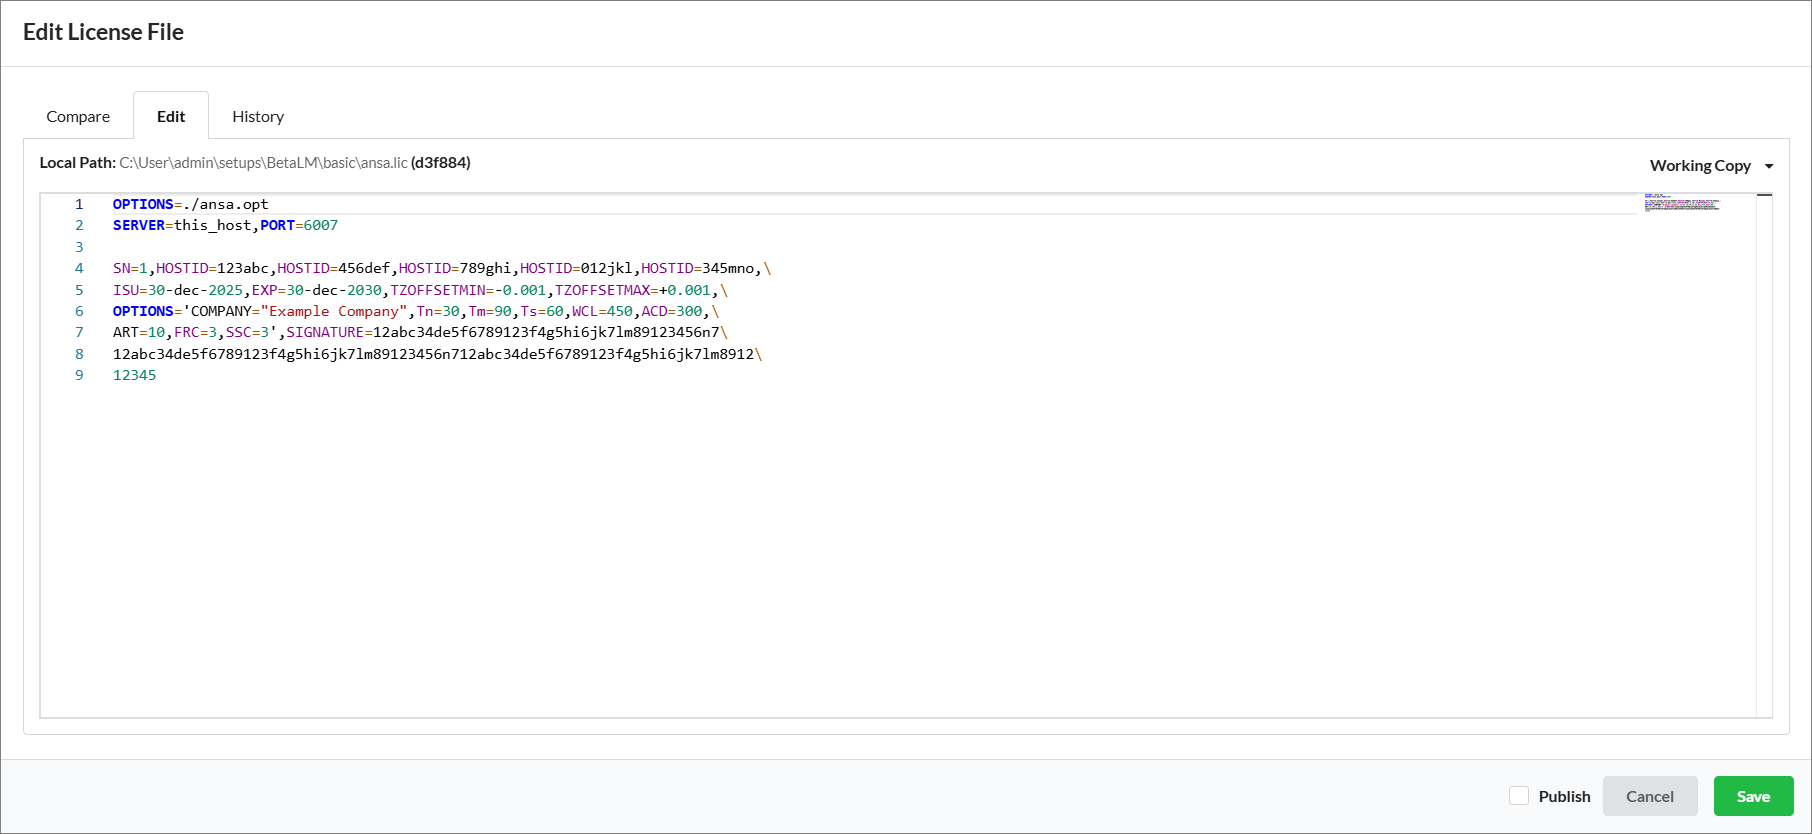 Text Editor: Edit Tab
To work on an old version of the file, click the Working Copy dropdown then select the file revision you want to use.
You can use the History tab to update older versions of the file.
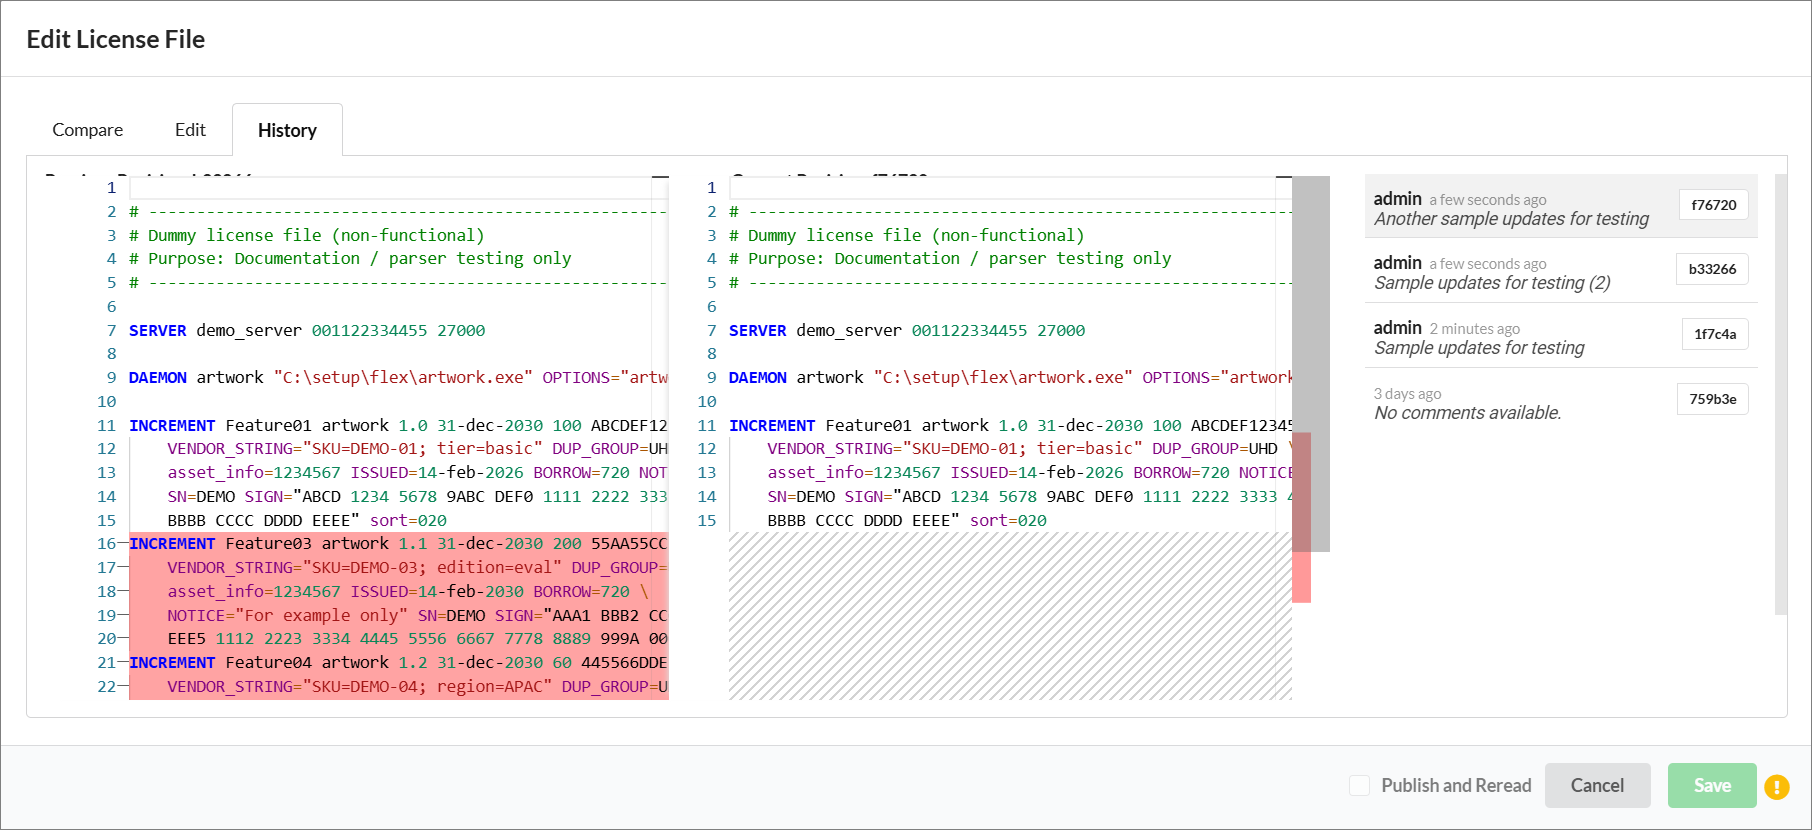 Text Editor: History Tab
Semantic License Comparison
For FlexNet, LM-X, and RLM license files, CLIMS displays a more intuitive view of the file changes.
Under the Compare tab, use the Text Diff sub-tab to update the license file while also viewing the differences between the local and working copies.
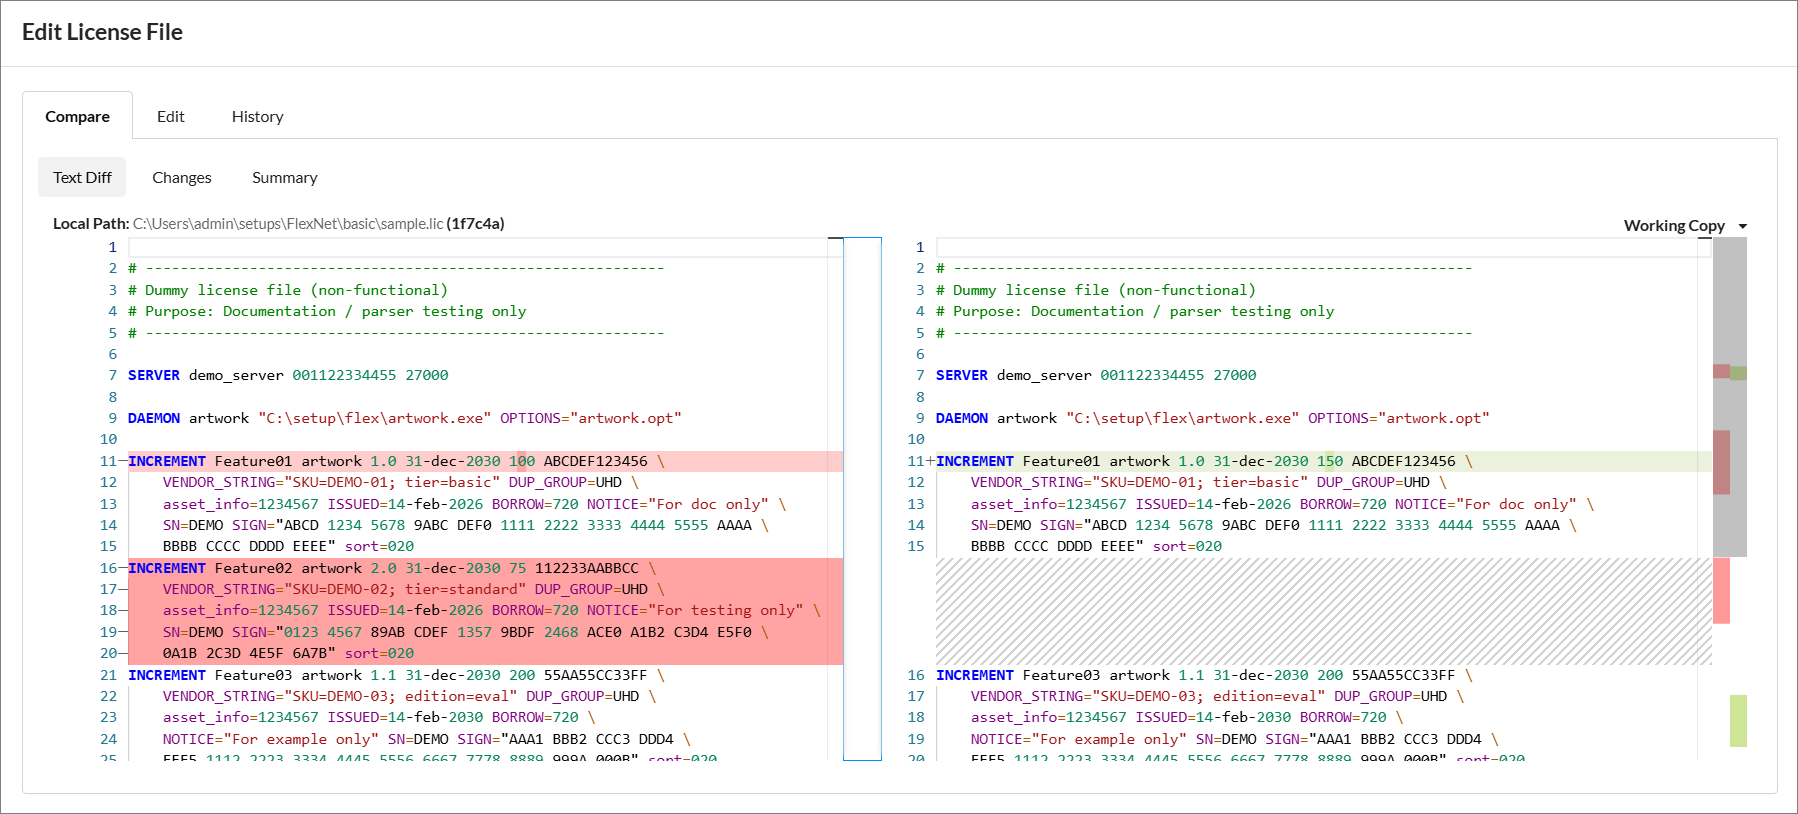
The Changes sub-tab summarizes and categorizes the changes made per line. Click on an item to drill down into the insights and details.
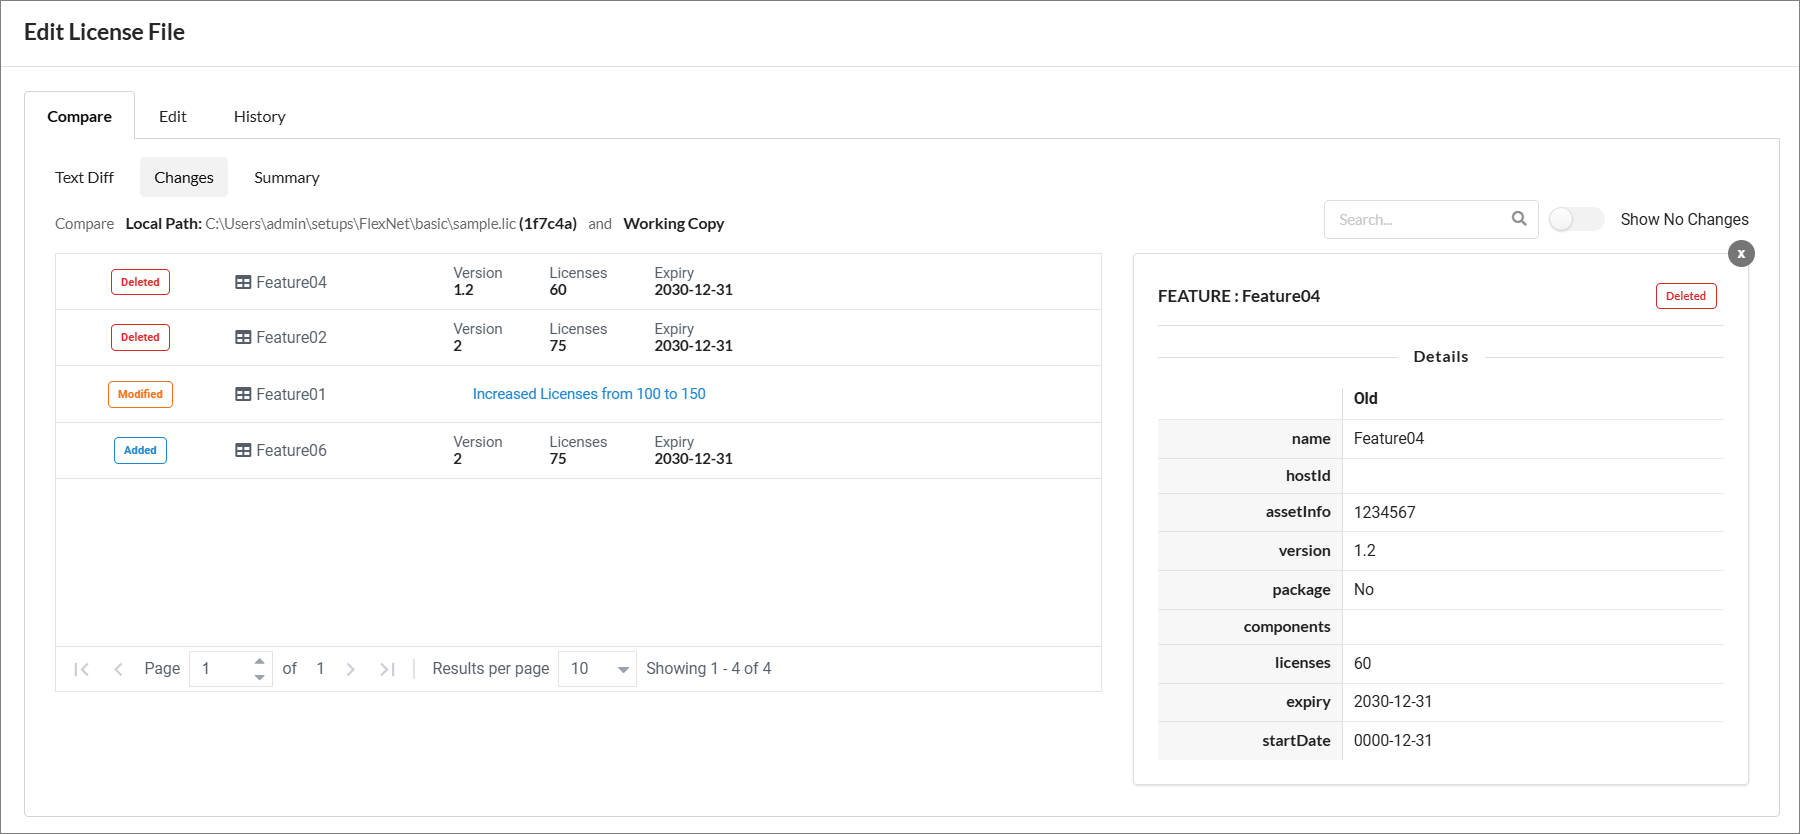
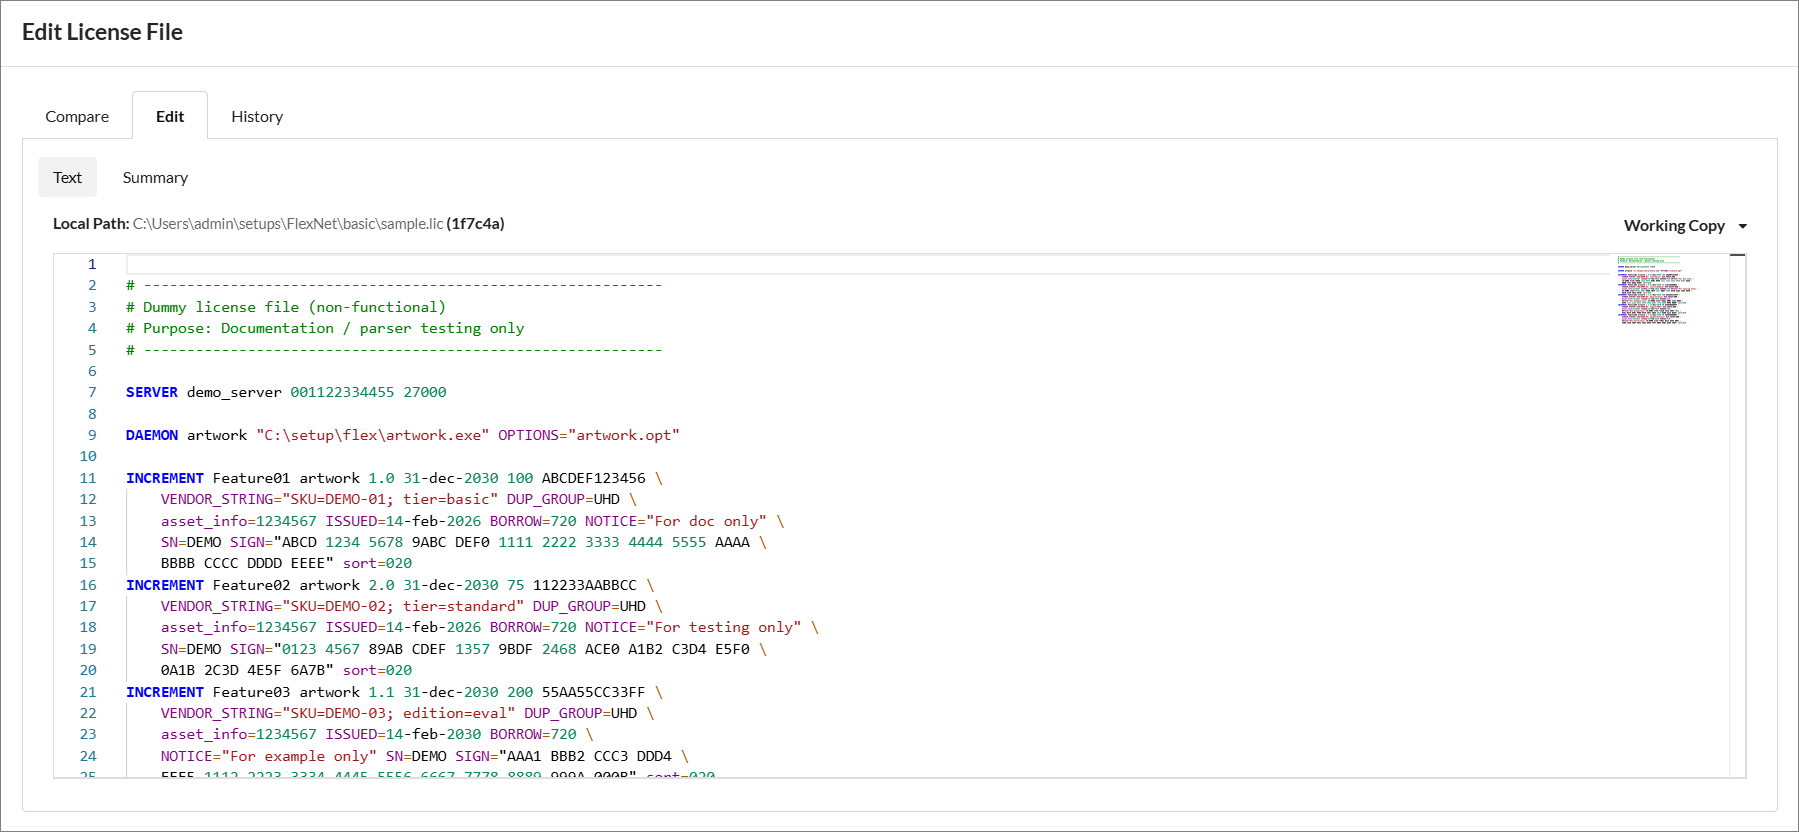
Under the Edit tab, use the Text sub-tab to update the license file.
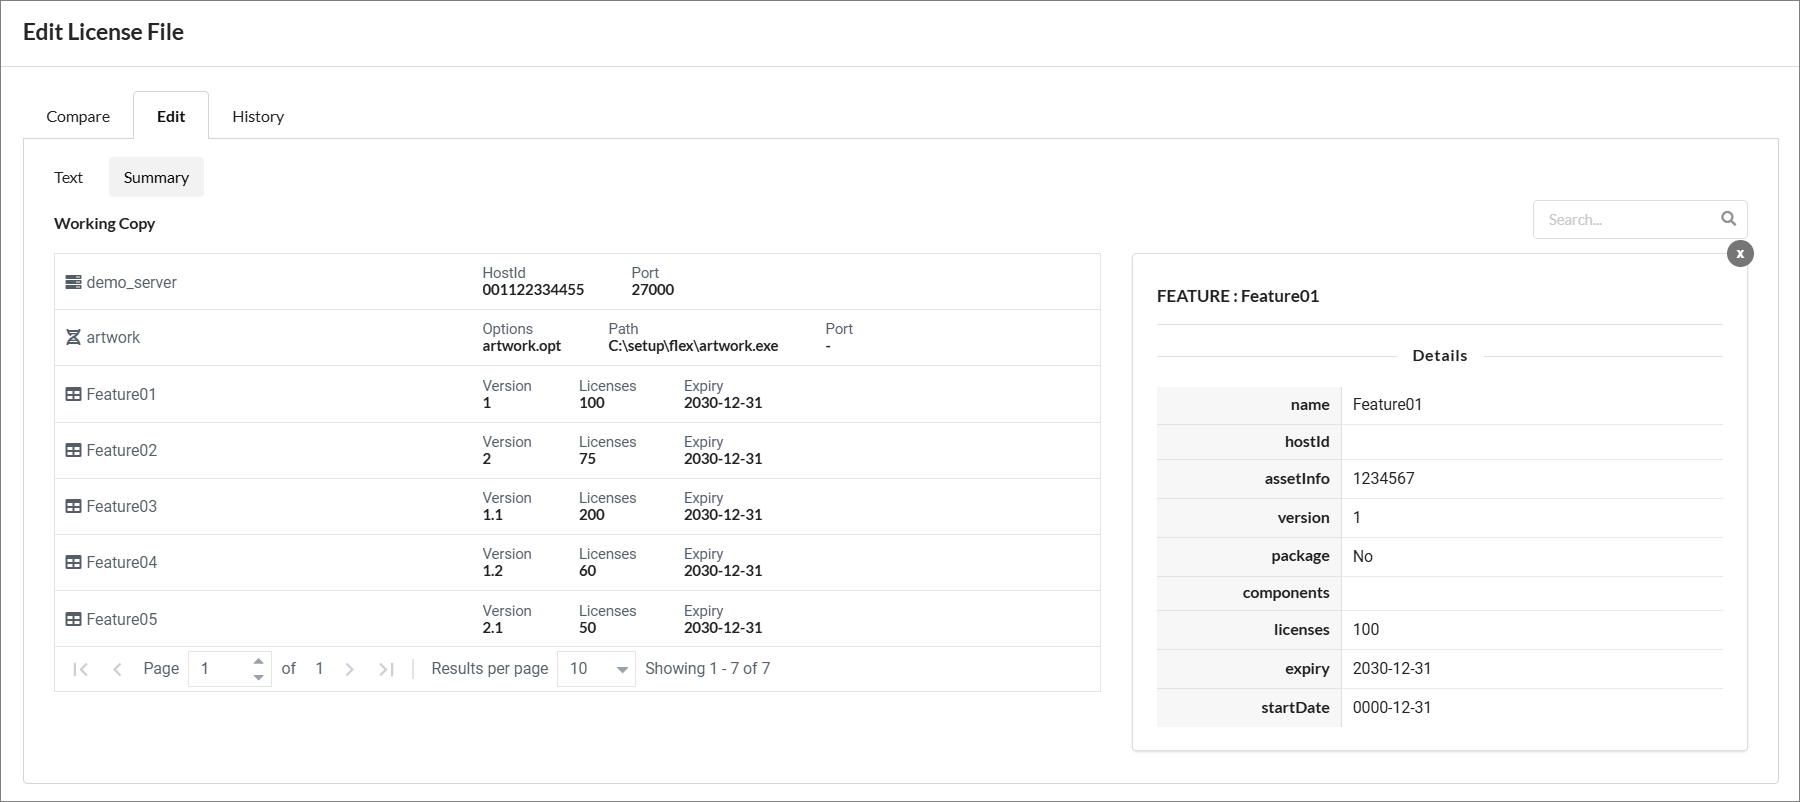
You can view the summary of the file contents using the Summary sub-tab. This sub-tab is available to both the Compare and Edit tabs.
Save File Changes
Once you are done updating the license/options file, tick Publish or Publish and Reread at the lower-right corner of the text editor modal, then click Save.
Execute Publish or Publish and Reread on the Licenses tab if you did not tick this option beforehand.
Detected Local File Updates
CLIMS can detect local updates made to the license and option files.
In this scenario, you have an option to either Discard or Accept the local changes.
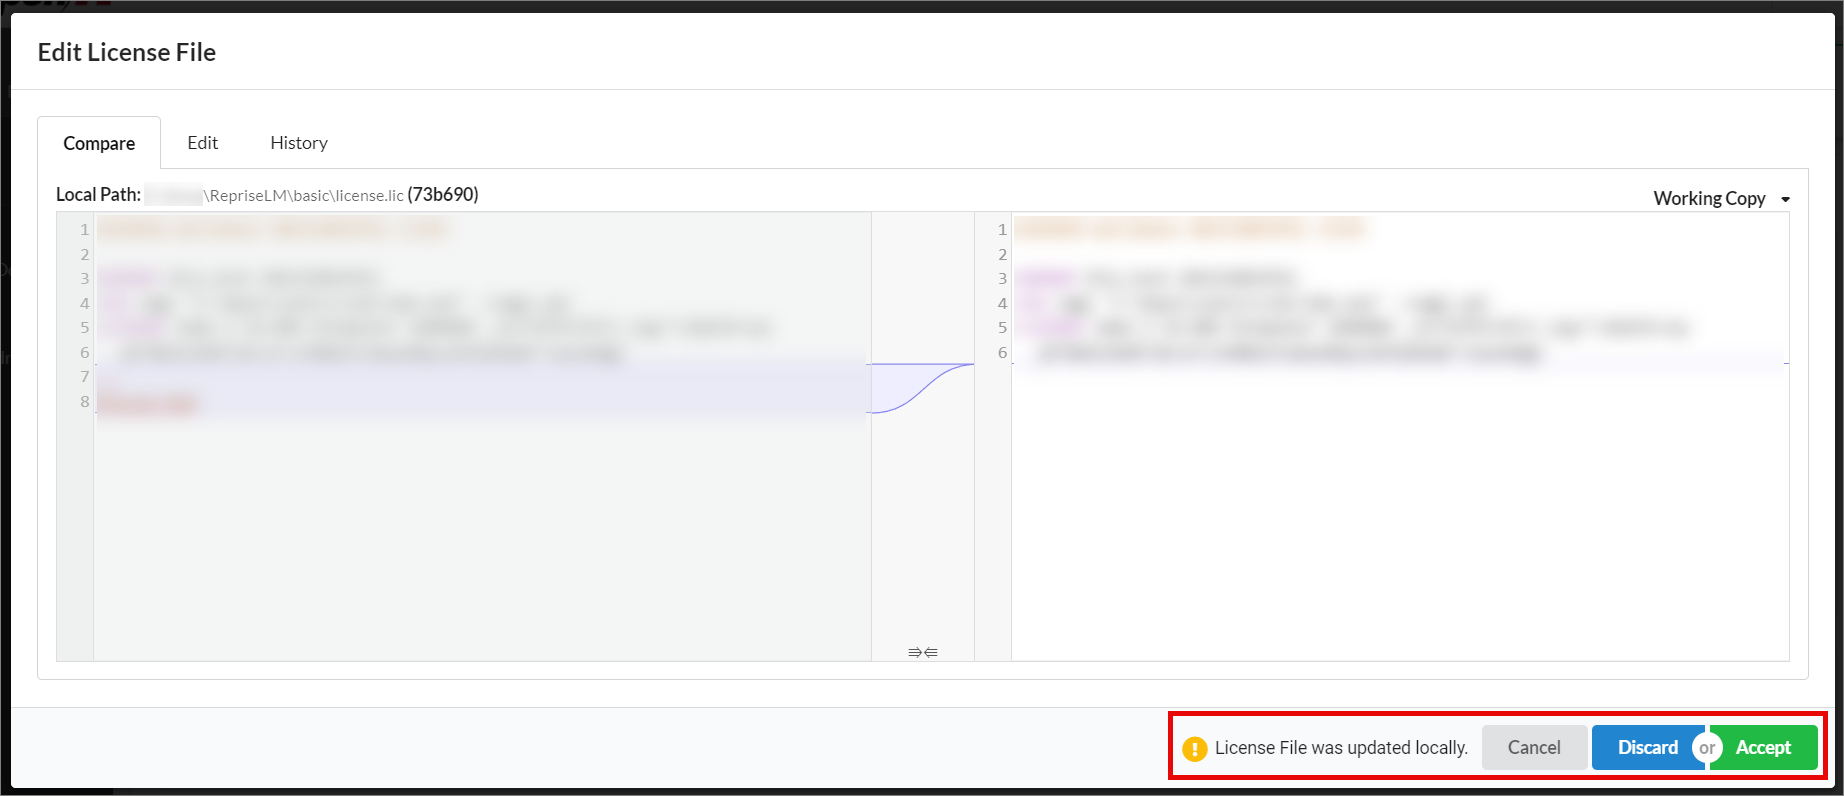
Save the changes afterwards.
Upload a New License File
-
From the Manage page, select the preferred vendor.
-
Go to the Licenses tab, then click Add New License File.
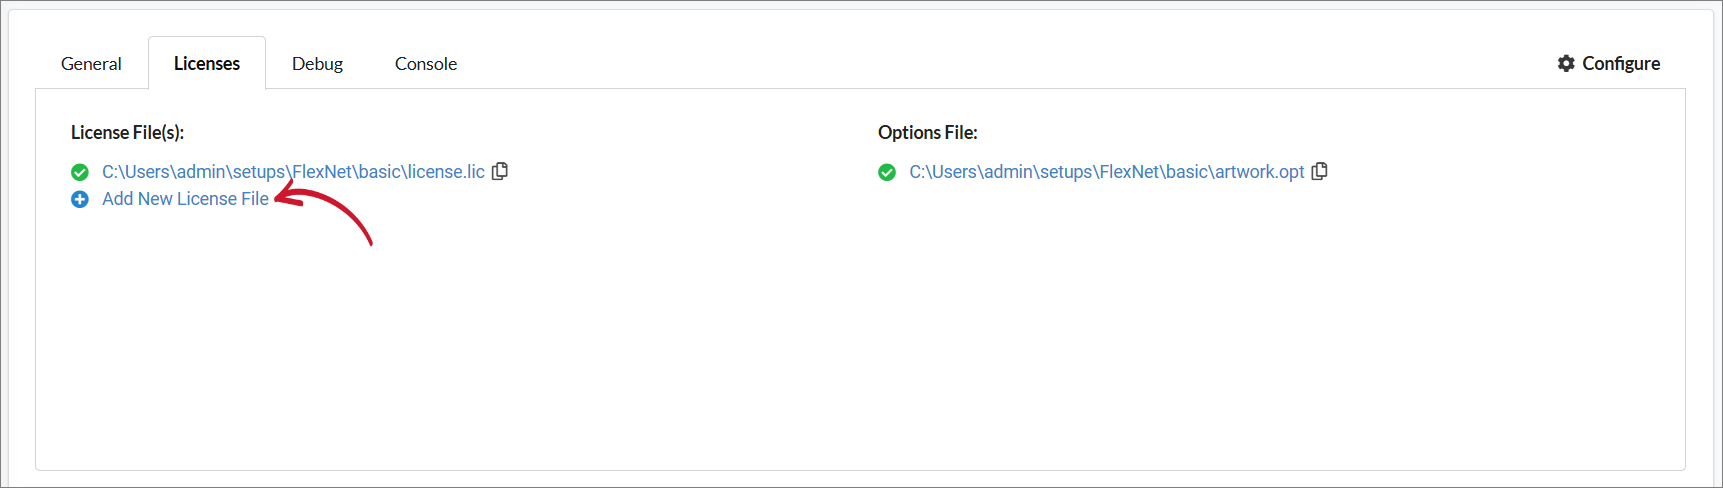 Licenses Tab: Add New License File
-
Click Browse File and select a valid license file.
warningThe file size limit is 2MB.
-
Add a comment.
-
Tick Publish or Publish and Reread.
-
Click Upload.
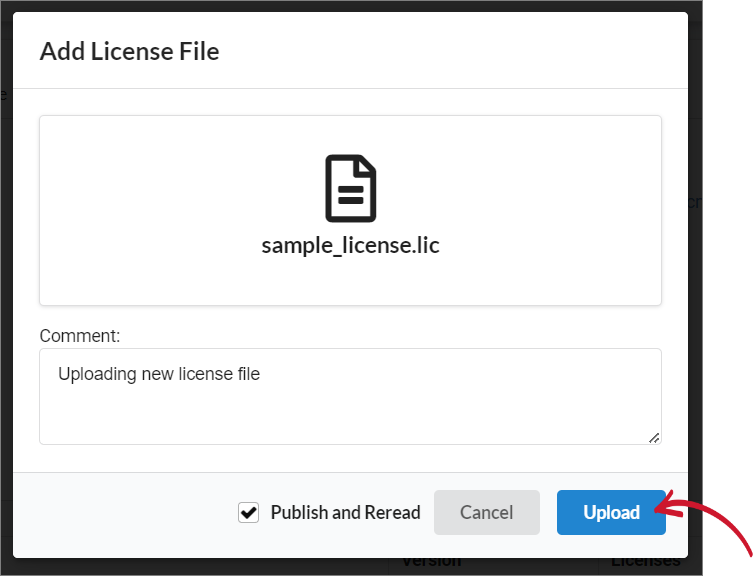 Upload New License File
warningExecute Publish or Publish and Reread on the Licenses tab if you did not tick this option beforehand.
Options File Generator
The Options File Generator provides a structured graphical way to configure FlexNet license usage settings within CLIMS.
This complements the existing text editor by allowing you to:
- Configure license behavior using guided form fields
- Define access control rules through tables and controls
- Manage logging and server settings visually
- Generate a properly formatted options file automatically
After configuring the necessary settings, CLIMS generates the options file, which can be published to the license server and applied through a license server reread.
To access the Options File Generator:
-
From the Manage page, select the preferred vendor.
-
Click Configure.
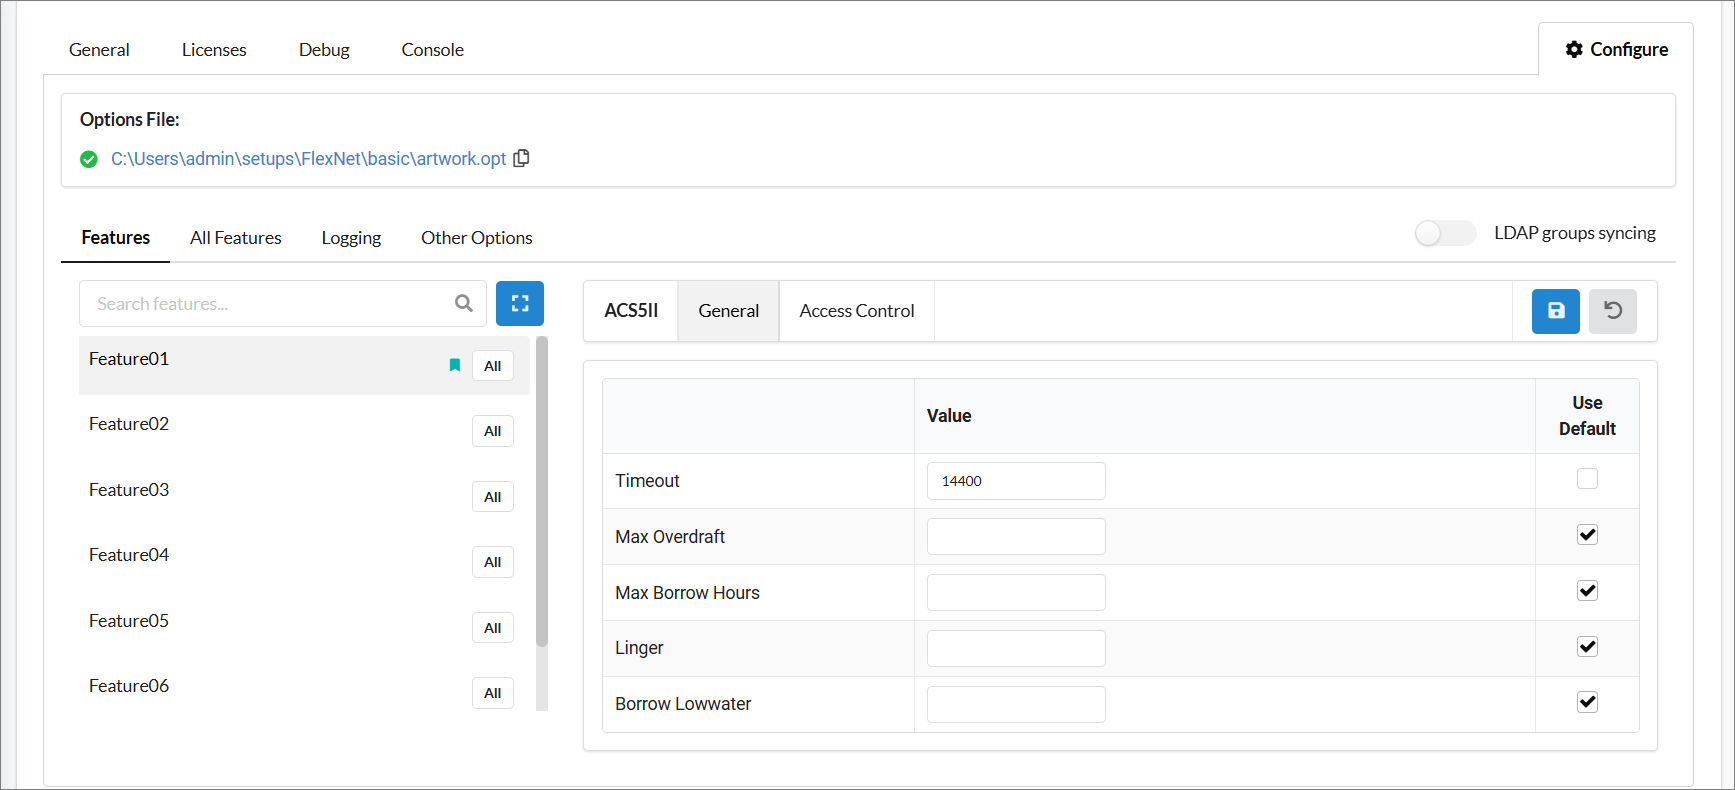
Configure Per-Feature Settings
The Features sub-tab allows you to define settings and access rules for specific licensed features.
-
Go to the Features sub-tab, select a feature from the list.
-
Under General, configure the following options as needed:
- Timeout - defines how long a license remains idle before it is released
- Max Overdraft - allows the number of licenses in use to exceed the total license count
- Max Borrow Hours - defines the maximum duration a license can be borrowed for offline use
- Linger - keeps a licensed checked out for a short period after the application is closed
- Borrow Lowwater - defines the minimum number of licenses that cannot be borrowed
Tick the Use Default checkbox to apply system-defined values instead.
-
Under Access Control, select a category to configure (i.e., Users, Groups, Hosts, or Host Groups).
-
To add a new record, click the add button. This opens a prompt where you can specify the entity name(s).
Alternatively, click the Add from LDAP button to import data from the configured LDAP data source. This is only applicable to Users and Groups.
Click Add or Import to save the record.
-
Configure the following options per record as needed:
- Included - allows the entity to use licenses
- Excluded - prevents the entity from using licenses
- Reserved - allocates licenses exclusively for the entity
- Max - limits the number of licenses the entity can use simultaneously
- Borrow Included - allows the entity to borrow licenses
- Borrow Excluded - prevents the entity from borrowing licenses
-
Click Save changes to pre-save your configuration.
-
Continue updating other settings as needed. Once done, click the Publish and Reread button to generate and apply the options file.
Configure Global Settings
The All Features sub-tab defines default settings and access rules that apply to all licensed features.
-
Go to the All Features sub-tab.
-
Under General, configure the Timeout. This defines how long a license remains idle before it is released.
Tick the Use Default checkbox to apply system-defined values instead.
-
Under Access Control, select a category to configure (i.e., Users, Groups, Hosts, or Host Groups).
-
To add a new record, click the add button. This opens a prompt where you can specify the entity name(s).
Alternatively, click the Add from LDAP button to import data from the configured LDAP data source. This is only applicable to Users and Groups.
Click Add or Import to save the record.
-
Configure the following options per record as needed:
- Included - allows the entity to use licenses
- Excluded - prevents the entity from using licenses
-
Click Save changes to pre-save your configuration.
-
Continue updating other settings as needed. Once done, click the Publish and Reread button to generate and apply the options file.
Configure Logging
-
Go to the Logging sub-tab.
-
Configure the following options as needed:
- Debug Log Settings
- Path - directory where the detailed logs will be stored
- Affix Obfuscation Markers - masks sensitive information in the logs
- No Logs - disables logging for the selected events
- Report Log Settings
- Path - directory where the usage logs will be stored
Tick the Use Default checkbox to apply system-defined values instead.
- Debug Log Settings
-
Click Save changes to pre-save your configuration.
-
Continue updating other settings as needed. Once done, click the Publish and Reread button to generate and apply the options file.
Configure Other Options
-
Go to the Other Options sub-tab.
-
Configure the following options as needed:
- Automatic Reread - automatically reloads configuration changes
- Daemon Select Timeout - defines how long the server waits for daemon responses
- FQDN Matching - controls hostname matching
- Group Case Insensitive - ignores case differences in group names
- Max Connections - defines the number of simultaneous connections
Tick the Use Default checkbox to apply system-defined values instead.
-
Click Save changes to pre-save your configuration.
-
Continue updating other settings as needed. Once done, click the Publish and Reread button to generate and apply the options file.
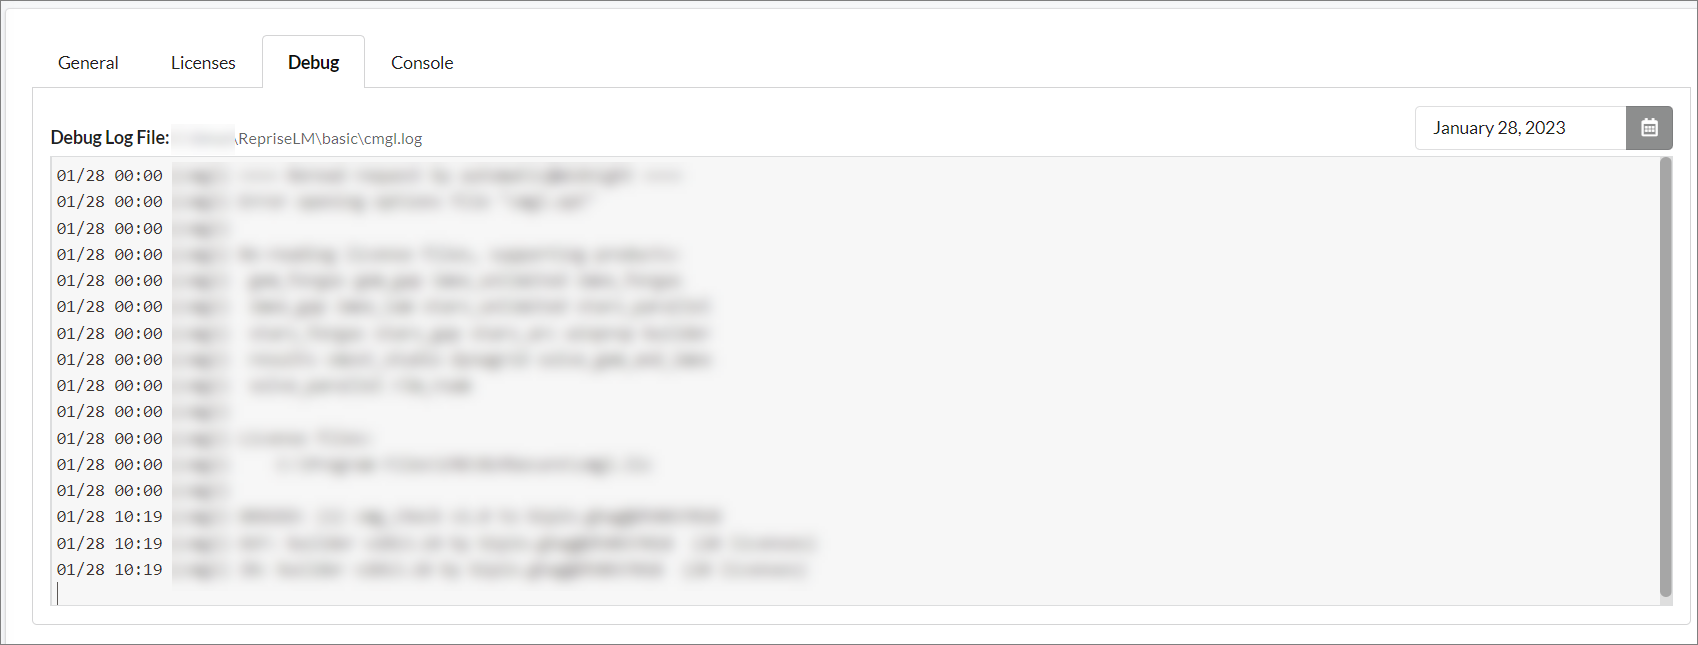
View a Debug Log File
-
From the Manage page, select the preferred vendor.
-
Go to the Debug tab.
-
To view logs from a specific day, select the desired date using the provided date selector.
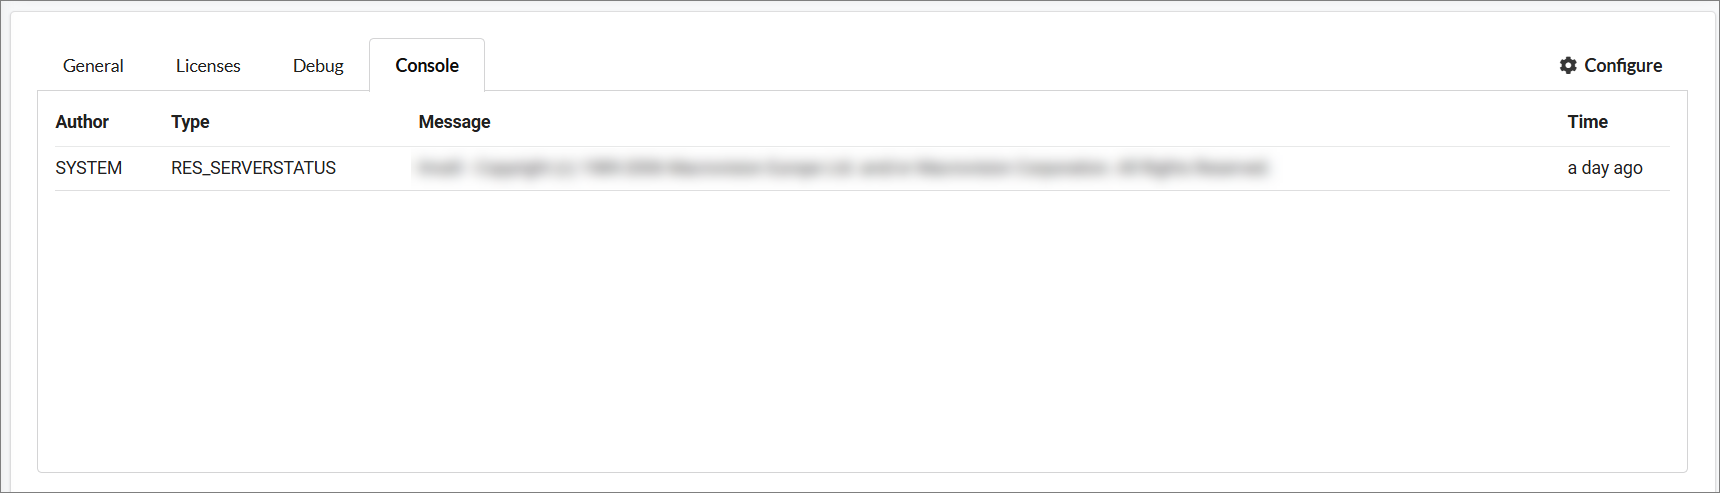
View the Console Tab
The Console tab displays the 100 most recent console command logs made when running the vendor daemon.
Vendor Labeling
-
Go to the Manage page.
-
Click the table button to switch to Table View.
-
Click the Edit Label icon of the target vendor.
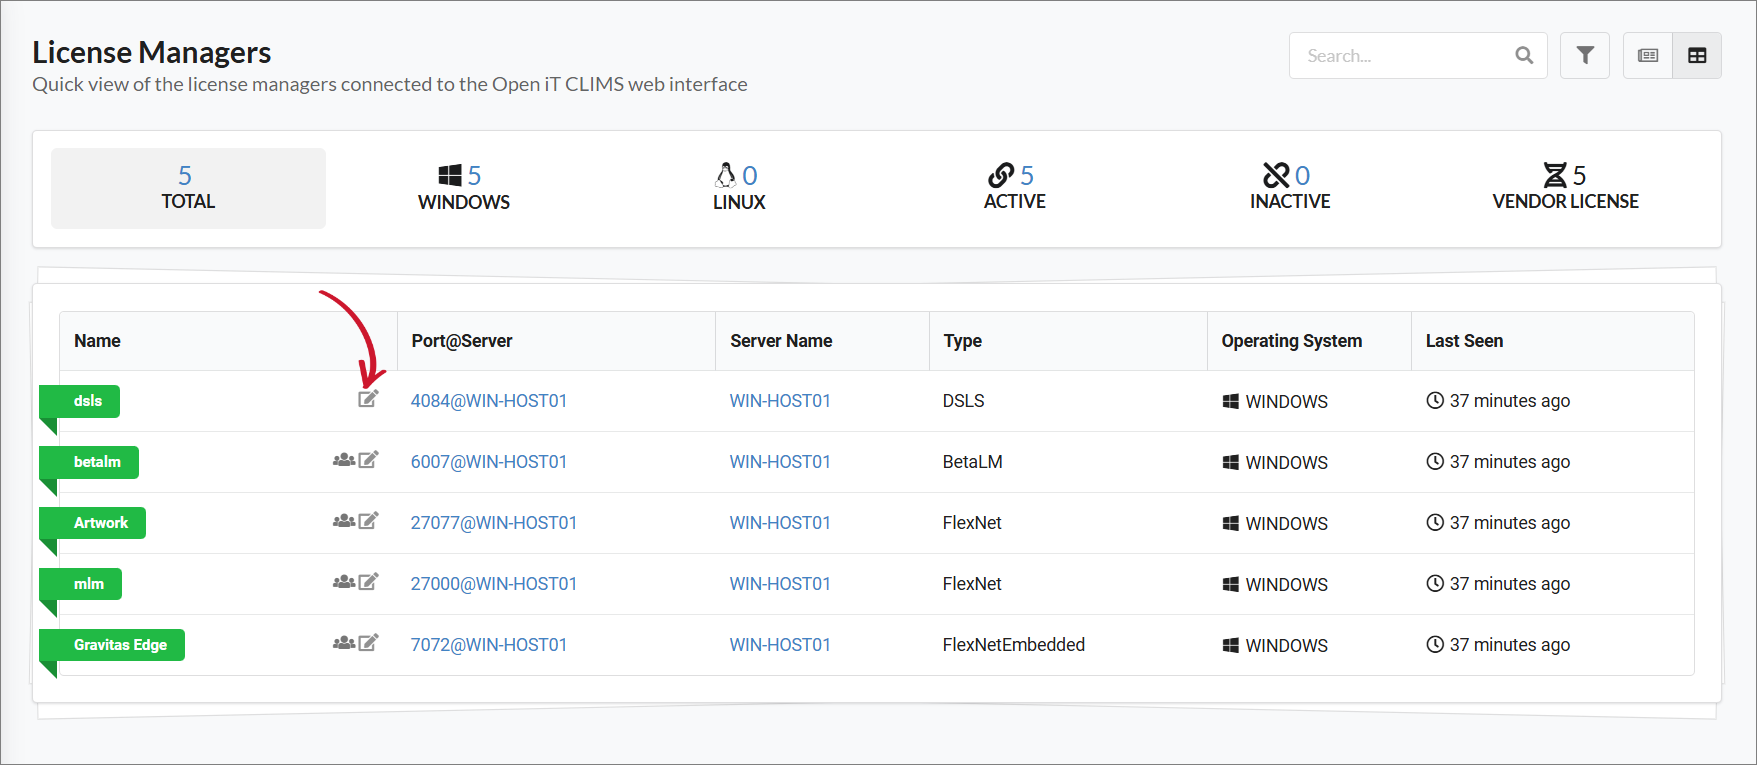 Enable Editing of Vendor Label
-
Type in the preferred vendor label.
-
Click Save.
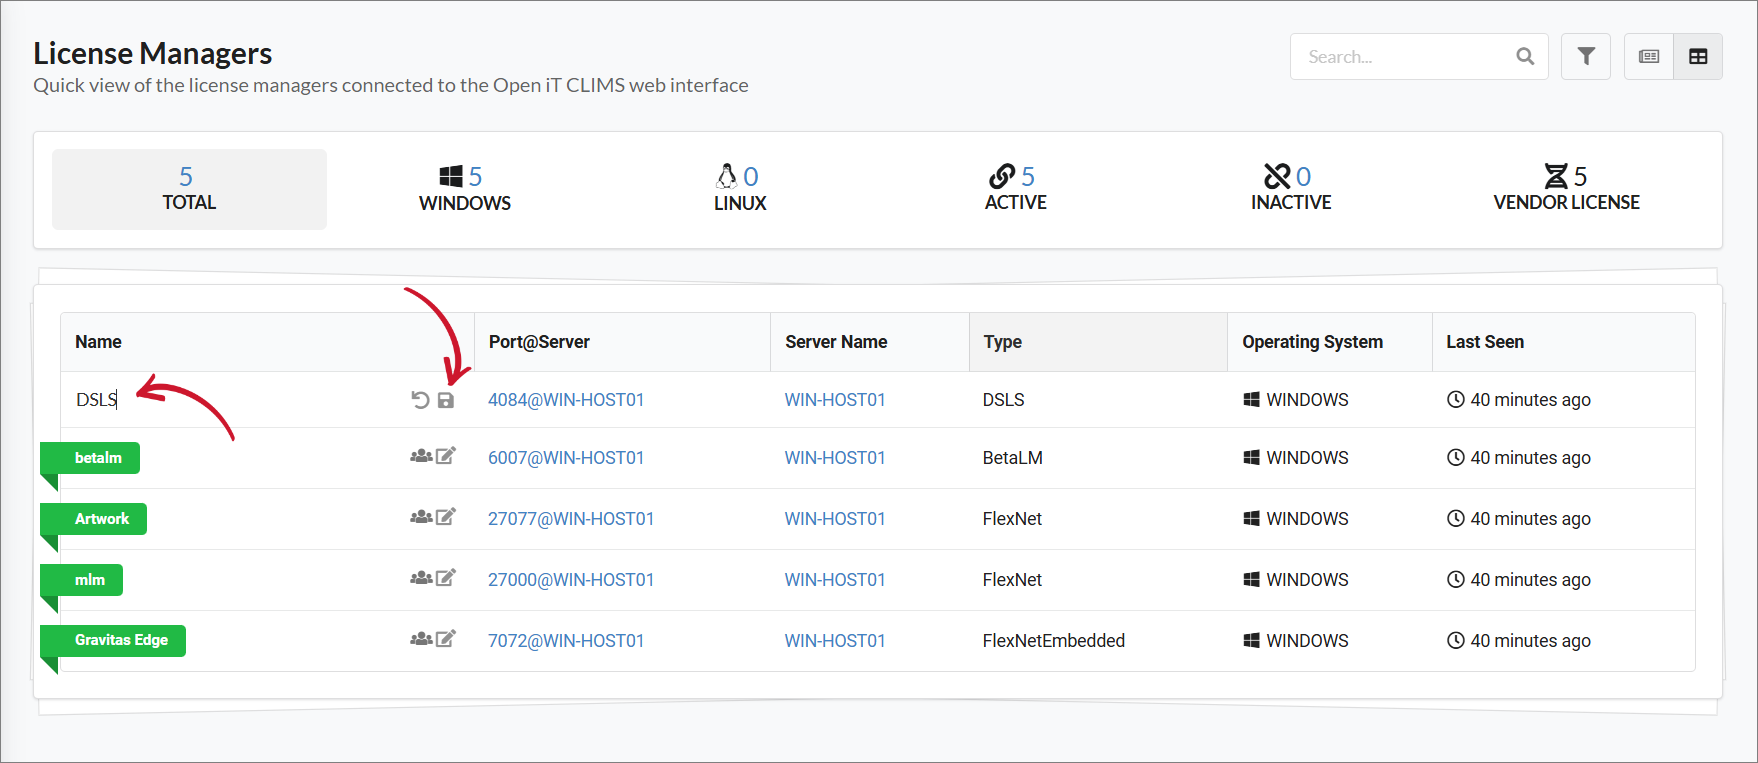 Editing the Vendor Label
Configure the Vendor Label Format
You can formulate a vendor label format using the following variables:
{label}- the custom vendor label{hostname}- the hostname of the vendor{raw}- the default vendor name
To configure the vendor label format:
-
Log in using an Administrator account.
-
Go to Administration > Configurations.
-
In Configurations/General, create a label syntax in LabelFormat.
Use the available variables as preferred. You can also include additional characters and symbols in the label format.
The sample label format below appends the hostname and raw vendor name to the vendor label.
-
Click Save.
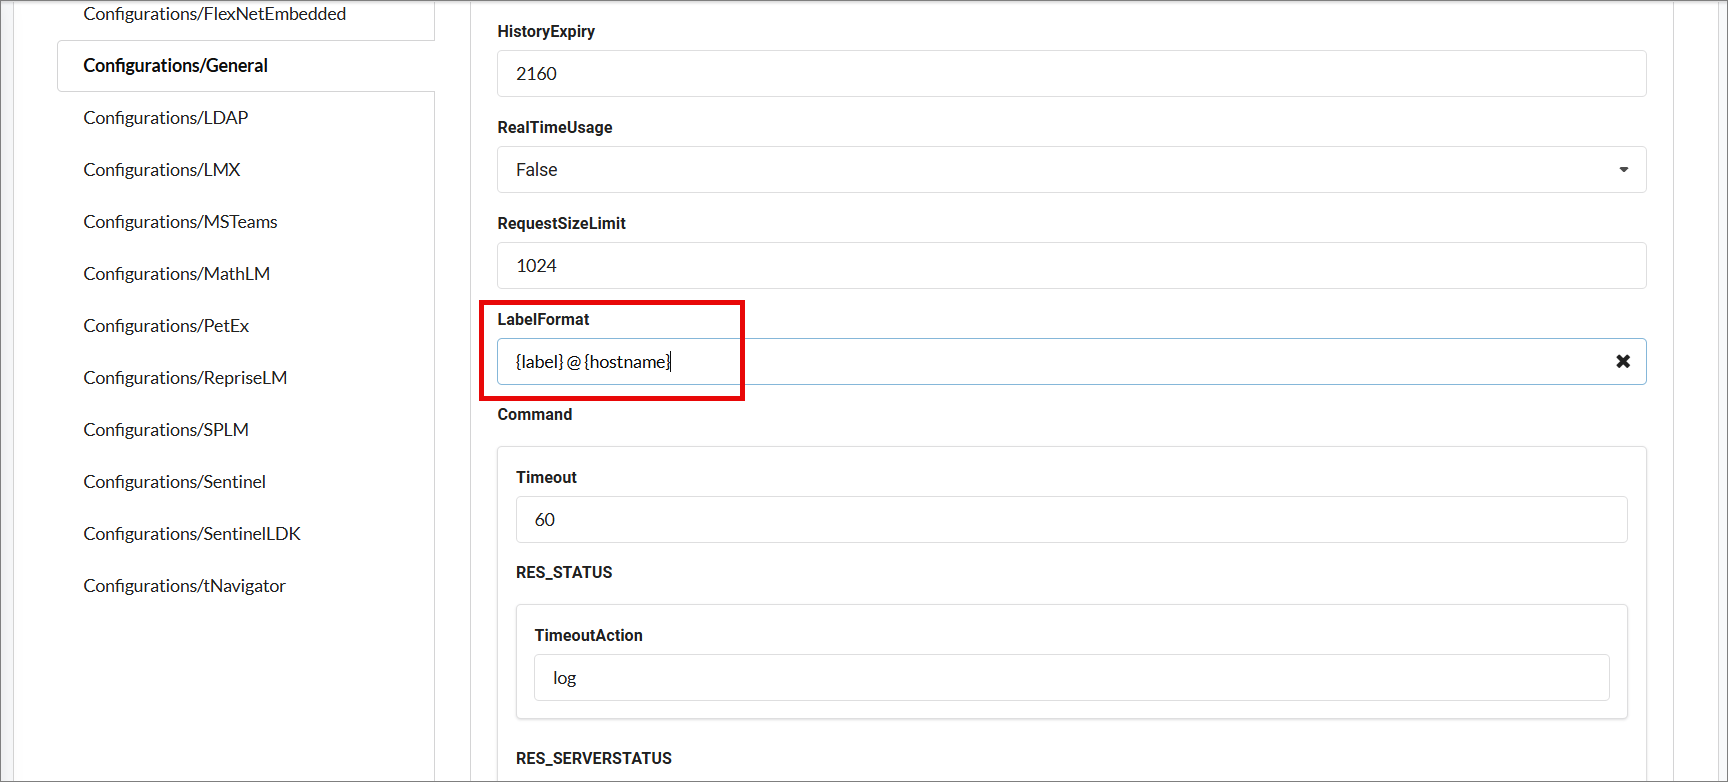 Saving Configurations/General
Go to the Manage page and the vendor labels should already follow the configured format.