Access Management
You must be an Administrator to manage local users, their roles, and access controls.
Managing Roles
Roles and Permissions
CLIMS has two (2) pre-made roles:
Administrator
This is the built-in admin role that has full access permission. Administrators have the full capabilities to manage CLIMS Server and the license servers connected to it. They are also the only users that can navigate to the Identity Server interface and Administration tab to grant privileges to identity roles and users.
The default admin account created upon CLIMS Server installation has the Administrator role.
The user who installed the CLIMS Server automatically becomes an Administrator.
See the list of administrators in Authentication.json, which is in C:\Program Files\OpeniT\Zero\Configuration by default.
User
This role has limited access permission, specifically for license server monitoring only.
The table below shows the default capabilities available for each role/permission.
| Capability | Administrator (Full Access Permission) | User (Limited Access Permission) |
|---|---|---|
| Stop license server | ✔ | ✘ |
| Start license server | ✔ | ✔ |
| Reread license server | ✔ | ✔ |
| View vendor daemon status | ✔ | ✔ |
| View license/options file | ✔ | ✔ |
| Modify license/options file | ✔ | ✔ 🛈 |
| Upload new license file | ✔ | ✔ 🛈 |
| Publish license file to the license server | ✔ | ✘ |
| View license server debug log | ✔ | ✔ |
| View license usage utilization | ✔ | ✔ |
| View users of license | ✔ | ✔ |
| Revoke license usage | ✔ | ✘ |
| View CLIMS Client dashboard | ✔ | ✔ |
| Upgrade CLIMS Clients through the interface | ✔ | ✘ |
| Manage CLIMS configuration | ✔ | ✘ |
| Manage Identity Server | ✔ | ✘ 🛈 |
| Manage Access Controls | ✔ | ✘ |
By default, all members of the Active Directory have the user role, which has limited access permission.
Add a New Identity Role
-
Log in using an Administrator account.
-
On the upper-right corner of the page, click on the username, then select Manage.
-
Once redirected to the Identity Server interface, click on the username again, then select Roles.
-
Under Create a new role, type in the Name of the new role, then click Add.
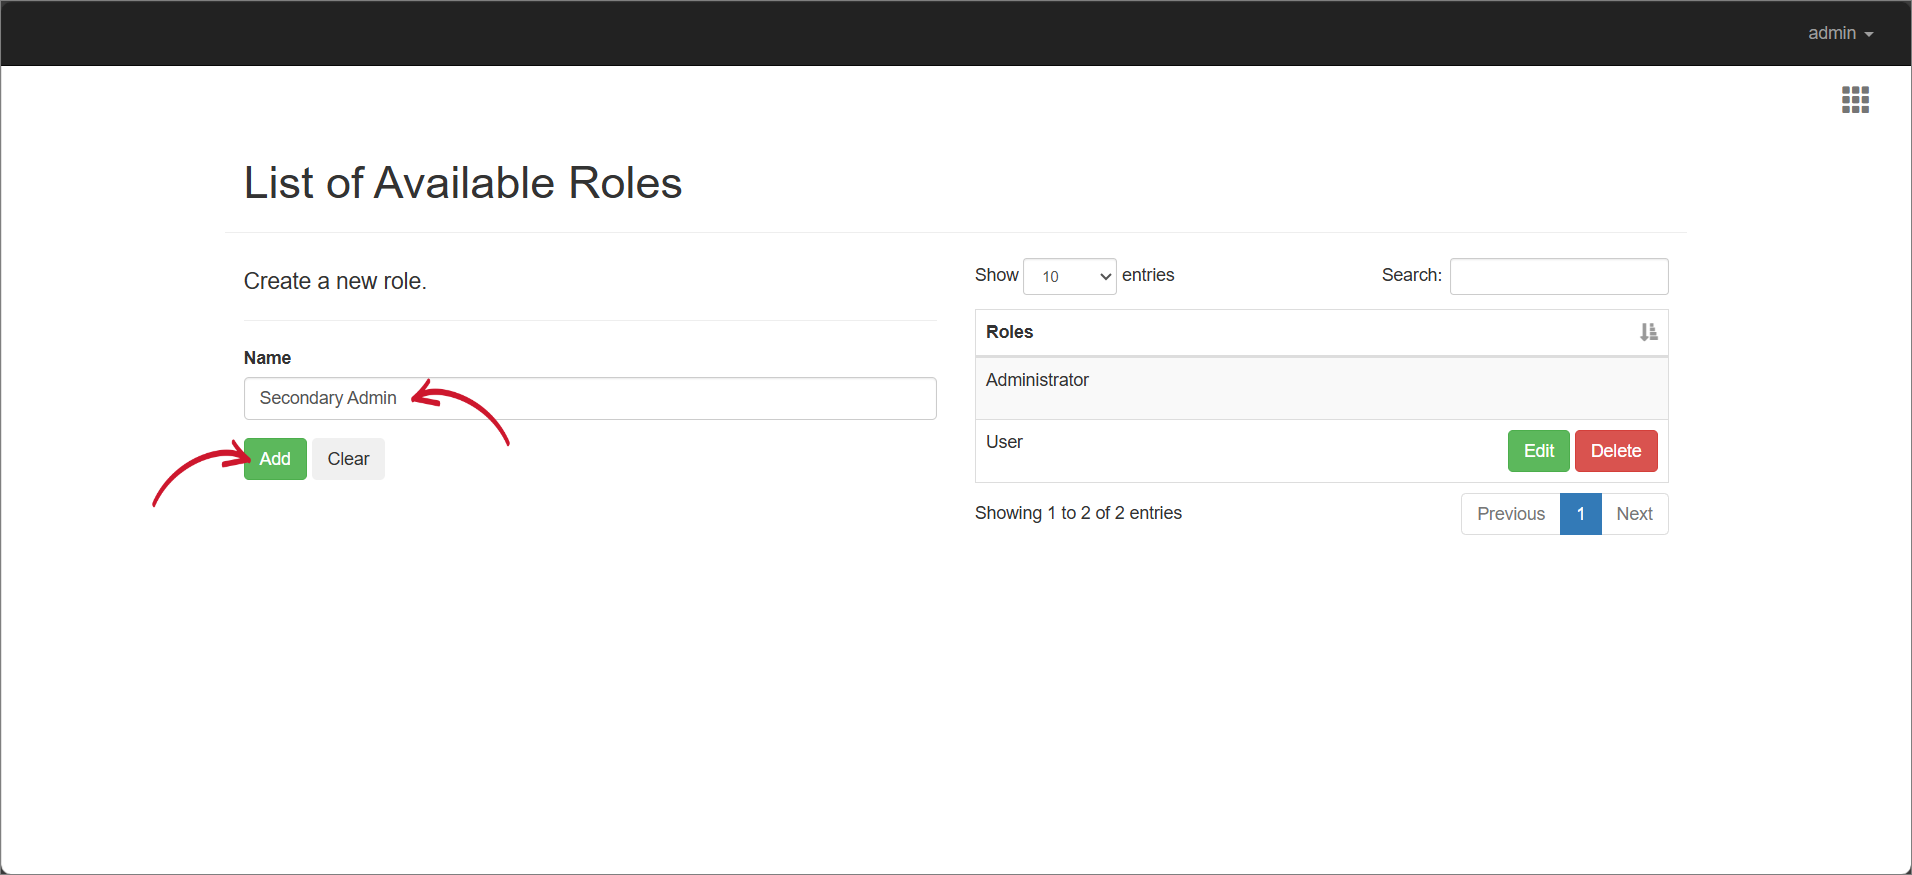 Adding a New Role
Edit an Identity Role
-
Log in using an Administrator account.
-
On the upper-right corner of the page, click on the username, then select Manage.
-
Once redirected to the Identity Server interface, click on the username again, then select Roles.
-
Click the Edit button of the target role.
-
Modify the role name as needed.
-
Click Save.
Delete an Identity Role
-
Log in using an Administrator account.
-
On the upper-right corner of the page, click on the username, then select Manage.
-
Once redirected to the Identity Server interface, click on the username again, then select Roles.
-
Click the Delete button of the target role.
-
Click Continue to proceed.
Add a Domain User or Group to the Administrator Group
To do this, you need to access the machine where the CLIMS Server is installed.
-
Go to the Configuration folder, which is
C:\Program Files\OpeniT\Zero\Configurationby default. -
Create a copy of
Authentication.jsonand rename the duplicate file toAuthentication.Override.json.tipOverride files are used to store custom or environment-specific configuration changes separately from the default configuration. This approach helps preserve the original settings, simplifies upgrades, and ensures that custom modifications are not accidentally overwritten.
Open the existing
Authentication.Override.json, if there is already one. -
In the override file, add the new user(s) and/or group(s) under Administrators following the
domain\\nameformat.Authentication.Override.json},
"Administrators": [
"DOMAIN\\user1",
"SVG\\johnsmith",
"SVG\\development-grp"
]
Managing Local Users
Add a New Local User
-
Log in using an Administrator account.
-
On the upper-right corner of the page, click on the username, then select Manage.
-
Once redirected to the Identity Server interface, click on the username again, then select Users.
-
Click Register new user.
-
Provide the needed details in the registration form.
-
Click Register.
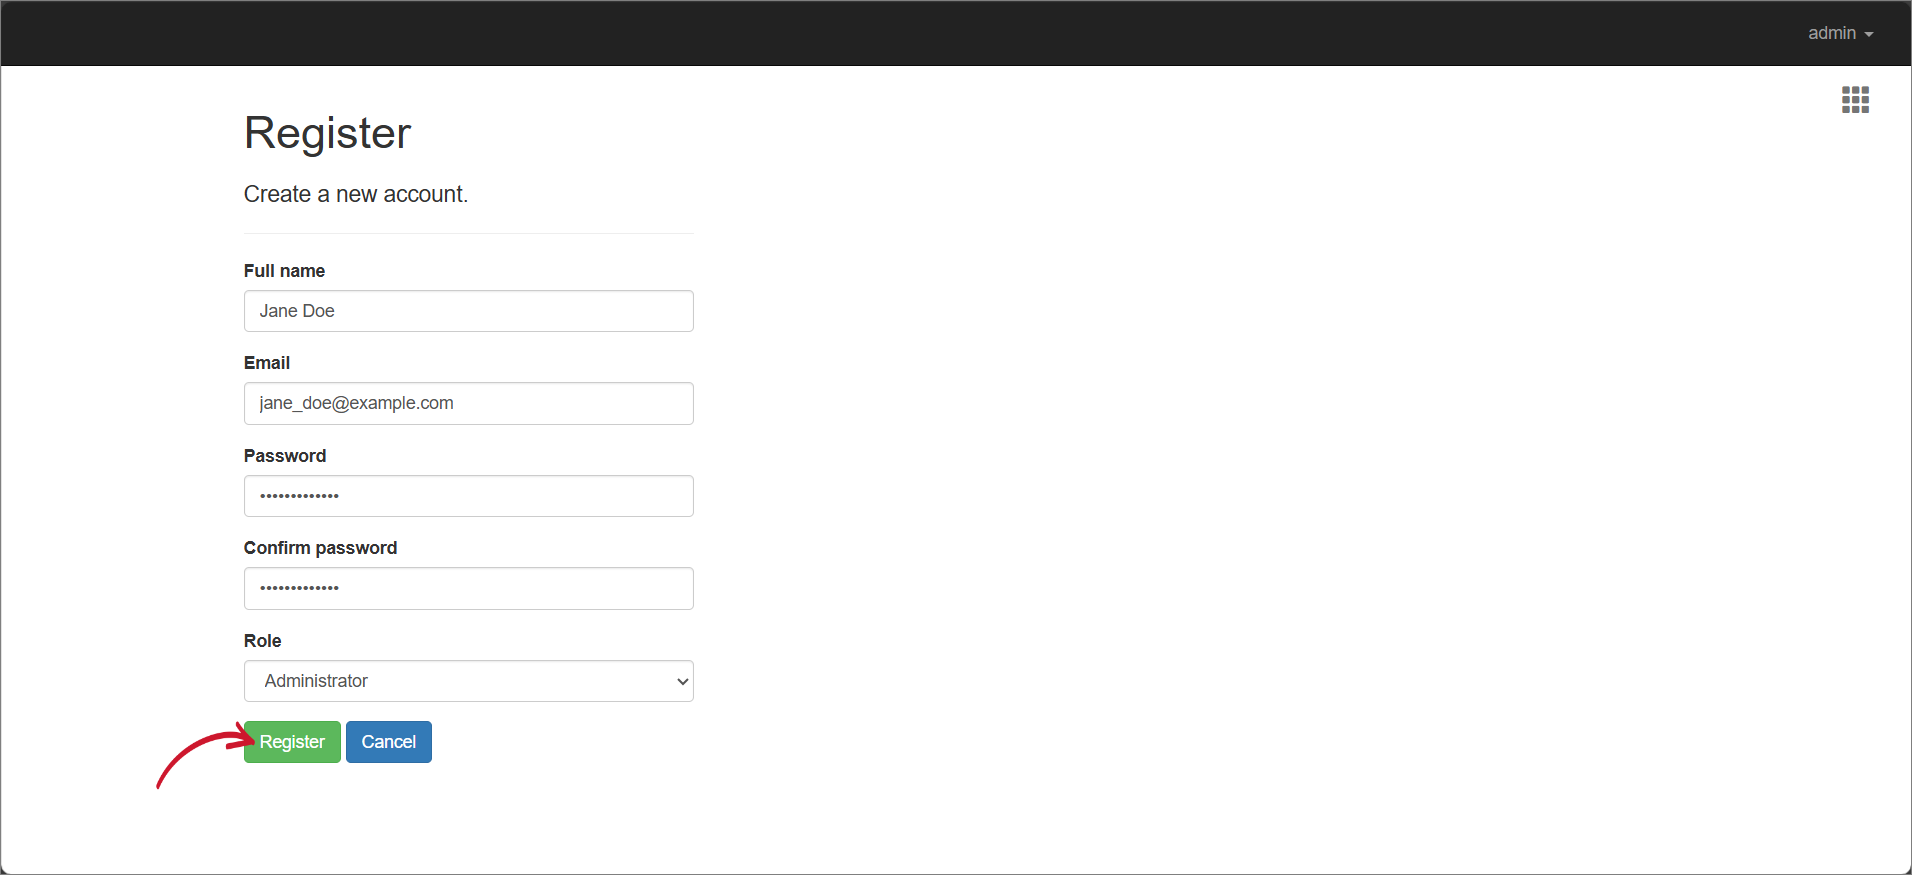 Adding a New User
The password must have at least one non-alphanumeric character, one lowercase, and one uppercase letter.
Edit Local User Details
-
Log in using an Administrator account.
-
On the upper-right corner of the page, click on the username, then select Manage.
-
Once redirected to the Identity Server interface, click on the username again, then select Users.
-
Click the Edit button of the target user.
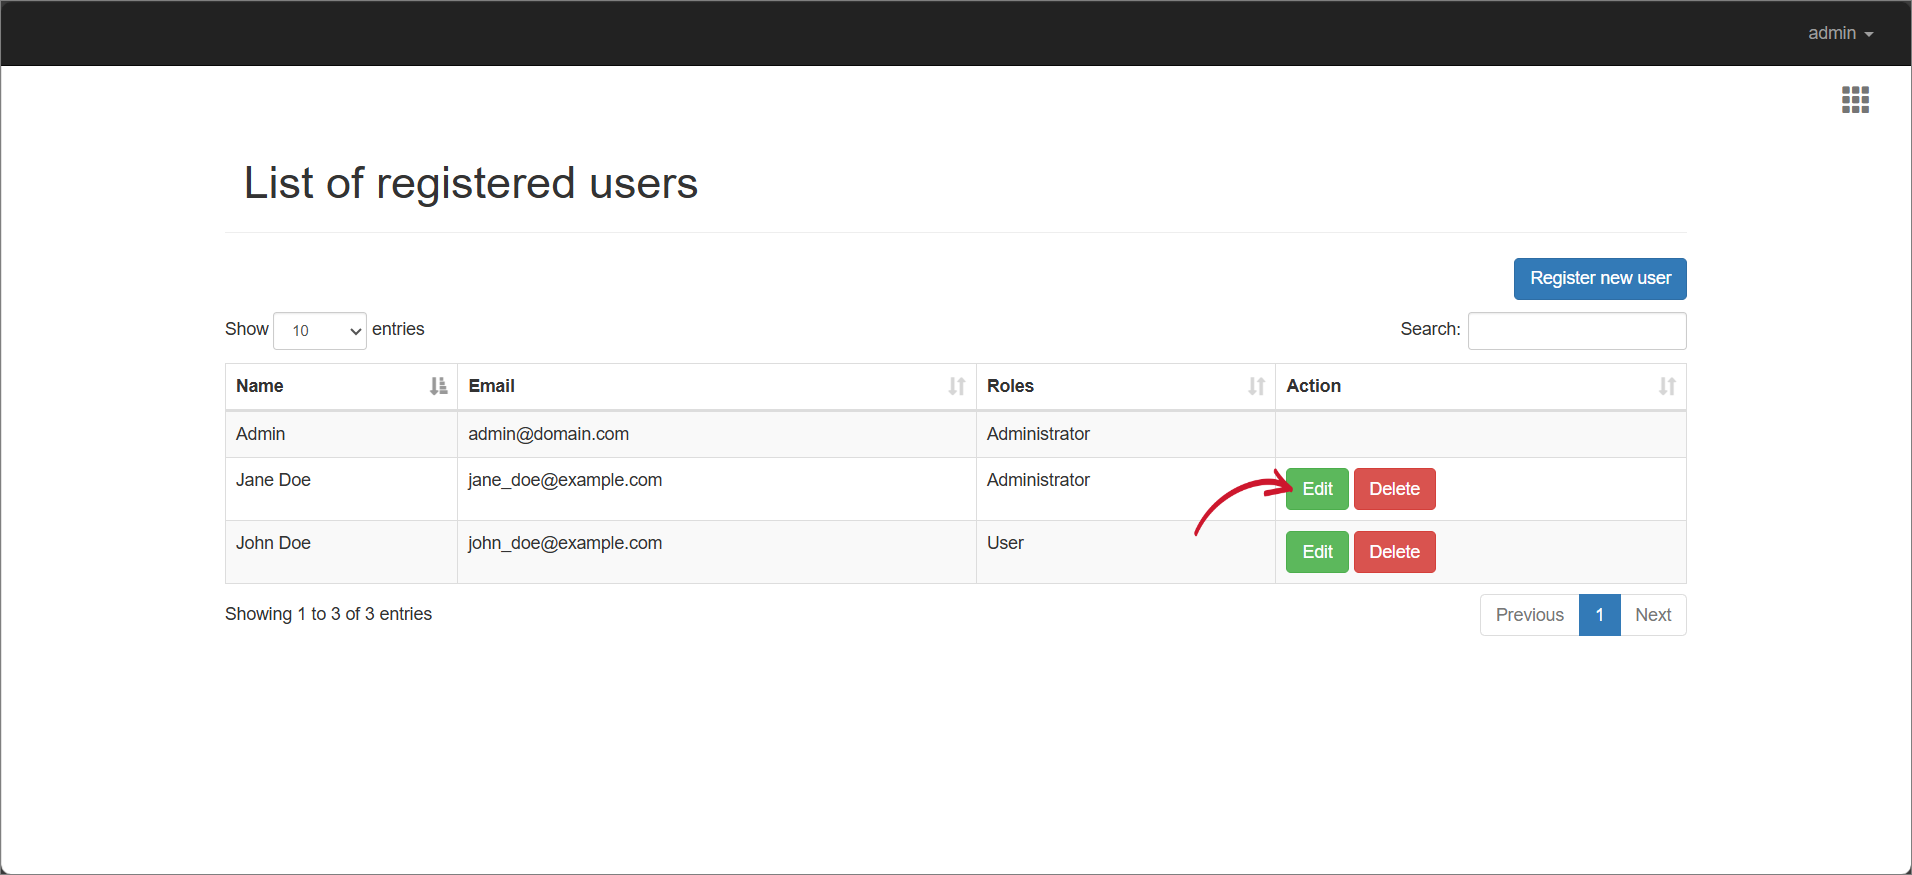 Enable Editing of User Details
-
Update the details as needed.
-
Click Save.
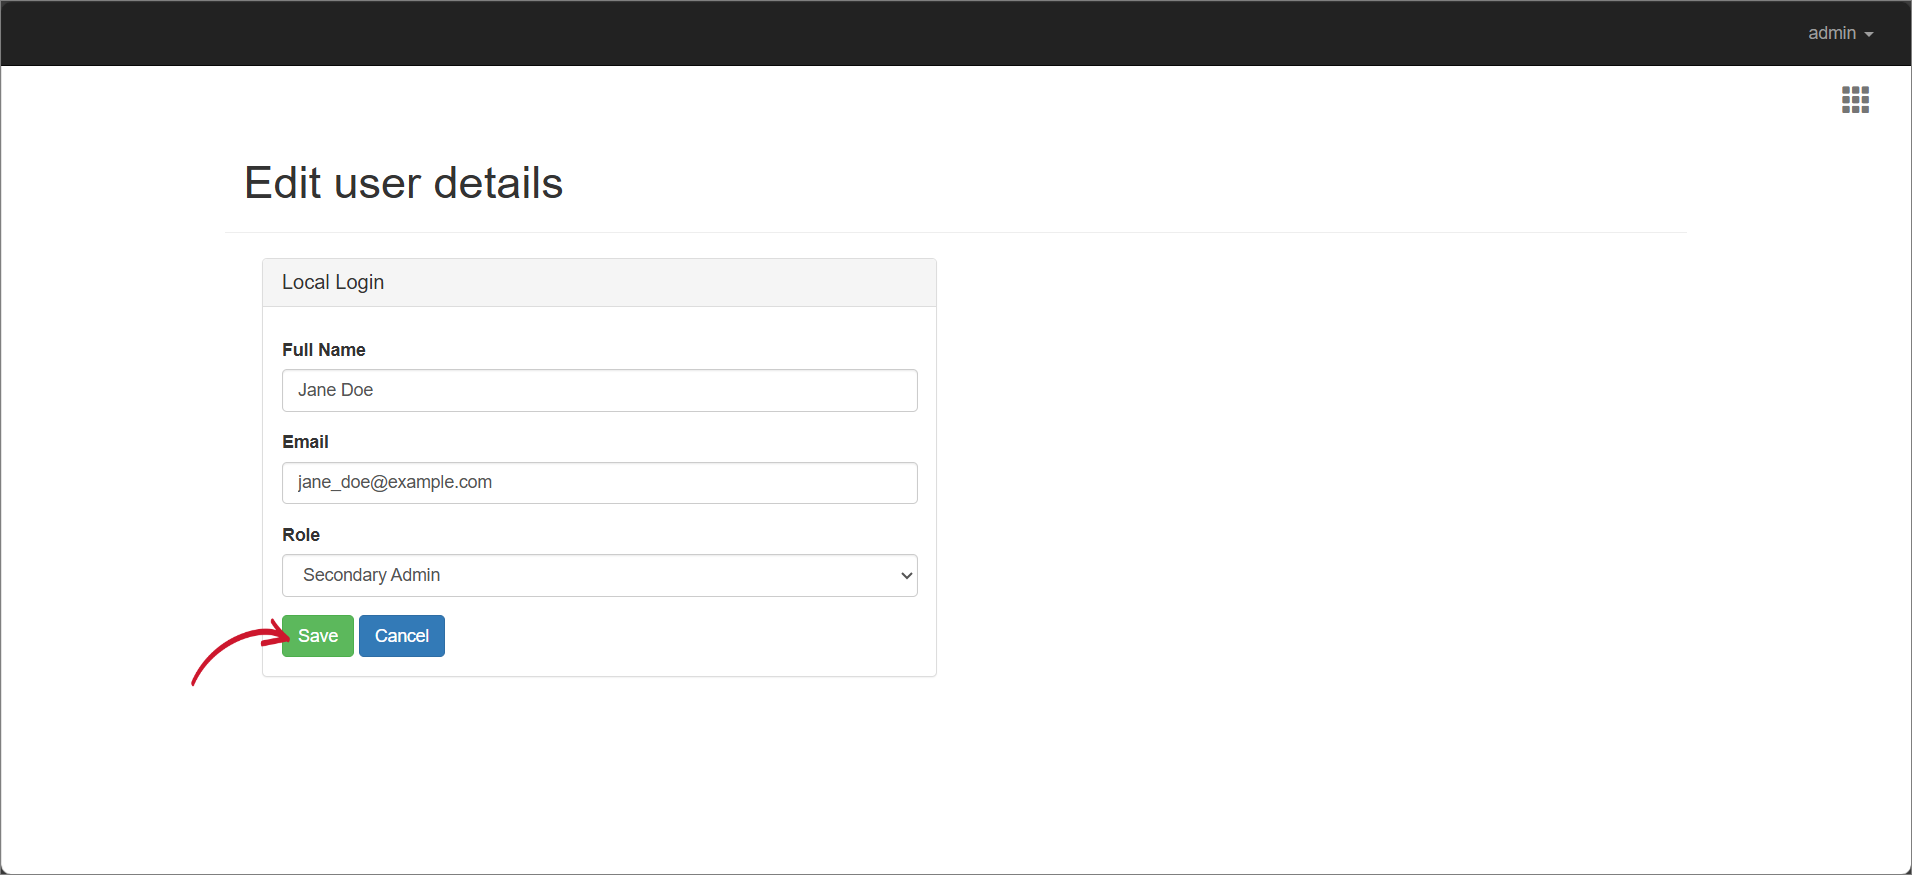 Updating the User Details
Delete a Local User
-
Log in using an Administrator account.
-
On the upper-right corner of the page, click on the username, then select Manage.
-
Once redirected to the Identity Server interface, click on the username again, then select Users.
-
Click the Delete button of the target user.
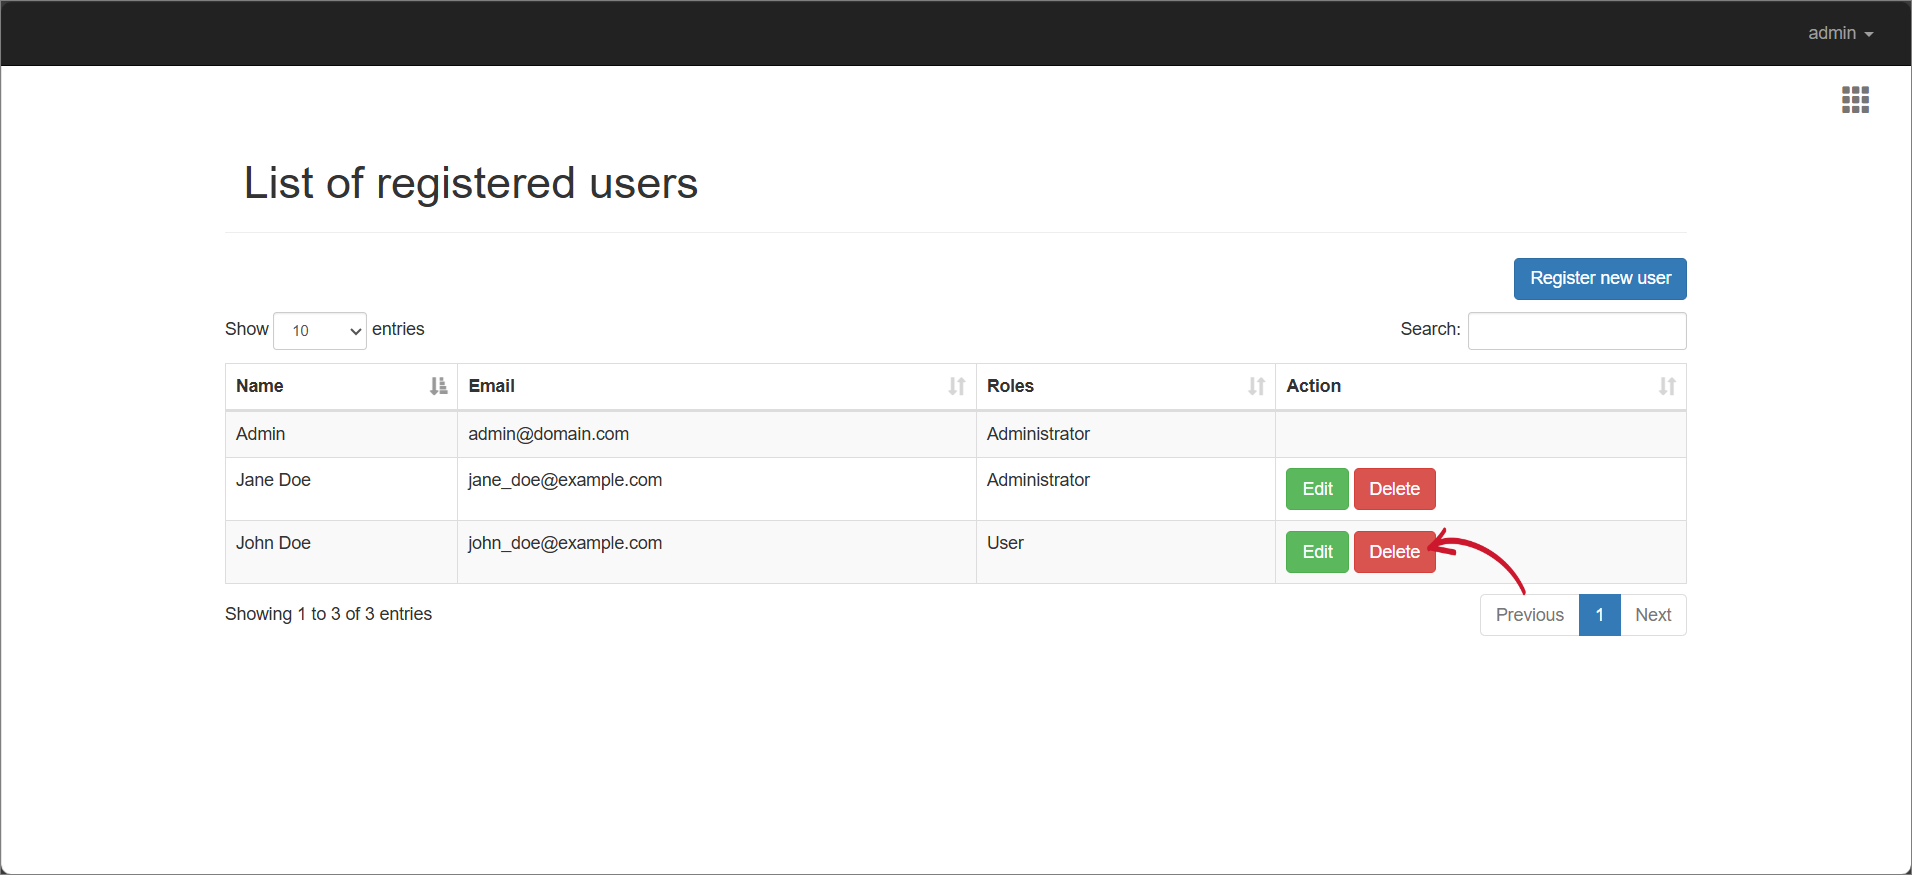 Deleting a User
-
Click Continue to proceed.
Managing Access Control
Access control lets administrators decide on what users can do in CLIMS.
With access control, you can grant permissions, limit available pages, and apply specific access filters. You can set access control for the following entity:
- Users using their Active Directory (AD) username
- Users using their email address from Identity Server
- Active Directory (AD) Groups
- Roles from Identity Server
The default access control, Everyone, applies to all non-admin users.
Once an access control is created, it takes precedence over the default access control.
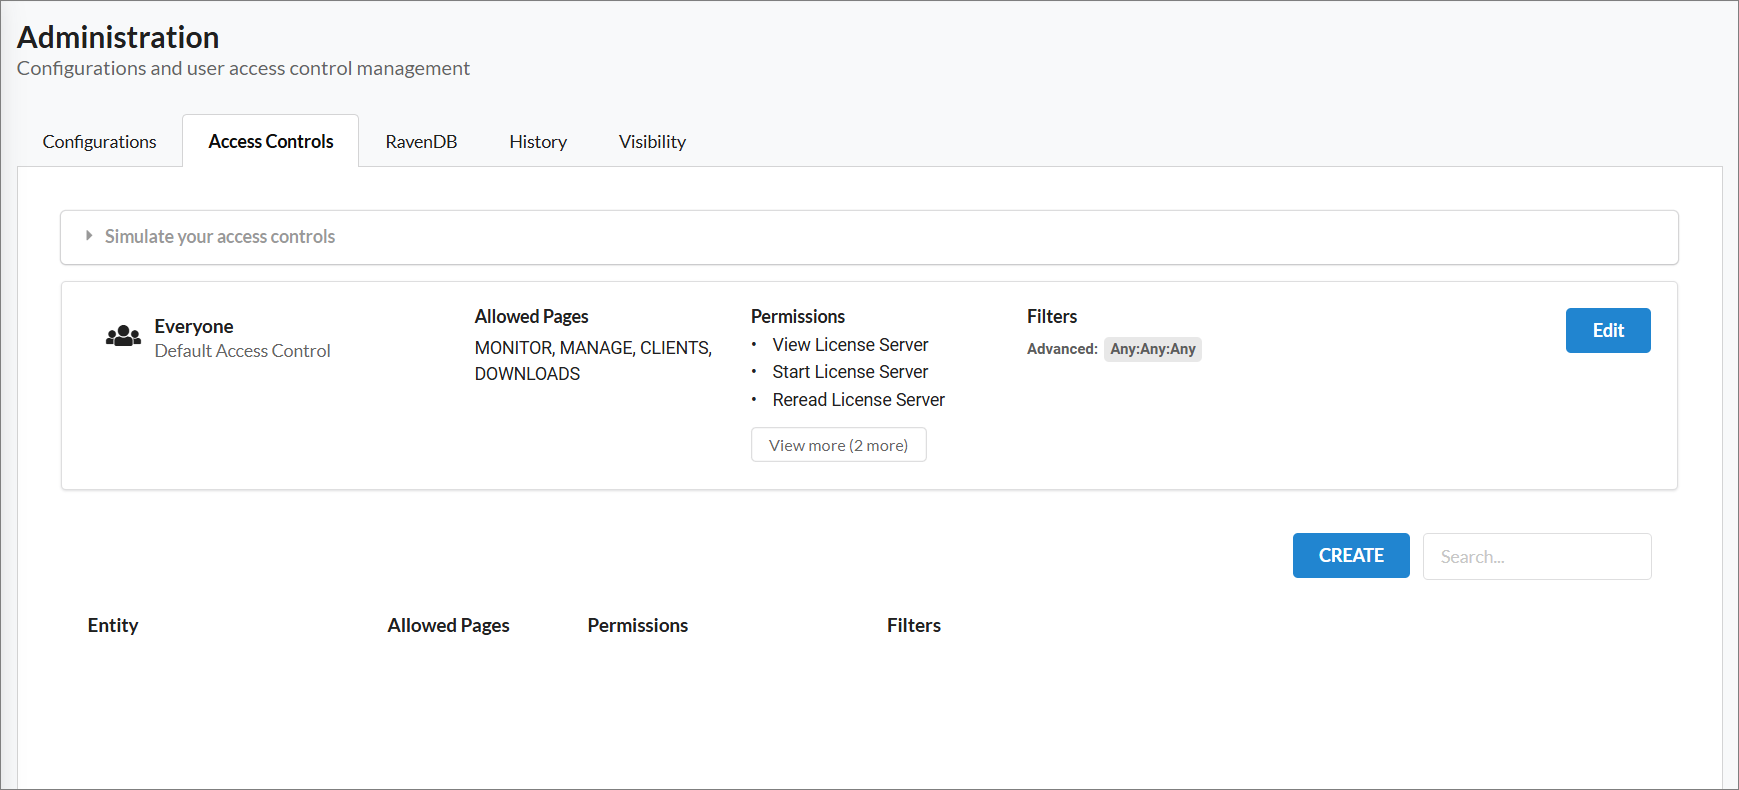
Understanding how CLIMS Access Controls work
The scenarios below discuss the behaviors and limitations of CLIMS' Access Control.
Behaviors
- If a user belongs to multiple AD groups with different access controls, the user inherits all permissions granted to those AD groups.
- An access control with empty permission and filters (basic and/or advanced) adopts the permission and filters of the default access control, Everyone.
- An entity can have multiple access controls.
Limitations
An access control will not take effect if:
- The AD username or AD group is added to the Administrator Group in Authentication.json.
- The user has the Administrator role in the Identity Server.
Administrator permissions always take priority over other access levels.
Create an Access Control
-
Log in using an Administrator account.
-
Go to Administration > Access Controls.
-
Click CREATE.
-
Choose the Entity Type. An access control can be for a specific user or role
-
Provide the Entity Name.
- If the Entity Type is User, type in the user's email address or AD account.
- If the Entity Type is Role, specify the role name or AD group.
For AD groups and usernames, follow the
domain\namesyntax. -
Add basic Filters. You may filter by License Types, Vendor Daemons, and Hosts.
-
For complex filters that require relationship between multiple filter values, enable the Advanced Filters option.
-
Formulate the advanced filter(s), then click Create.
-
Choose the necessary Permissions.
-
Under Page Visibility, select the pages that will be accessible to the access control.
-
Click Save.
Examples
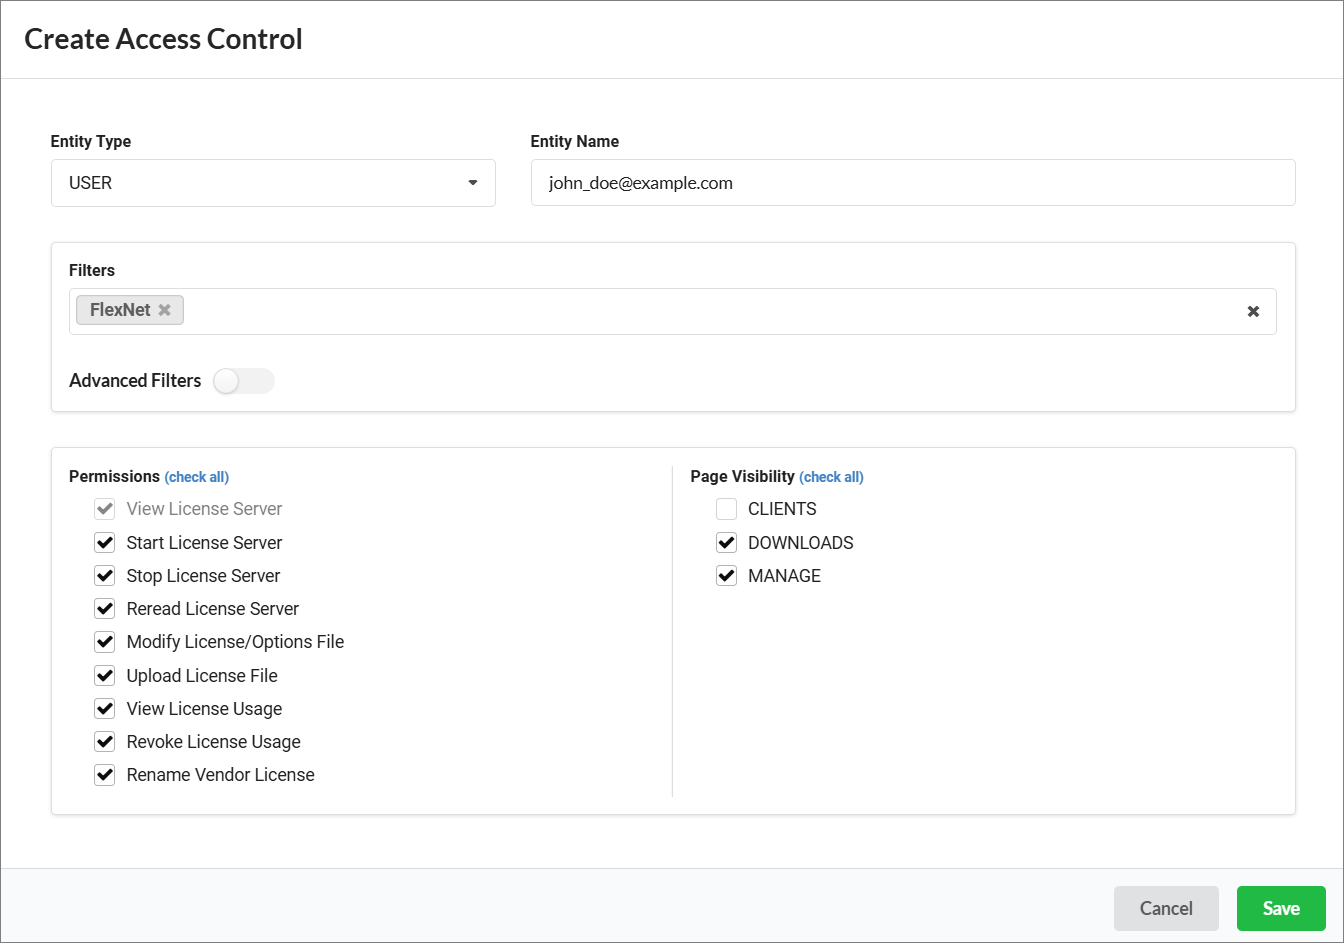
To grant the user john_doe@example.com full permissions to manage FlexNet in any host and access to the Downloads and Manage pages:
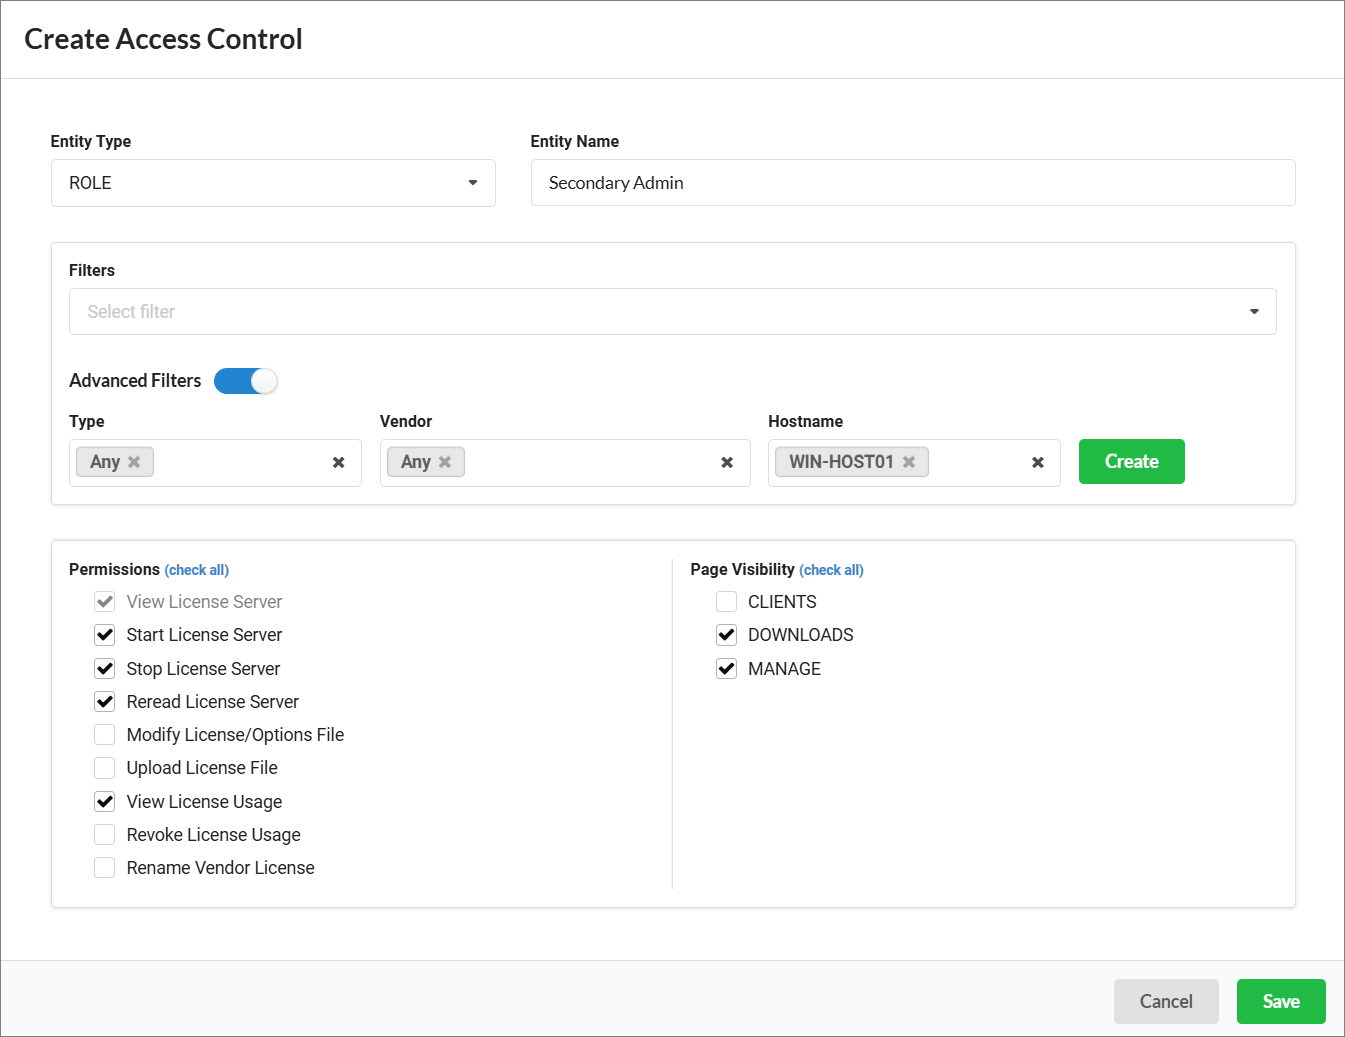
To grant users with the Secondary Admin role selected permissions to manage any vendors in WIN-HOST01 and access to the Downloads and Manage pages:
Edit an Access Control
-
Log in using an Administrator account.
-
Go to Administration > Access Controls.
-
Click the Edit button of the target access control.
-
Update as needed.
-
Click Save.
Delete an Access Control
-
Log in using an Administrator account.
-
Go to Administration > Access Controls.
-
Click the Delete button of the target access control.
-
Click Yes to continue.
Simulating a User Access
Administrators can simulate user access to experience the perspective of a specific user and see how their access controls affect their view.
To start a simulation:
-
Log in using an Administrator account.
-
Go to Administration > Access Controls.
-
Click on Simulate your access controls.
-
Choose the user you want to simulate.
-
Select the role(s) you want to experience in the simulation.
-
Click Start Simulation.
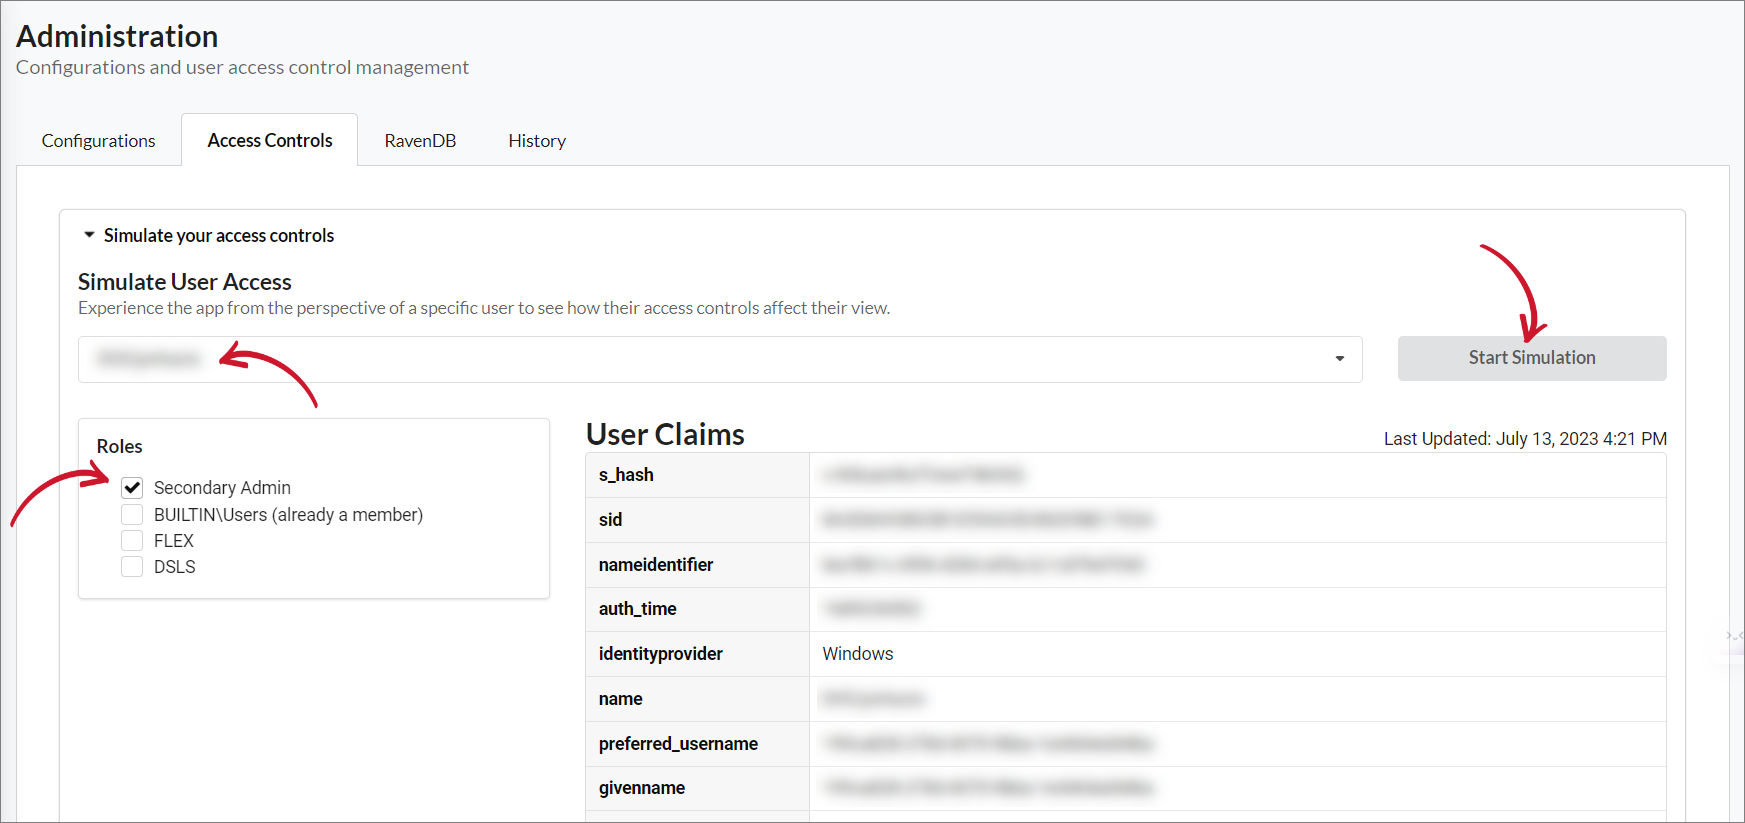 Simulate User Access
-
Click Confirm.
To end a simulation:
-
On the upper-right corner of the page, click on
Viewing as:<User>. -
Click End Simulation.
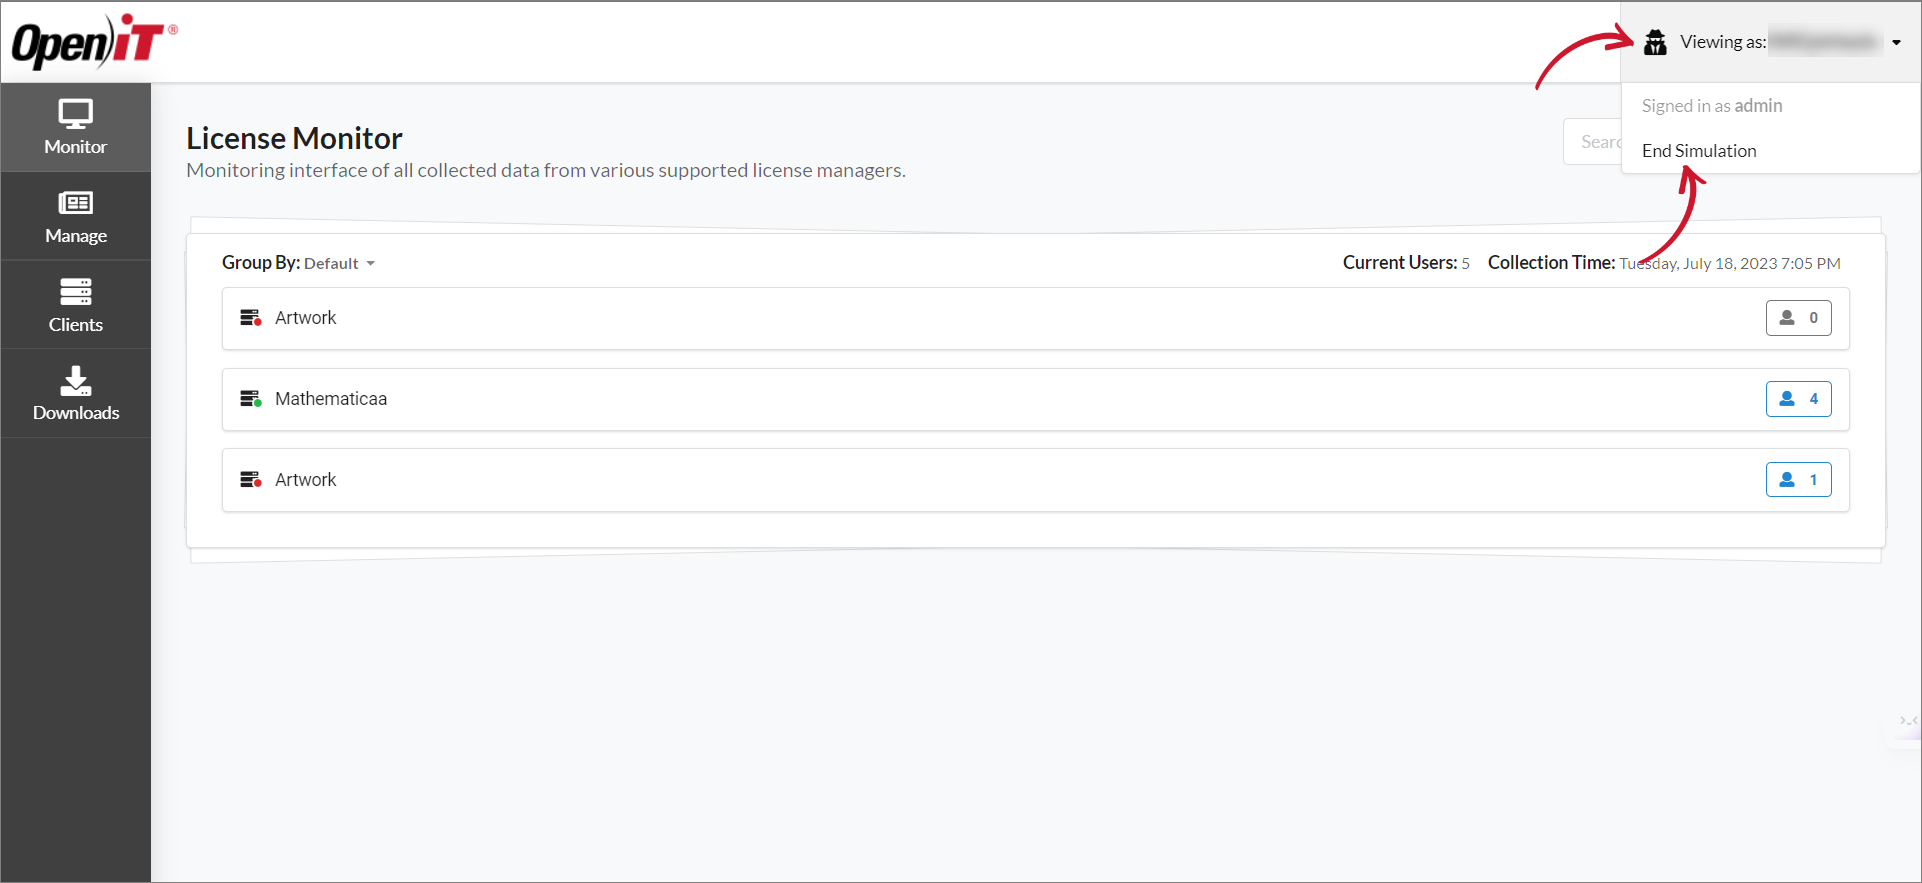 End Simulation