Post-Installation Configuration
This guide provides instructions on important procedures that you should do after a successful installation of Analysis Server.
If Analysis Server was installed with Single Sign-On (SSO) enabled, complete the SSO-specific configuration steps before proceeding with the common post-installation configuration steps.
SSO-Specific Configuration
Complete this section only if Analysis Server was installed with Single Sign-On (SSO) enabled.
-
Import SSL Certificate. Use these instructions to successfully import a valid SSL certificate.
-
Website Binding to HTTPS. Use these instructions to create website binding to https to host the Analysis Server.
-
Please follow the instructions for application registration for the specific OIDC (OpenID Connect):
-
Microsoft Entra ID (Azure) - Microsoft Entra ID (Azure) - Application Registration. Use these instructions to register the Analysis Server application to your Azure Active Directory.
-
Zitadel - Zitadel Management Console - Application Registration. Use these instructions to register the Analysis Server application to your Zitadel instance.
-
Okta - Okta Admin Console - Application Registration. Use these instructions to register the Analysis Server application to your Okta instance.
-
Keycloak - Keycloak Administration Console - Client Registration. Use these instructions to register the Analysis Server application to your Keycloak instance.
-
-
Please follow the instructions for application setting configuration for the specific OIDC (OpenID Connect):
-
Microsoft Entra ID (Azure) - Application Settings Configuration for Microsoft Entra ID (Azure) - SSO. Use these instructions to configure the Analysis Server for a successful Single Sign-On authentication using Azure (Microsoft Entra ID).
-
Zitadel - Application Settings Configuration for Zitadel - SSO. Use these instructions to configure the Analysis Server for a successful Single Sign-On authentication using Zitadel instance.
-
Okta - Application Settings Configuration for Okta - SSO. Use these instructions to configure the Analysis Server for a successful Single Sign-On authentication using Okta instance.
-
Keycloak - Application Settings Configuration for Keycloak - SSO. Use these instructions to configure the Analysis Server for a successful Single Sign-On authentication using Keycloak instance.
-
-
Administration Tab Access Configuration. Use these instructions to configure users and groups that will have access to the Analysis Server web interface Administration tab.
Configuration for Separate Core Server and Analysis Server Hosts
Complete this section only if Analysis Server is installed on a different machine from Core Server.
Configure the Core Server Workspace
Apply the configurations shown in the Open iT Core Server.
Update the Core Server workspace.yaml file to connect the Analysis Server code location to the Dagster daemon running on Core Server.
-
Go to the instance directory, which is by default in
C:\Program Files\OpeniT\Core\Configuration\dagster\instance, and open theworkspace.yamlfile. -
Add or update the
analysisservercode location underload_from.workspace.yamlload_from:
- grpc_server:
host: localhost
port: 4266
location_name: coreserver
- grpc_server:
host: <as_hostname>
port: <as_port_number>
location_name: analysisserverwhere
<as_hostname>is the host name of your Analysis Server and<as_port_number>is the port number where your Analysis Server is running.Exampleload_from:
- grpc_server:
host: localhost
port: 4266
location_name: coreserver
- grpc_server:
host: WIN-HOST01
port: 4268
location_name: analysisserver -
Save the changes.
Verify the Orchestrator Environment Variables
On the Analysis Server host, verify that the following system environment variables were created during installation:
DAGSTER_HOMEOPENIT_GRPC_AS_PORT
Make sure that:
DAGSTER_HOMEpoints to the Dagster home directory used by Analysis Server.OPENIT_GRPC_AS_PORTcontains the gRPC port used by the Analysis Server code location.
Verify the Dagster Configuration File
-
Go to the directory specified by the
DAGSTER_HOMEenvironment variable. -
Verify that the
dagster.yamlfile exists. -
Open
dagster.yamland verify that it contains the PostgreSQL storage and queued run coordinator configurations.dagster.yamlstorage:
postgres:
postgres_db:
username: <postgresql_user>
password: <postgresql_password>
hostname: <coreserver_hostname>
db_name: openit
port: 5432
run_coordinator:
module: dagster._core.run_coordinator
class: QueuedRunCoordinatorwhere:
<postgresql_user>is the super admin username used in your PostgreSQL setup.<postgresql_password>is the password of the super admin used in your PostgreSQL setup.<coreserver_hostname>is your Core Server host name.
Examplestorage:
postgres:
postgres_db:
username: postgres
password: postgresql_password
hostname: WIN-HOST01
db_name: openit
port: 5432
run_coordinator:
module: dagster._core.run_coordinator
class: QueuedRunCoordinator
Verify the Analysis Server Code Location Service
On the Analysis Server host:
-
Open Services.
-
Right-click the Open iT Analysis Server Pipeline service, then select Properties.
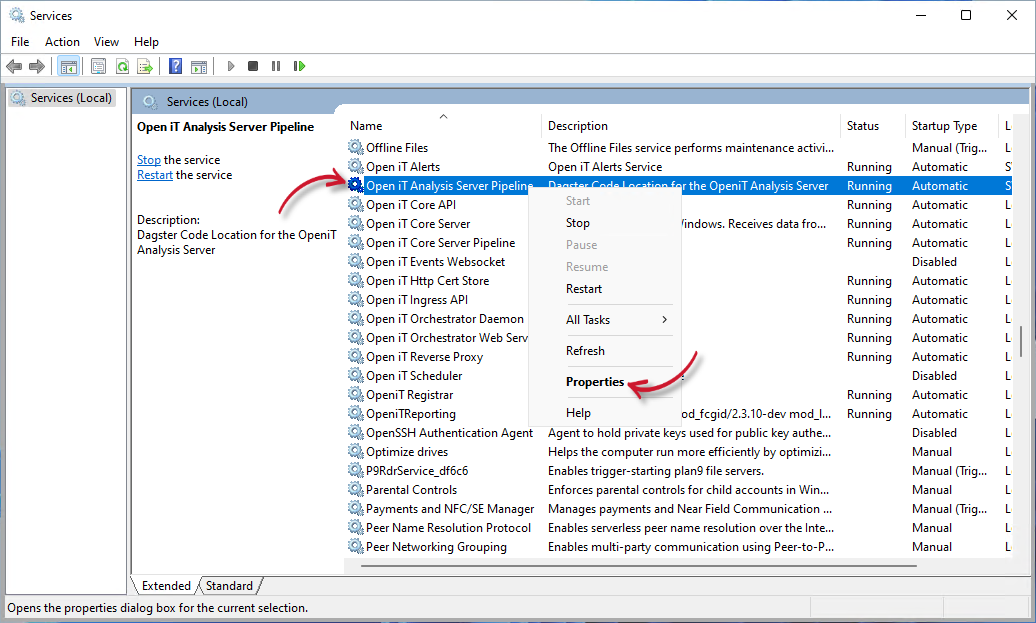 Analysis Server Pipeline Service Properties
 -
On the General tab, make sure that Startup type is set to Automatic.
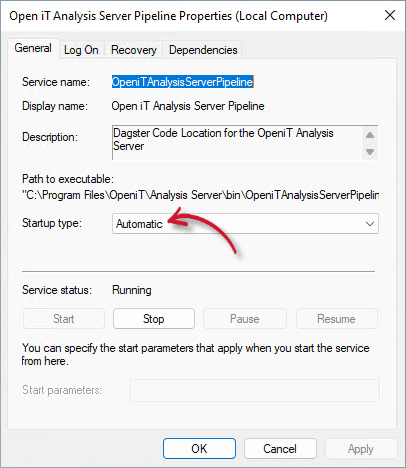 Analysis Server Pipeline Service Startup Type
If the service does not start, review the service logs and Dagster code location error logs for troubleshooting.
Common Post-Installation Configuration
Complete the following steps for all Analysis Server installations.
-
Create and Deploy SQL Database. Background processes of the Analysis Server use an SQL Server database. Furthermore, the successful rendering of the web interface requires the creation and deployment of the SQL and OLAP databases.
-
Create and Deploy OLAP Database. OLAP database is used to successfully create reports using the Analysis page and some other external reporting tools.
-
Switch to Columnstore. It is recommended to switch to Columnstore Index to maximize the features and improvements that Columnstore offers.
-
Install and Configure SSRS. Use these instructions to properly set up and configure Analysis Server Reporting Services.
noteThe Analysis Server service account should have access to the SSRS installation. The System User role is enough.
-
Install SSRS. Perform this step only if SSRS was not installed during the process of meeting the installation requirements for Analysis Server.
-
-
Verify that the Analysis Server code location is successfully loaded. Follow these instructions:
a. Access the Data Processing GUI by navigating:
-
With Ingress:
https://<ingress-uri>/dagster-webserveror use the link in the navigation menu.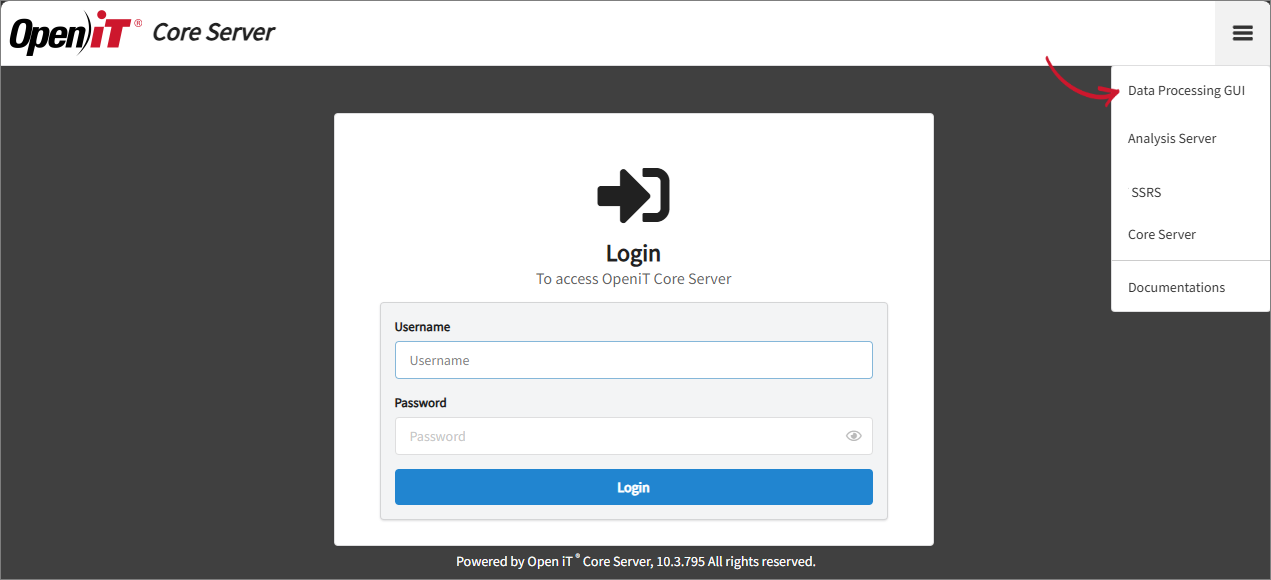 Data Processing GUI Link
 -
Without Ingress:
http://localhost:27910/dagster-webserver
b. In the left navigation, click Deployment. Make sure that the Status of analysisserver code location is Loaded.
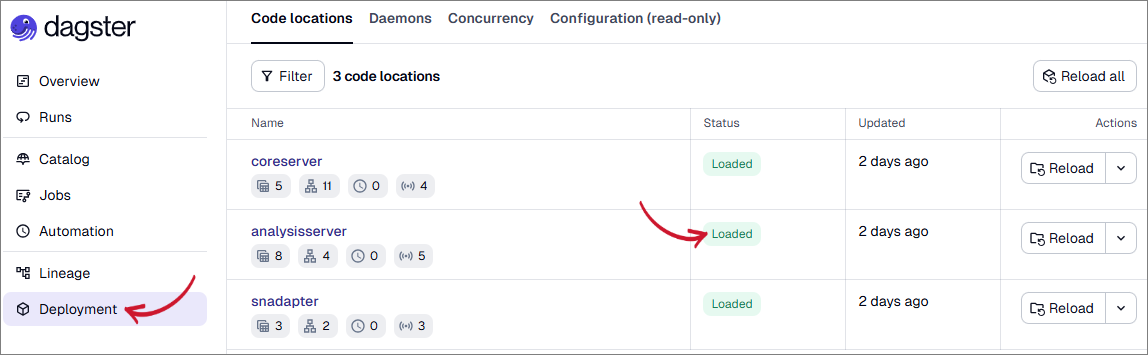 Analysis Server Code LocationNOTE
Click View Error to see the error logs for troubleshooting.
-
-
Access the Web Interface. After creating and deploying the SQL and OLAP databases, the Analysis Server web interface will be accessible.
-
Set the Core Server Database Path. Use these instructions to set the Core Server database path for Analysis Server data loading.
warningMake sure to locate the configuration key Root.Etl.CoreDatabasePath.
-
Configure Mapping Sources. Use these instructions to set up the mappings for Active Directory information and user to groups mapping.
-
Configure Time Zones. Use these instructions to set up the proper Time Zones to use in processing the data and reporting.
-
Synchronize Core Server Data. Use these instructions to load and process data from the Core Server into the Analysis Server database.
-
Review and Apply HTTP/TLS Recommendations. Use these instructions to apply recommended HTTP/TLS security hardening.