We’re upgrading your documentation experience!
A new doc website is live at docs.openit.cloud — a temporary preview during our transition. This website is now in maintenance-only mode (only critical issues will be addressed).
Explore the new website and send us your feedback!
#
Adobe Creative Cloud
#
Introduction
Open iT supports Adobe Creative Cloud usage reporting by collecting application usage and logs from Adobe applications and user information from the Adobe Admin Console via the User Management API (UM API).
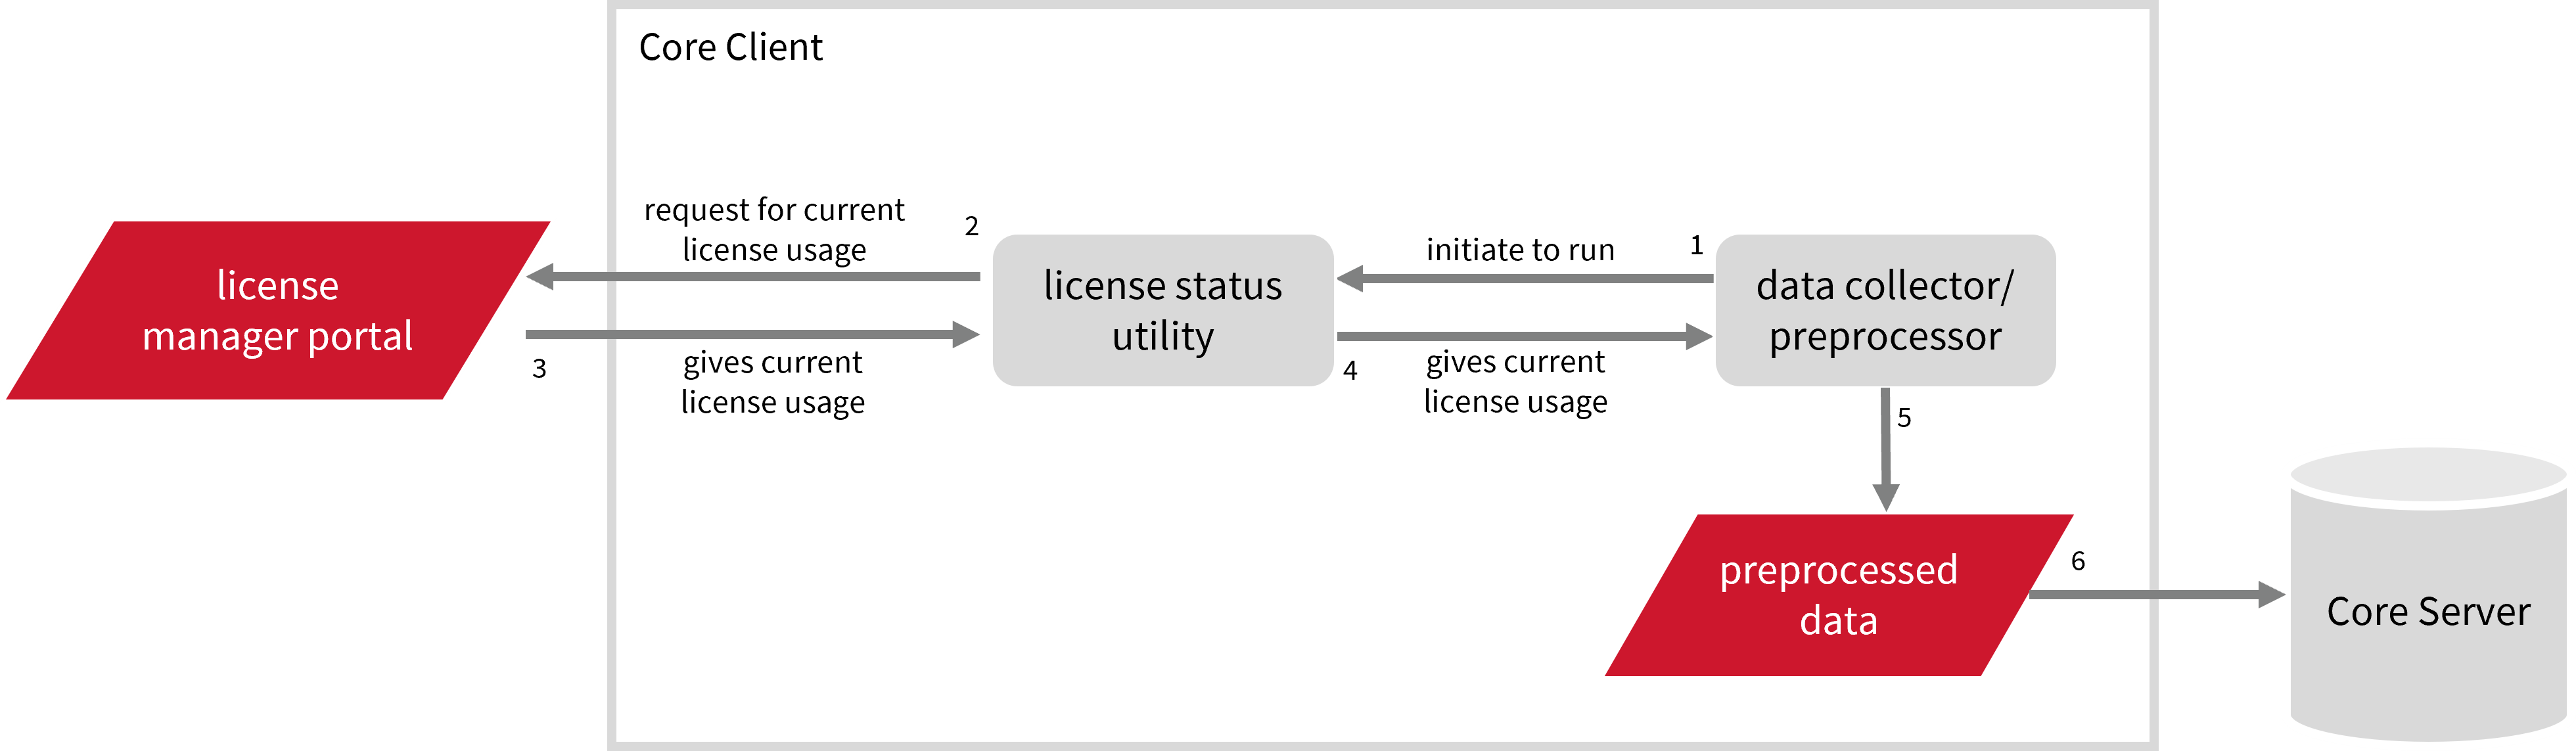
For this collection, the data source is through an API. The data collector/preprocessor initiates the license status utility every hour using a 5-minute sample interval, triggering the data collection process. The license status utility requests the current license usage data from the license manager portal. After the license manager portal provides the requested data, the license status utility passes this information to the data collector/preprocessor. The data collector/preprocessor processes the data, preparing it for transmission. Finally, the preprocessed data is sent to the Core Server every night, according to the client's timezone, for further storage, completing the license usage data collection and processing.
These will produce the following aggregated data types used for historical reporting:
- (89) Total License Use Licenseevents
- (90) Individual License Use Licenseevents
- (91) Usergroup License Use Licenseevents
- (108) Host License Use Licenseevents
- (109) Hostgroup License Use Licenseevents
- (118) Product Inventory
- (139) License Subscription Inventory v2
- (140) License Product Assignment v2
The following sections will guide you in setting up the necessary configuration to collect and send the required data to the server.
Apply the configurations shown in the Open iT server.
#
Requirements
- An Open iT Client connected to an Open iT Server or a coexistent Open iT setup
- Activated LicenseAnalyzer collection and Adobe workstation collectors
- Adobe Enterprise Plan
- Administrator privileges in the Adobe Developer Console
#
Obtaining the Adobe API Access Credentials
You need the following credentials to access the UM API:
- Scope
- Organization ID
- Client ID
- Client Secret
To get these access credentials, create a project in the Adobe Developer Console that integrates with the UM API.
Log in to the Adobe Developer Console using an account with administrative rights.
Add and configure an API to your project. Select User Management API from the list of Adobe services.
After configuring UM API to your project, go to the Project overview page to view the API credential details.
#
Migrating to OAuth Server-to-Server Credentials
Adobe is moving from Service Account (JWT) credentials to OAuth Server-to-Server credentials.
Starting from Open iT version 10.2, necessary updates to fully support Adobe's migration to the OAuth model have been implemented. These updates require the following steps to ensure continuous Open iT integration with Adobe's new credential system.
Add the new credential to your existing project that uses Service Account (JWT) credentials.
Reconfigure the Adobe Cloud data collection to update the API access credentials.
#
Configuring Cloud Data Collection
These are the required steps to configure collection of Adobe Cloud data.
Go to the Components directory, which is by default in
C:\Program Files\OpeniT\Core\Configuration\Components.Open
adobecloudcollector.xml.Input the API access credentials in their respective value attribute.
adobecloudcollector.xml... 10| <Object> 11| <Name>scope</Name> 12| <Description>This is required for OAuth Server-to-Server Credentials</Description> 13| <Value type="String">Insert string of scopes here (Comma-separated)</Value> 14| </Object> 15| 16| <Object> 17| <Name>org_id</Name> 18| <Description>This is required for OAuth Server-to-Server and JWT Credentials</Description> 19| <Value type="String">Insert the organization ID (IMS_ORG_ID or ORG_ID) here</Value> 20| </Object> 21| 22| <Object> 23| <Name>client_id</Name> 24| <Description>This is required for OAuth Server-to-Server and JWT Credentials</Description> 25| <Value type="String">Insert the client ID (CLIENT_ID) here</Value> 26| </Object> 27| 28| <Object> 29| <Name>client_secret</Name> 30| <Description>This is required for OAuth Server-to-Server and JWT Credentials</Description> 31| <Value type="String">Insert the client secret (CLIENT_SECRET) here</Value> 32| </Object> 33| ...Save the changes.
#
Activating Cloud Data Collection
These are the required steps to activate collection of Adobe Cloud data.
Go to the scheduler directory, which is by default in
C:\Program Files\OpeniT\Core\Configuration\scheduler, and opencollect_license_adobe-cloud.oconf.Locate and set
root.scheduler.jobs.collect_adobe_cloud.general.activetotrueto activate the collection of Adobe Cloud data.collect_license_adobe-cloud.oconf13| } 14| general 15| { 16| active 17| { 18| type=bool 19| value=trueSave the changes.
Refer to the Adobe Cloud Data Job Scheduler Instances Configuration table to learn the attributes used to configure Adobe Cloud data collection.
#
Configuring Application Usage Tracking in the Workstations
These are the required steps to monitor Adobe application usage in the workstations.
Go to the Configuration directory, which is by default in
C:\Program Files\OpeniT\Core\Configuration.Open
appusage_process_rules-adobe.conf.Copy the file contents.
From the same directory, open
appusage_process_rules_master.conf.Paste the copied contents.
Add the copied contents as new entries/lines in the file. Make sure that the existing configurations in
appusage_process_rules_master.confare kept as is.Save the changes.
#
Distributing Files to the Clients
Files from the server automatically reflect on the client after restarting the client service or every 6 hours, which is the default schedule for file distribution. However, you can manually download the file configuration:
Manually Downloading the Distributable Configuration Files Package
#
Next Steps?
Mapping Adobe Username to Email Address Renaming Vendor License Renaming Features Create and Add Report License Monitor