Forward Proxy
The Forward Proxy provides a seamless way to automatically send collected data from your local environment to a centralized server. It is built to deliver data reliably and efficiently, ensuring that information reaches its destination without the need for constant manual handling.
With flexible configuration options, the system can be tailored to fit different workflows and requirements. By reducing manual intervention, it helps streamline operations, improve data consistency, and support timely decision-making across your organization.
To support reliable data delivery, the Forward Proxy uses a background job system powered by Hangfire to manage and track data processing tasks. This allows operations to run asynchronously, automatically retry when failures occur, and continue processing even after interruptions or restarts. Hangfire uses a persistent database (Hangfire DB) to store job states, enabling tasks to be recovered and resumed when needed. By default, Hangfire DB uses SQLite. However, it can also be configured to use other database systems, such as SQL Server and PostgreSQL.
Forward Proxy Configuration
Step 1: Open the CoreAPI Configuration Directory
-
Go to the OpeniT CoreAPI Configuration directory.
By default, this is in
C:\Program Files\OpeniT\Core\service\openit_coreapi.
Step 2: Create or Open the Override File
-
Create a copy of
Forwarding.json. -
Rename the duplicate file to
Forwarding.Override.json.tipOverride files are used to store custom or environment-specific configuration changes separately from the default configuration. This approach helps preserve the original settings, simplifies upgrades, and ensures that custom modifications are not accidentally overwritten.
-
If a
Forwarding.Override.jsonfile already exists, open the existing file instead.
Step 3: Provide the Server URL
-
In the override file, update the value of the NewServerUrl where the data will be sent.
Forwarding.Override.json{
"Forwarding": {
"NewServerUrl": "http://server:port",
"ValidateSslCertificate": true,
"IncomingSaveDir": "incoming_save",
"ScheduleCron": "*/5 * * * *",
"MaxParallelism": 6,
"MaxBatchSize": 1024,Example{
"Forwarding": {
"NewServerUrl": "https://WIN-HOST01:1234",
"ValidateSslCertificate": true,
"IncomingSaveDir": "incoming_save",
"ScheduleCron": "*/5 * * * *",
"MaxParallelism": 6,
"MaxBatchSize": 1024, -
(Optional) You may also update the other data forwarding configurations as needed.
Configuration Key Description ValidateSslCertificateUse this to determine whether the SSL/TLS certificate presented by the destination server is validated during connection.
By default, this is set totrue. Setting this value tofalseis not recommended and should only be done with a full understanding of the associated risks. This setting is intended for internal use only.IncomingSaveDirUse this to specify the directory where incoming files are temporarily stored before processing. ScheduleCronUse this to specify the cron expression that defines how often the forwarding job runs. The default value is */5 * * * *, which means the job will run every 5 minutes. MaxParallelismUse this to specify the maximum number of concurrent forwarding operations. The default value is 6. MaxBatchSizeUse this to specify the maximum number of files included in a single batch for forwarding. The default value is 1024. Data Forwarding Configuration Settings
Step 4: (Optional) Modify Connection and Timeout Settings
-
Update the connection and timeout-related settings in the configuration file as needed.
Forwarding.Override.json"HttpClient": {
"RequestTimeoutMinutes": 5,
"MaxConnectionsPerServer": 32,
"PooledConnectionLifetimeMinutes": 10,
"PooledConnectionIdleTimeoutMinutes": 2,
"HandlerLifetimeMinutes": 15
},Configuration Key Description RequestTimeoutMinutesUse this to specify the maximum time the system waits for a request to complete before it is canceled. The default value is 5 minutes. MaxConnectionsPerServerUse this to specify the maximum number of simultaneous connections allowed to a single server. The default value is 32. PooledConnectionLifetimeMinutesUse this to specify how long a connection can be reused before it is replaced with a new one. The default value is 10 minutes. PooledConnectionIdleTimeoutMinutesUse this to specify how long an unused connection stays in the pool before it is closed. The default value is 2 minutes. HandlerLifetimeMinutesUse this to specify the duration a connection handler is kept before it is recycled to refresh underlying connections and settings. The default value is 15 minutes. Connection and Timeout Settings
Step 5: (Optional) Enable Selective Forwarding
-
Update the Selective configuration as needed to control which data is sent to the new server.
Forwarding.Override.json"Selective": {
"Enabled": false,
"ForwardBlocks": ["workstation"]
}This is not enabled by default, and the default forward block is workstation. You can check the included TaskBlocks in the next section.
Step 6: (Optional) Modify TaskBlocks Settings
-
Update the TaskBlocks configuration as needed to further refine which data is sent to the new server.
Forwarding.Override.json"TaskBlocks": {
"workstation": [
"upload_appusage_win_data",
"upload_appusage_win_sum",
"upload_appusage_win2_data",
"upload_recorder",
"upload_freezemonitor"
],
"licenseserver": [
"upload_licpoll",
"upload_flexlogcollector"
]
}
Step 6: Apply the Changes
-
Save the changes in the configuration file.
-
Open the Task Manager.
-
Click Services.
-
Restart the OpeniTCoreAPI service to apply the changes.
Looping forwarding configurations are not allowed. For example, if data from Server A is forwarded to Server B, Server B must not be configured to forward the same data back to Server A. Similarly, forwarding data from a server back to itself (for example, Server A to Server A) is also not allowed.
Configuring Hangfire DB Storage
By default, Hangfire DB uses SQLite as its storage database; however, it can also be configured to use SQL Server or PostgreSQL depending on your deployment requirements.
SQLite should not be used in production environments. Open iT recommends using a production-ready database platform for improved scalability, reliability, and maintainability.
Using SQL Server
Database Authentication Requirements
The CoreAPI service runs under the Local System account, which cannot authenticate to remote SQL Server instances using Windows Authentication.
- Remote SQL Server Connections
- Use SQL Server Authentication (SQL Login) when connecting to a remote SQL Server.
- Local SQL Server Connections
- You can use either:
- Windows Authentication
- When using Windows Authentication, CoreAPI connects using NT AUTHORITY\SYSTEM.
- SQL Server Authentication (SQL Login)
- When using SQL Server Authentication, make sure it is configured to use Mixed Mode authentication.
- Windows Authentication
- You can use either:
- Ensure that the account being used has the following server roles:
- public (default)
- dbcreator
- If the target database already exists before CoreAPI starts:
- Make sure the account used by CoreAPI is:
- Mapped to the database, and
- Assigned the following database roles:
- public (default)
- dbowner
- Make sure the account used by CoreAPI is:
Updating the Configuration File
Step 1: Open the CoreAPI Configuration Directory
-
Go to the OpeniT CoreAPI Configuration directory.
By default, this is in
C:\Program Files\OpeniT\Core\service\openit_coreapi.
Step 2: Create or Open the Override File
-
Create a copy of
CoreAPI.json. -
Rename the duplicate file to
CoreAPI.Override.json.tipOverride files are used to store custom or environment-specific configuration changes separately from the default configuration. This approach helps preserve the original settings, simplifies upgrades, and ensures that custom modifications are not accidentally overwritten.
-
If a
CoreAPI.Override.jsonfile already exists, open the existing file instead.
Step 3: Update the Hangfire DB Provider
-
In the override file, update the value of the Provider value to SQLServer. The value is not case-sensitive.
CoreAPI.Override.json"Hangfire": {
"Provider": "SQLServer",
"Storage": {
"SQLServer": "Data Source=<server>\\<instance>;Database=HangfireDb;TrustServerCertificate=True;User Id=<user>;Password=<password>;",
"PostgreSQL": "Host=<host>;Port=<port>;Database=HangfireDb;Username=<user>;Password=<password>",
"SQLite": "coreapi-jobs.db"
}, -
Under the Storage object, update the SQLServer details.
CoreAPI.Override.json"Hangfire": {
"Provider": "SQLServer",
"Storage": {
"SQLServer": "Data Source=<server>\\<instance>;Database=HangfireDb;TrustServerCertificate=True;User Id=<user>;Password=<password>;",
"PostgreSQL": "Host=<host>;Port=<port>;Database=HangfireDb;Username=<user>;Password=<password>",
"SQLite": "coreapi-jobs.db"
},where:
Configuration Key Description Data SourceUse this to specify the SQL Server address, including the instance name. User IdUse this to specify the SQL Server login username. PasswordUse this to specify the password for the specified SQL Server login. SQL Server Connection Details
Keep the
TrustServerCertificateandDatabasevalues as they are. If the HangfireDb database does not exist yet, it will be created automatically.Example"Hangfire": {
"Provider": "SQLServer",
"Storage": {
"SQLServer": "Data Source=WIN-HOST01\\SQLServer1234;Database=HangfireDb;TrustServerCertificate=True;User Id=user_alpha;Password=*******;",
"PostgreSQL": "Host=<host>;Port=<port>;Database=HangfireDb;Username=<user>;Password=<password>",
"SQLite": "coreapi-jobs.db"
},
Step 4: Apply the Changes
-
Save the changes in the configuration file.
-
Open the Task Manager.
-
Click Services.
-
Restart the OpeniTCoreAPI service to apply the changes.
Using PostgreSQL
Step 1: Open the CoreAPI Configuration Directory
-
Go to the OpeniT CoreAPI Configuration directory.
By default, this is in
C:\Program Files\OpeniT\Core\service\openit_coreapi.
Step 2: Create or Open the Override File
-
Create a copy of
CoreAPI.json. -
Rename the duplicate file to
CoreAPI.Override.json.tipOverride files are used to store custom or environment-specific configuration changes separately from the default configuration. This approach helps preserve the original settings, simplifies upgrades, and ensures that custom modifications are not accidentally overwritten.
-
If a
CoreAPI.Override.jsonfile already exists, open the existing file instead.
Step 3: Update the Hangfire DB Provider
-
In the override file, update the value of the Provider value to PostgreSQL. The value is not case-sensitive.
CoreAPI.Override.json"Hangfire": {
"Provider": "PostgreSQL",
"Storage": {
"SQLServer": "Data Source=<server>\\<instance>;Database=HangfireDb;TrustServerCertificate=True;User Id=<user>;Password=<password>;",
"PostgreSQL": "Host=<host>;Port=<port>;Database=HangfireDb;Username=<user>;Password=<password>",
"SQLite": "coreapi-jobs.db"
}, -
Under the Storage object, update the PostgreSQL details.
CoreAPI.Override.json"Hangfire": {
"Provider": "SQLServer",
"Storage": {
"SQLServer": "Data Source=<server>\\<instance>;Database=HangfireDb;TrustServerCertificate=True;User Id=<user>;Password=<password>;",
"PostgreSQL": "Host=<host>;Port=<port>;Database=HangfireDb;Username=<user>;Password=<password>",
"SQLite": "coreapi-jobs.db"
},where:
Configuration Key Description HostUse this to specify the hostname or IP address of the database server. PortUse this to specify the port number used by the database service. UsernameUse this to specify the username used to connect to the database. PasswordUse this to specify the password associated with the database user account. PostgreSQL Connection Details
Keep the
Databasevalue unchanged.CoreAPI.Override.json"Hangfire": {
"Provider": "SQLServer",
"Storage": {
"SQLServer": "Data Source=<server>\\<instance>;Database=HangfireDb;TrustServerCertificate=True;User Id=<user>;Password=<password>;",
"PostgreSQL": "Host=WIN-HOST02;Port=1234;Database=HangfireDb;Username=user_beta;Password=*******",
"SQLite": "coreapi-jobs.db"
},
Step 4: Apply the Changes
-
Save the changes in the configuration file.
-
Open the Task Manager.
-
Click Services.
-
Restart the OpeniTCoreAPI service to apply the changes.
Accessing the Hangfire Dashboard
Hangfire provides a web-based dashboard for monitoring and managing background jobs within the Forward Proxy. The dashboard gives visibility into job activity and processing status, allowing users to track ongoing operations and review completed or failed tasks.
The Hangfire Dashboard is only accessible from the machine where the Core Server is installed.
Access the Hangfire Dashboard using either of the following URLs:
https://localhost:27895/jobs/
or
https://<hostname>:27895/jobs/
where <hostname> is the hostname or IP address of the machine where the Core Server is installed.
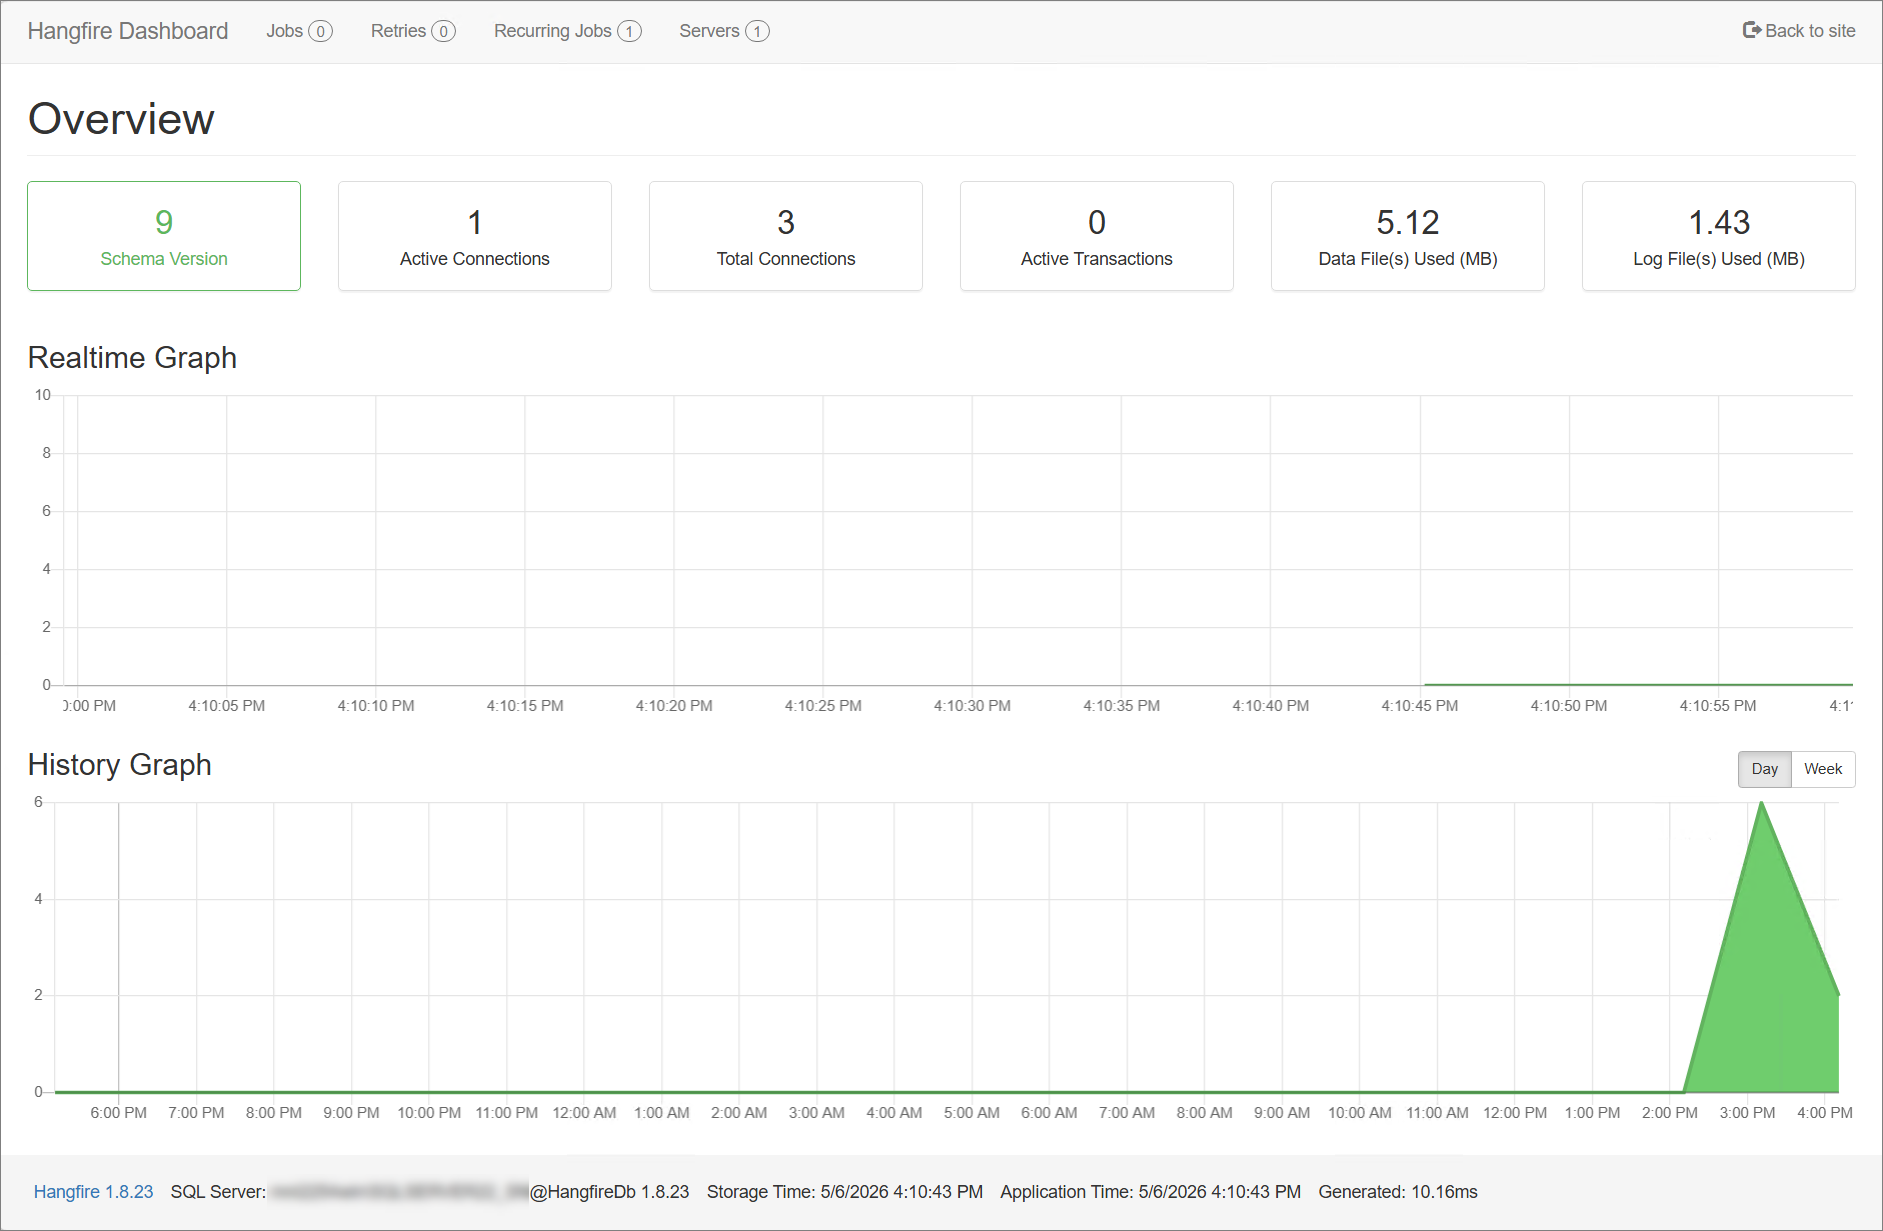
Through the dashboard, users can:
- View queued, processing, succeeded, and failed jobs
- Monitor job execution activity
- Inspect error details for failed jobs
- Retry failed jobs when necessary
The dashboard helps simplify job monitoring and troubleshooting by providing a centralized interface for managing background task execution.
Manually Triggering Jobs Using the Hangfire Dashboard
Step 1: Open the Recurring Jobs Page
-
Open the Hangfire Dashboard. This is accessible through:
https://localhost:27895/jobs/or
https://<hostname>:27895/jobs/where
<hostname>is the hostname or IP address of the machine where the Core Server is installed. -
In the navigation tab, select Recurring Jobs.
Step 2: Trigger the Job
-
Tick the checkbox beside the selected job.
-
Click Trigger now button above the list of jobs.
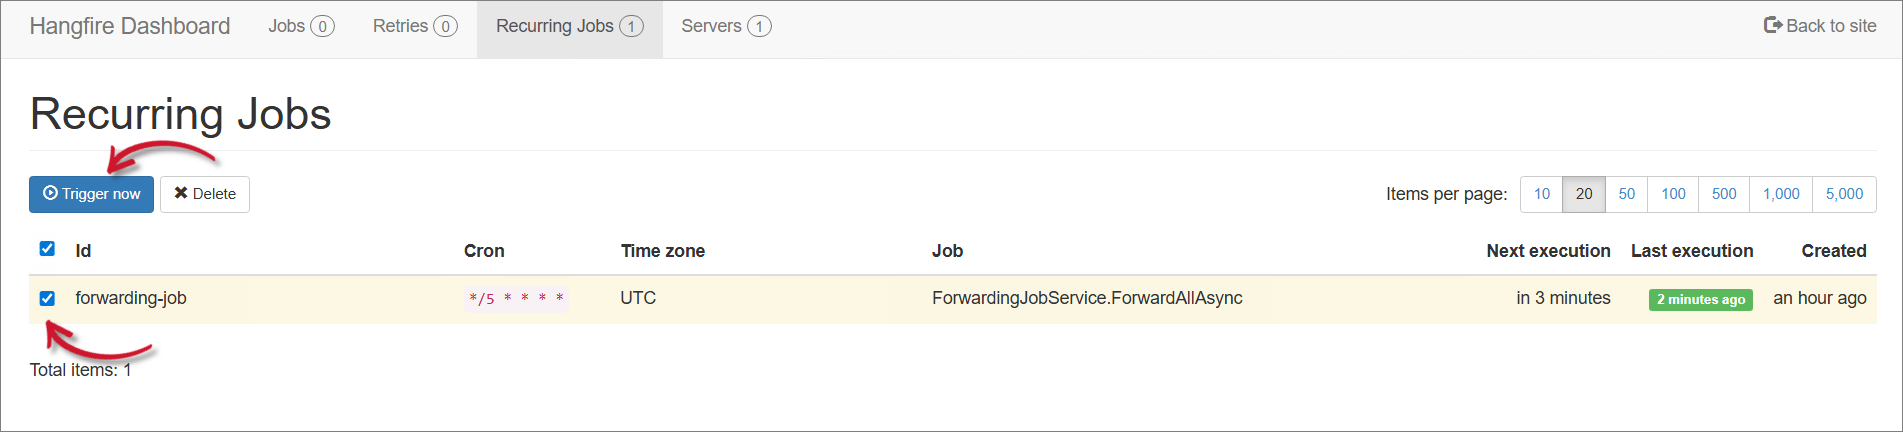 Trigger Job
 -
Verify that the Last execution column for the triggered job has been updated.