We’re upgrading your documentation experience!
A new doc website is live at docs.openit.cloud — a temporary preview during our transition. This website is now in maintenance-only mode (only critical issues will be addressed).
Explore the new website and send us your feedback!
#
Zetaware License Manager
#
Introduction
Open iT supports Zetaware usage reporting by collecting log files and converting them to Open iT format.
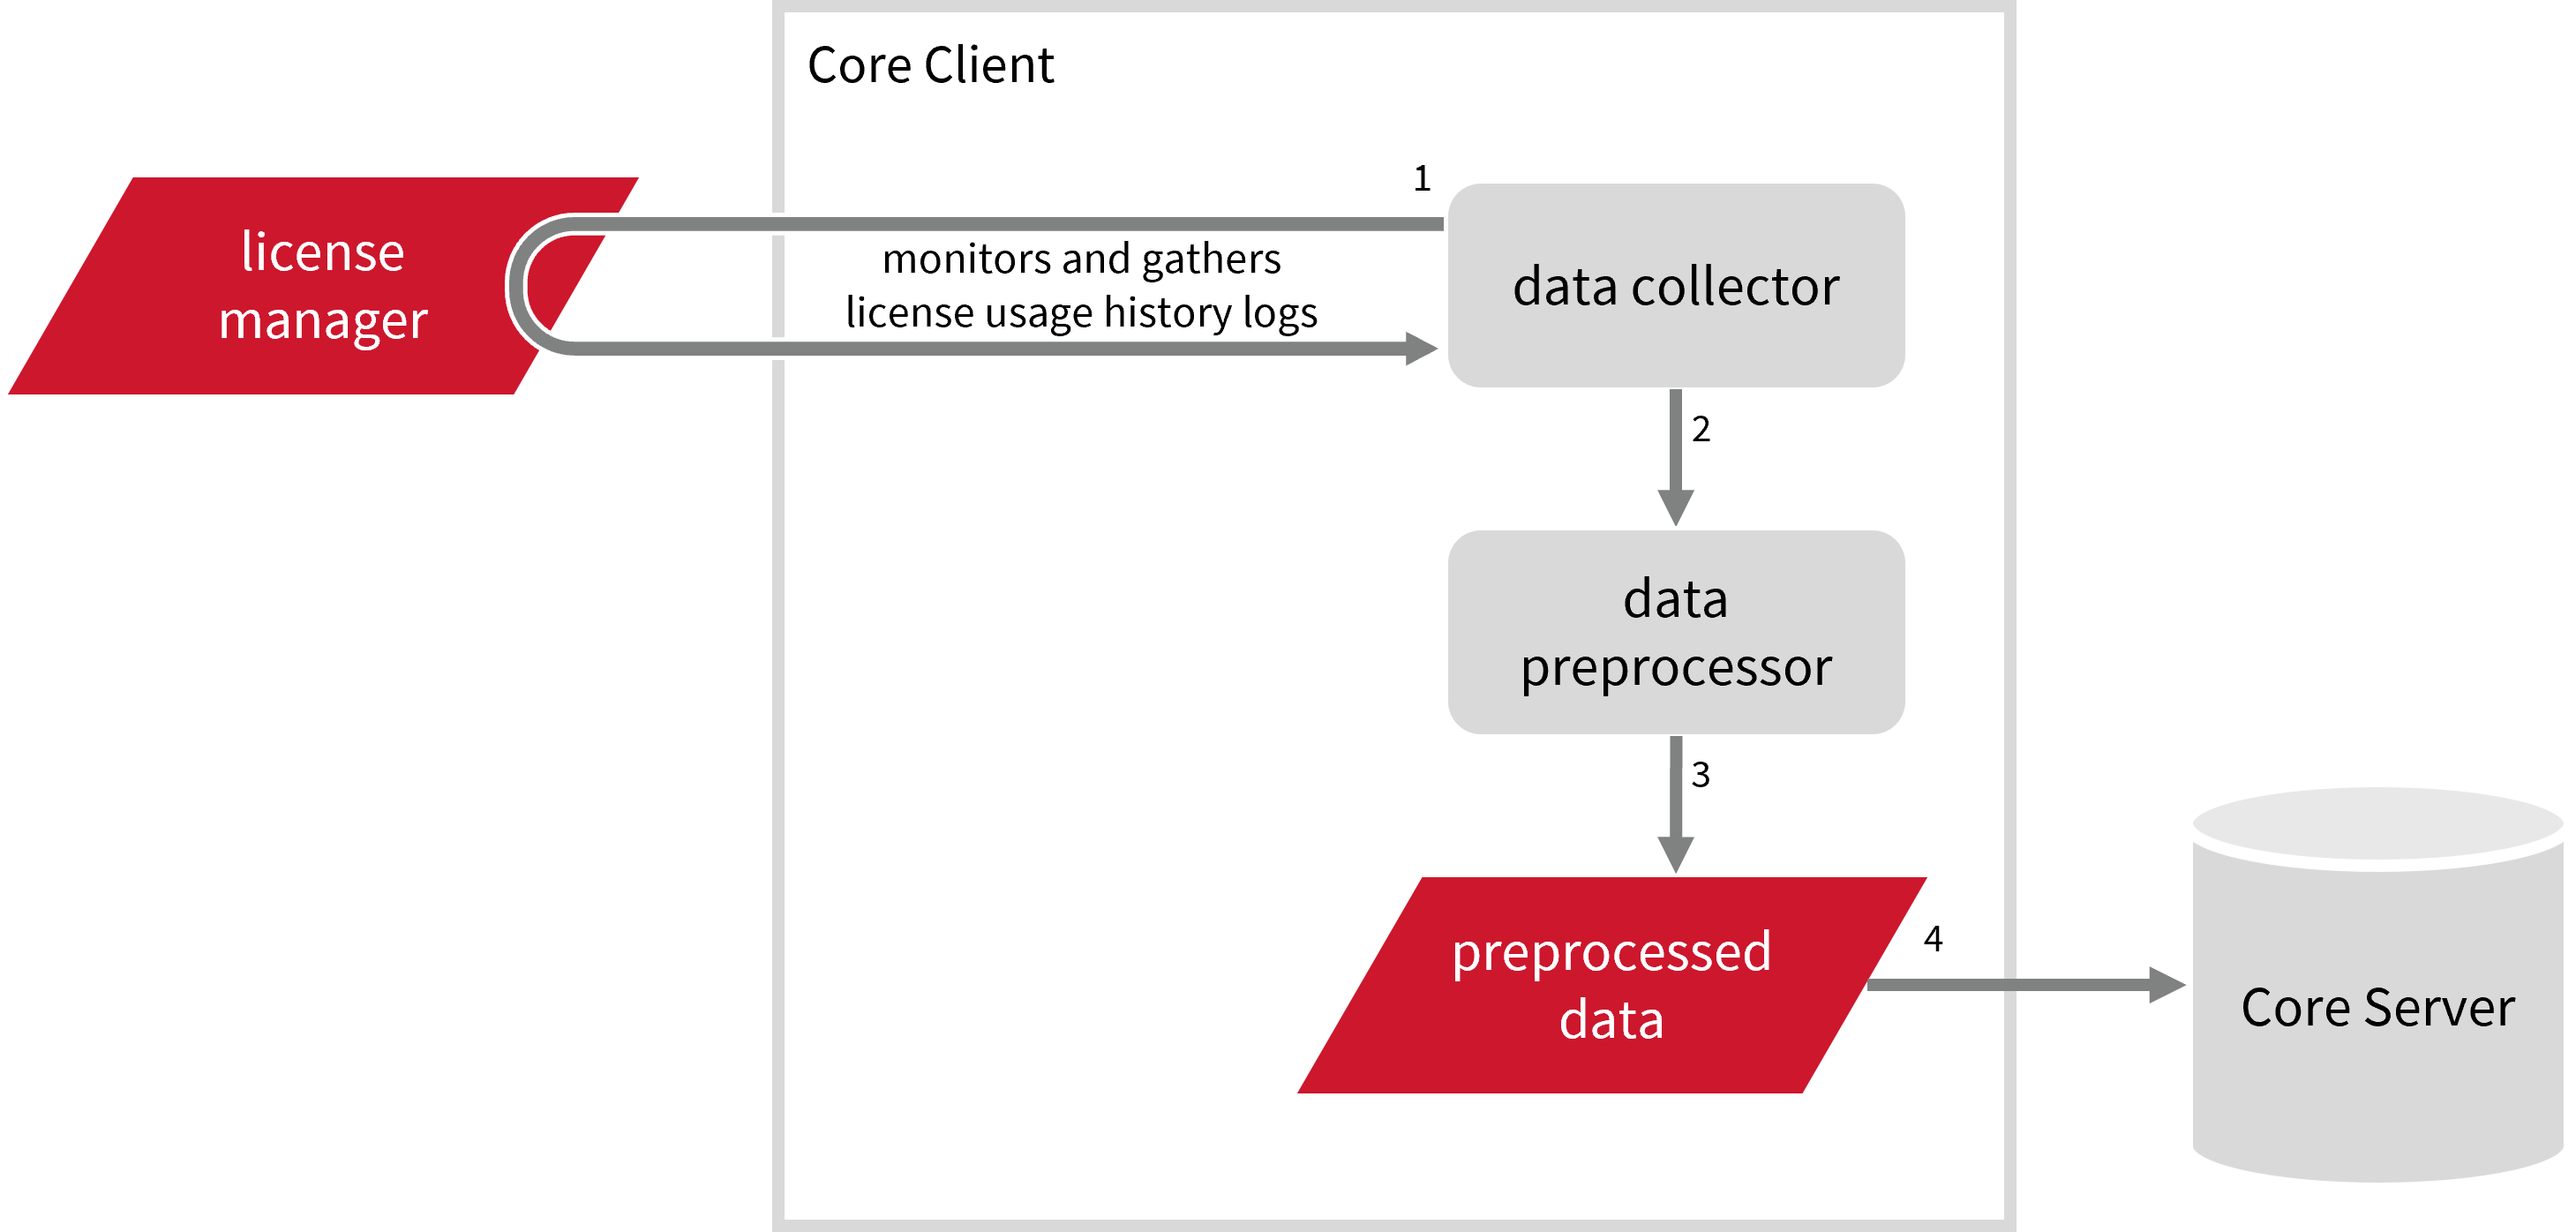
An Open iT client is installed on your license server for this collection. The data collector monitors and gathers the license usage history logs from the license manager every midnight. Once the logs are collected, the data collection process triggers and the logs are passed to the data preprocessor. After the data is preprocessed, it is transferred to the Core Server for further storage, completing the history logs collection and processing.
This will produce the following aggregated data types used for historical reporting:
The following sections will guide you in setting up the necessary configuration to collect and send the required data to the server.
Apply the configurations shown in the Open iT client.
#
Requirements
- An Open iT Client connected to an Open iT Server or a coexistent Open iT setup
- License server administrative rights
- Full path to the debug log file
#
Configuring Events Log File Collection
These are the required steps to configure collection of Zetaware events log files.
Go to the Components directory, which is by default in
C:\Program Files\OpeniT\Core\Configuration\Components, and back up thelogfilecollector-zetaware.xmlfile.Open a command prompt with Administrator level privileges.
Go to the bin directory, which is by default in
C:\Program Files\OpeniT\Core\bin, run the command:Command Syntaxcd $BIN_DIRExamplecd C:\Program Files\OpeniT\Core\binOnce in the directory, set the location of the Zetaware log files, run the command:
Command Syntaxopenit_confinit -c "logfilecollector-zetaware.logfilecollector.source.dir=<zetaware_log_dir>"where
<zetaware_log_dir>is the location of the Zetaware log files.Exampleopenit_confinit -c "logfilecollector-zetaware.logfilecollector.source.dir=C:\User\AppData\Local\Zetaware\1234"You can add multiple directories by typing in a semi-colon-separated list.
Exampleopenit_confinit -c "C:\User\AppData\Local\Zetaware\1234;C:\User\AppData\Local\Zetaware\2345;C:\User\AppData\Local\Zetaware\3456"Update the configuration file, run the command:
Command Syntaxopenit_confbuilder --clientMake sure no errors are encountered.
Refer to the Zetaware Events Log File Collection Configuration table to learn more about Zetaware configuration in logfilecollector-zetaware.xml.
#
Activating Events Log Data Collection
These are the required steps to activate collection of Zetaware events log data.
Open a command prompt with Administrator level privileges.
Go to the bin directory, which is by default in
C:\Program Files\OpeniT\Core\bin, run the command:Command Syntaxcd $BIN_DIRExamplecd C:\Program Files\OpeniT\Core\binOnce in the directory, activate the collection of Altair log data, run the command:
Command Syntaxopenit_oconfinit -u "collect_license_zetaware_event-logs.root.scheduler.jobs.collect_zetaware_licenselogs.general.active=true"
The collection runs every midnight by default. To configure the intervals, locate the instances attribute under collect_zetaware_licenselogs, preprocess_zetaware_licenselogs-events, or transfer_zetaware_licenselogs in the same file and configure the attributes.
Refer to the Zetaware Events Log Job Scheduler Instances Configuration table to learn the attributes used to configure Zetaware data collection and transfer.
#
Verifying Events Log Data Collection
After configuration, you can verify that the data is collected and sent to the server by following these steps:
Open a command prompt with Administrator level privileges.
Go to the bin directory, which is by default in
C:\Program Files\OpeniT\Core\bin, run the command:Command Syntaxcd $BIN_DIRExamplecd C:\Program Files\OpeniT\Core\binRun the command:
Command Syntaxopenit_executor -r collect_license_zetaware_event-logsVerify that there are
archiver*.infiles created in the server in the archiver directory, which is by default inC:\ProgramData\OpeniT\Data\incoming\archiver.
#
Sample Reports
#
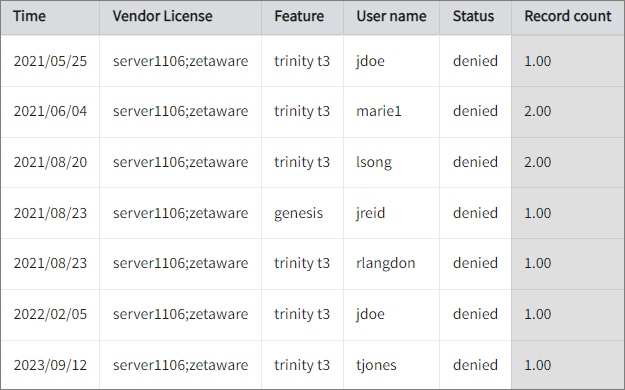
Denied Licenses per Feature
This sample report provides insights into how often users cannot access specific software features due to licensing limitations.
It offers several key benefits:
- Identifies Licensing Gaps – reveals which features frequently run out of available licenses, indicating a need for adjustments.
- Prevents Productivity Loss – helps minimize disruptions by ensuring critical users can access required features.
- Optimizes License Procurement – guides purchasing decisions by showing where additional licenses may be necessary.
- Improves Resource Allocation – ensures licenses are distributed efficiently based on demand.
- Enhances User Experience – reduces frustration by identifying recurring access issues.
- Supports Capacity Planning – helps forecast future licensing needs based on denial trends.
- Aids in Compliance & Audits – provides documentation on license usage patterns for internal reviews or vendor negotiations.
#
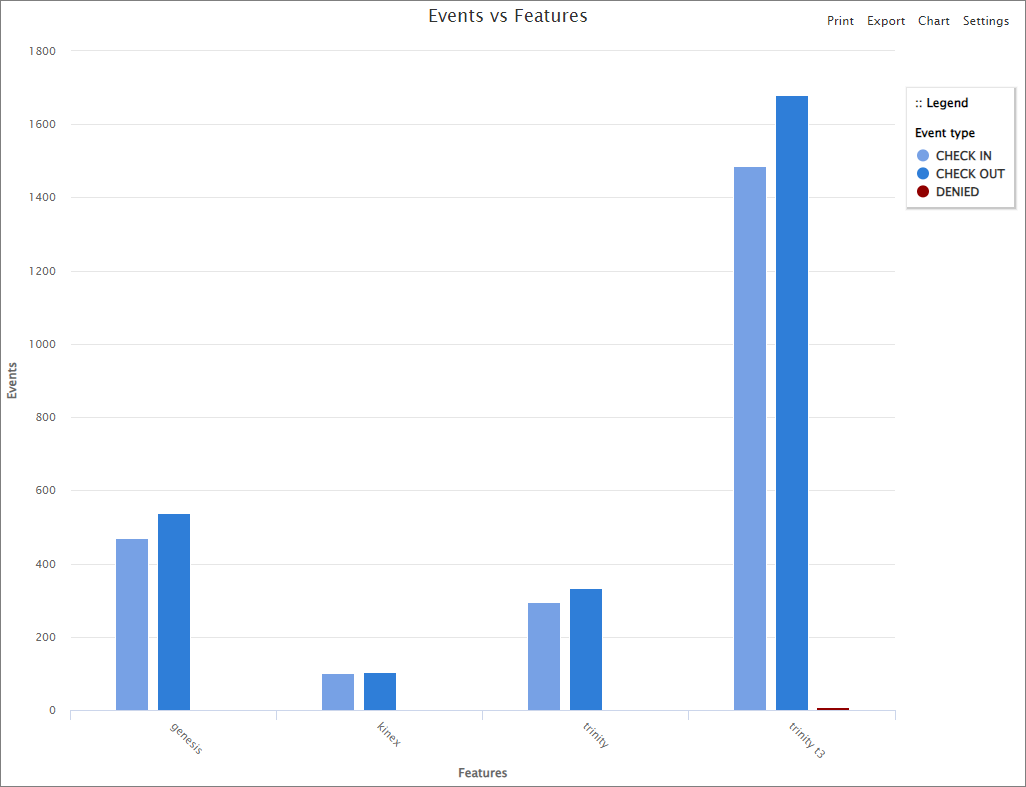
Events vs Features
This chart visualizes software license usage, helping organizations optimize resource allocation.
It offers several key benefits:
- License Utilization Insights – shows how often licenses are checked out and returned, helping balance supply and demand.
- Identifies Feature Demand – highlights frequently used and under-utilized features.
- Detects Licensing Bottlenecks – reveals trends in denied license requests, indicating where additional licenses may be needed.
- Optimizes Procurement Decisions – supports better budgeting by showing real-time license consumption.
- Prevents Access Issues – helps IT teams proactively allocate licenses to ensure critical users aren’t blocked.
- Enhances Compliance & Audit Readiness – provides a historical record of license activity for audits and vendor negotiations.
#
Next Steps?
Renaming Vendor License Renaming Features Create and Add Report