We’re upgrading your documentation experience!
A new doc website is live at docs.openit.cloud — a temporary preview during our transition. This website is now in maintenance-only mode (only critical issues will be addressed).
Explore the new website and send us your feedback!
#
Sentinel RMS License Manager
#
Introduction
Open iT supports Sentinel RMS usage reporting. The following sections will guide you on the required configuration for
Apply the configurations shown in the Open iT client.
#
Configuring License Manager Utility Polling
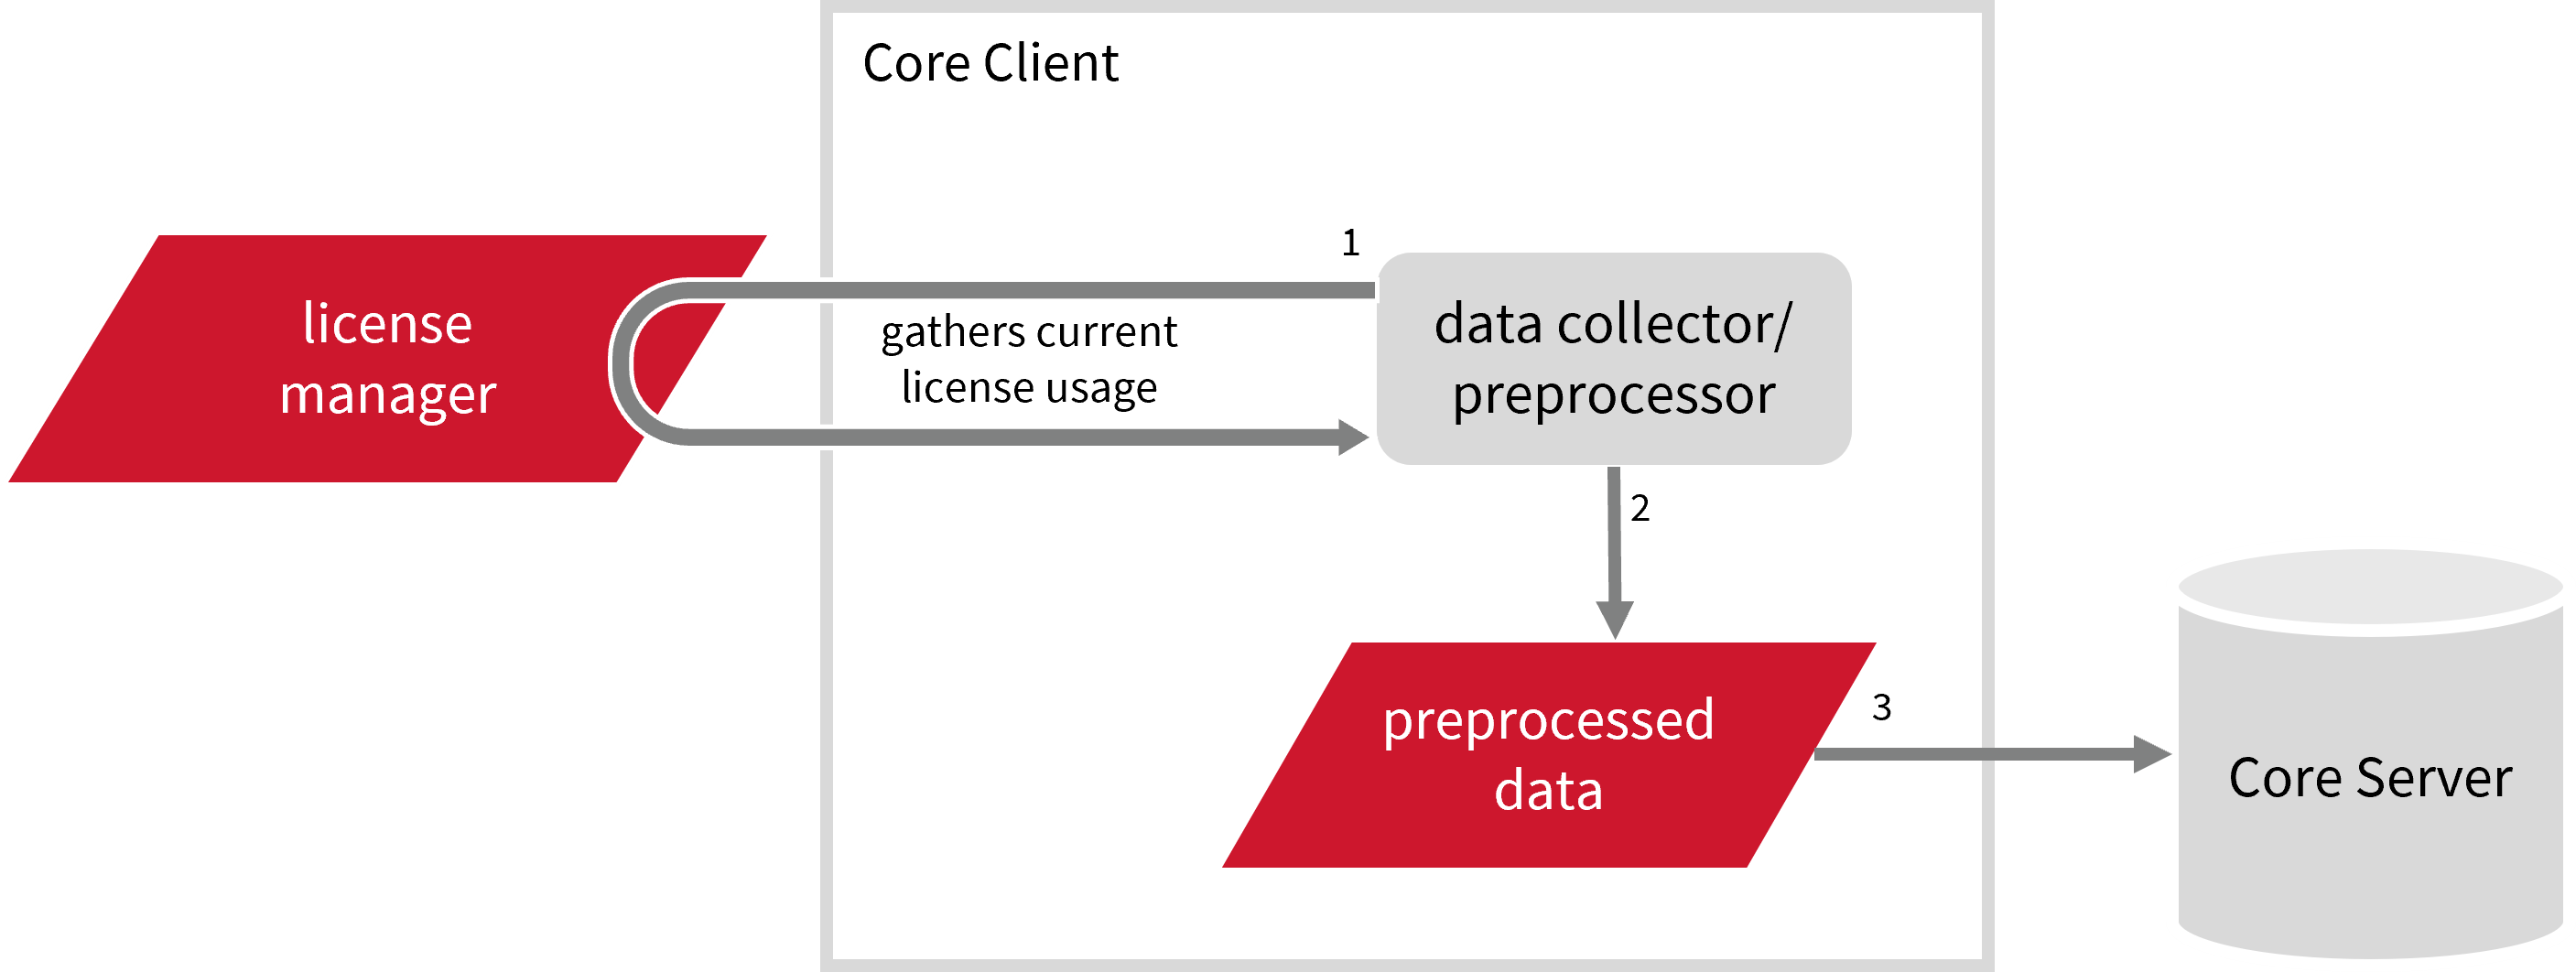
Open iT supports Sentinel RMS usage reporting by polling the license servers at regular intervals to get the current status of its license use and availability.
An Open iT client is installed on your license server for this collection. The data collector/preprocessor gathers the current license usage information from the license manager every hour using a 5-minute sample interval, triggering the data collection process. It also processes the gathered license usage. Once the data is preprocessed, it is transmitted to the Core Server, according to the client's timezone, for further storage, completing the license usage data collection and processing.
This will produce the following aggregated data types used for historical reporting:
- (49) Host User License Use
- (93) OLAP Raw Hourly
- (94) OLAP User Concurrency
- (95) Usergroup License Use v3.0
- (102) OLAP Total Use
The following sections will guide you in setting up the necessary configuration to collect and send the required data to the server.
#
Requirements
- An Open iT Client connected to an Open iT Server or a coexistent Open iT setup
- Activated LicenseAnalyzer collection and license poller
- License server administrative rights
- A working version of
lsmon
#
Configuring Data Collection
These are the required steps to activate and configure collection of Sentinel RMS usage data.
Make sure that you have a working version of lsmon in the bin directory, which is by default in C:\Program Files\OpeniT\Core\bin.
If configuring Sentinel RMS remotely, make sure that the lsapiw32.dll is in the same directory as lsmon.
Go to the Components directory, which is by default in
C:\Program Files\OpeniT\Core\Configuration\Components, and back up thelicpoll.xmlconfiguration file.Open a command prompt with Administrator level privileges.
Go to the bin directory, which is by default in
C:\Program Files\OpeniT\Core\bin, run the command:Command Syntaxcd $BIN_DIRExamplecd C:\Program Files\OpeniT\Core\binOnce in the directory, activate the collection of Sentinel RMS data, run the command:
Command Syntaxopenit_confinit -c "licpoll.license-types.sentinel-sample.active=true"Set the license server name used by the Sentinel RMS License Server, run the command:
Command Syntaxopenit_confinit -c "licpoll.license-types.sentinel-sample.status-command.arguments=<hostname>"Exampleopenit_confinit -c "licpoll.license-types.sentinel-sample.status-command.arguments=win-host01"Update the configuration file, run the command:
Command Syntaxopenit_confbuilder --clientMake sure no errors are encountered.
Make sure that you have a working version of lsmon in the bin directory, which is by default in /opt/openit/bin.
These instructions assume your configuration directory is /var/opt/openit/etc.
Go to the Components directory, which is by default in
/var/opt/openit/etc/Components, and back up thelicpoll.xmlconfiguration file.Go to the bin directory, which is by default in
/opt/openit/bin, run the command:Command Syntaxcd $BIN_DIRExamplecd /opt/openit/binOnce in the directory, activate the collection of Sentinel RMS data, run the command:
Command Syntax./openit_confinit -r /var/opt/openit/ -d /var/opt/openit/etc/ -c "licpoll.license-types.sentinel-sample.active=true"Set the license server name used by the Sentinel RMS License Server, run the command:
Command Syntax./openit_confinit -r /var/opt/openit/ -d /var/opt/openit/etc/ -c "licpoll.license-types.sentinel-sample.status-command.arguments=<hostname>"Example./openit_confinit -r /var/opt/openit/ -d /var/opt/openit/etc/ -c "licpoll.license-types.sentinel-sample.status-command.arguments=win-host01"Update the configuration file, run the command:
Command Syntax./openit_confbuilder --clientMake sure no errors are encountered.
Refer to the Sentinel RMS Data Collection Configuration table to learn more about Sentinel RMS configuration in licpoll.xml.
#
Verifying Data Collection
After configuration, you can verify that the data is collected by following these steps:
Open a command prompt with Administrator level privileges.
Go to the bin directory, which is by default in
C:\Program Files\OpeniT\Core\bin, run the command:Command Syntaxcd $BIN_DIRExamplecd C:\Program Files\OpeniT\Core\binRun the command:
Command Syntaxopenit_licpoll -# 1Verify that the temp directory, which is by default in
C:\ProgramData\OpeniT\Data\temp, contains aLicPolldirectory containing.dataandstatus-*.logfiles.
Go to the bin directory, which is by default in
/opt/openit/bin, run the command:Command Syntaxcd $BIN_DIRExamplecd /opt/openit/binRun the command:
Command Syntax./openit_licpoll -# 1Verify that the temp directory, which is by default in
/var/opt/openit/temp, contains aLicPolldirectory containing.dataandstatus-*.logfiles.
Continue reading if you need to configure log file parsing. If not, here are some
#
Configuring Log File Parsing
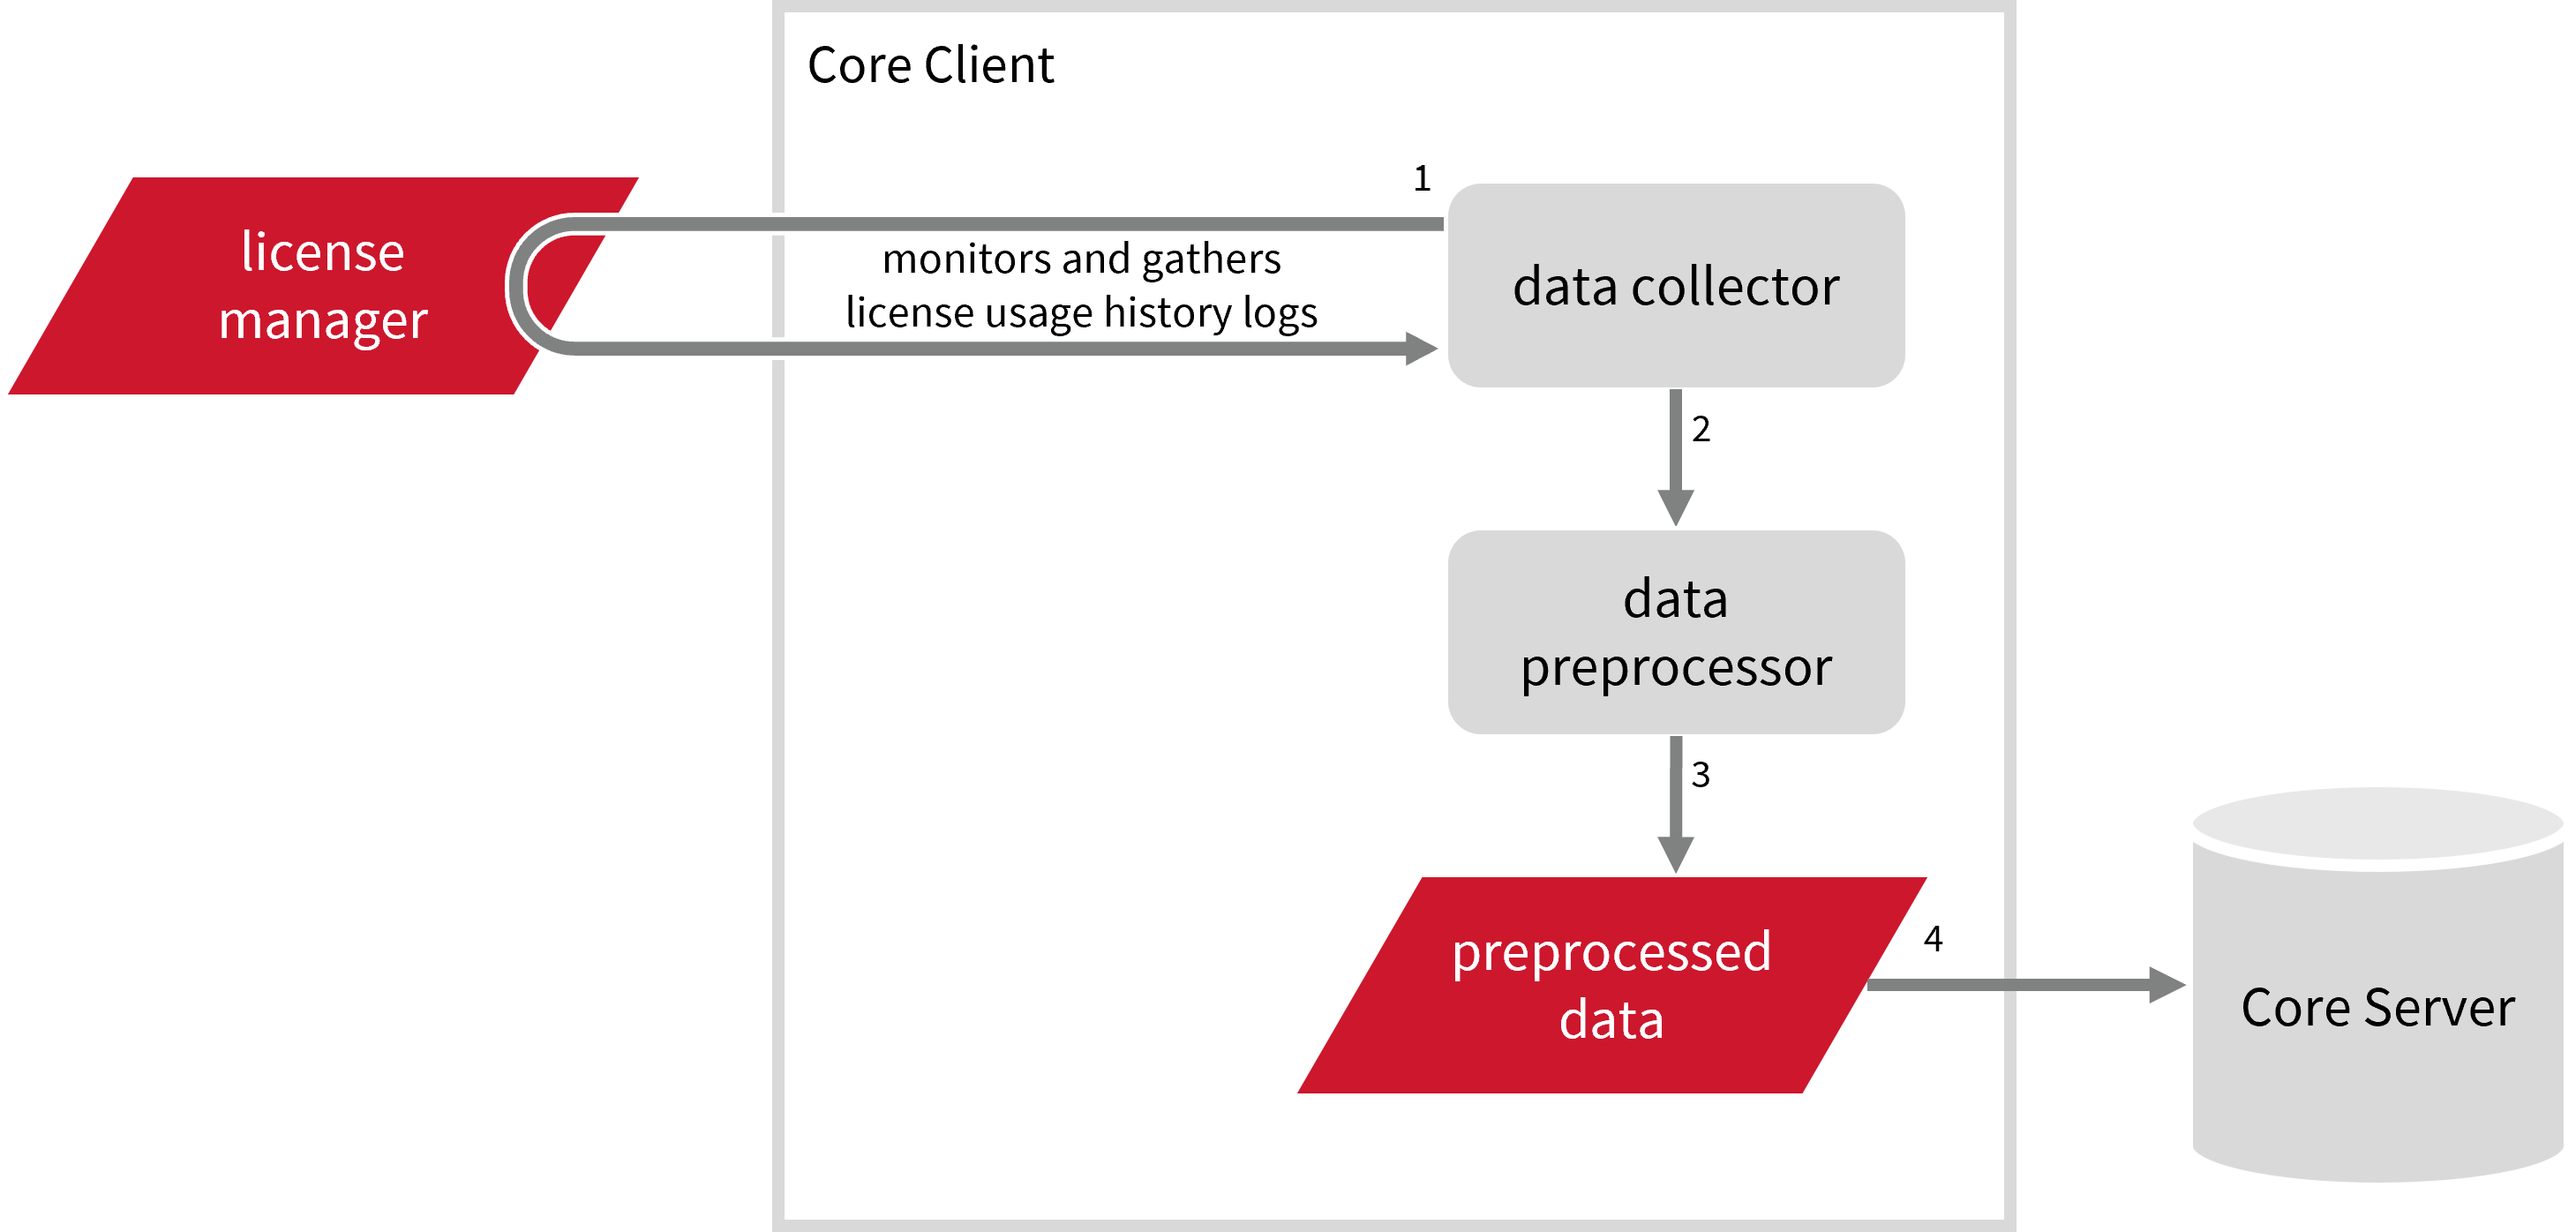
Open iT supports Sentinel RMS usage reporting by collecting log files and converting them to Open iT format.
An Open iT client is installed on your license server for this collection. The data collector monitors and gathers the license usage history logs from the license manager every 5 minutes. Once the logs are collected, the data collection process triggers and the logs are passed to the data preprocessor. After the data is preprocessed, it is transferred to the Core Server for further storage, completing the history logs collection and processing.
This will produce the following aggregated data types used for historical reporting:
Record Log Data:
- (89) Total License Use Licenseevents
- (90) Individual License Use Licenseevents
- (91) Usergroup License Use Licenseevents
- (108) Host License Use Licenseevents
- (109) Hostgroup License Use Licenseevents
Event Log Data:
The following sections will guide you in setting up the necessary configuration to collect and send the required data to the server.
#
Requirements
- An Open iT Client connected to an Open iT Server or a coexistent Open iT setup
- License server administrative rights
- Full path to the debug log file
#
Configuring Log File Collection
These are the required steps to configure collection of Sentinel RMS log files.
Go to the Components directory, which is by default in
C:\Program Files\OpeniT\Core\Configuration\Components, and back up thelogfilecollector-sentinel.xmlfile.Open a command prompt with Administrator level privileges.
Go to the bin directory, which is by default in
C:\Program Files\OpeniT\Core\bin, run the command:Command Syntaxcd $BIN_DIRExamplecd C:\Program Files\OpeniT\Core\binOnce in the directory, set the location of the Sentinel RMS log files, run the command:
Command Syntaxopenit_confinit -c "logfilecollector-sentinel.logfilecollector.source.dir=<sentinel_log_dir>"where
<sentinel_log_dir>is the location of the Sentinel RMS log files.Exampleopenit_confinit -c "logfilecollector-sentinel.logfilecollector.source.dir=C:\Sentinel\home\logs"Update the configuration file, run the command:
Command Syntaxopenit_confbuilder --clientMake sure no errors are encountered.
Refer to the Sentinel RMS Log File Collection Configuration table to learn more about Sentinel RMS configuration in logfilecollector-sentinel.xml.
These instructions assume your configuration directory is /var/opt/openit/etc.
Go to the Components directory, which is by default in
/var/opt/openit/etc/Components, and back up thelogfilecollector-sentinel.xmlfile.Go to the bin directory, which is by default in
/opt/openit/bin, run the command:Command Syntaxcd $BIN_DIRExamplecd /opt/openit/binOnce in the directory, set the location of the Sentinel RMS log files, run the command:
Command Syntax./openit_confinit -r /var/opt/openit/ -d /var/opt/openit/etc/ -c "logfilecollector-sentinel.logfilecollector.source.dir=<sentinel_log_dir>"where
<sentinel_log_dir>is the location of the Sentinel RMS log files.Example./openit_confinit -r /var/opt/openit/ -d /var/opt/openit/etc/ -c "logfilecollector-sentinel.logfilecollector.source.dir=/root/Sentinel/home/logs"Update the configuration file, run the command:
Command Syntax./openit_confbuilder --clientMake sure no errors are encountered.
Refer to the Sentinel RMS Log File Collection Configuration table to learn more about Sentinel RMS configuration in logfilecollector-sentinel.xml.
#
Activating Log Data Collection
These are the required steps to activate collection of Sentinel RMS log data.
Open a command prompt with Administrator level privileges.
Go to the bin directory, which is by default in
C:\Program Files\OpeniT\Core\bin, run the command:Command Syntaxcd $BIN_DIRExamplecd C:\Program Files\OpeniT\Core\binOnce in the directory, activate the collection of Sentinel RMS log data, run the command:
Command Syntaxopenit_oconfinit -u "collect_license_sentinel-logs.root.scheduler.jobs.collect_sentinel_licenselogs.general.active=true"
Go to the bin directory, which is by default in
/opt/openit/bin, run the command:Command Syntaxcd $BIN_DIRExamplecd /opt/openit/binOnce in the directory, activate the collection of Sentinel RMS log data, run the command:
Command Syntax./openit_oconfinit -u "collect_license_sentinel-logs.root.scheduler.jobs.collect_sentinel_licenselogs.general.active=true"
The collection runs every 5 minutes by default. To configure the intervals, locate the instances attribute under collect_sentinel_licenselogs, preprocess_sentinel_licenselogs-events, preprocess_sentinel_licenselogs-records or transfer_sentinel_licenselogs in the same file and configure the attributes.
Refer to the Sentinel RMS Log Job Scheduler Instances Configuration table to learn the attributes used to configure Sentinel RMS data collection and transfer.
#
Deactivating Record Log Data Collection
Turning on log data collection automatically aggregates record and event log data. If you want to collect event log data only, follow these steps.
Open a command prompt with Administrator level privileges.
Go to the bin directory, which is by default in
C:\Program Files\OpeniT\Core\bin, run the command:Command Syntaxcd $BIN_DIRExamplecd C:\Program Files\OpeniT\Core\binOnce in the directory, deactivate the collection of record log data, run the command:
Command Syntaxopenit_oconfinit -u "collect_license_sentinel-logs.root.scheduler.jobs.preprocess_sentinel_licenselogs-records.general.active=false"Change the handling of event logs, run the command:
Command Syntaxopenit_oconfinit -u "collect_license_sentinel-logs.root.scheduler.jobs.preprocess_sentinel_licenselogs-events.operations.arguments=--srcdir \"${OpeniT.directories.temp}/LogFileCollector\" --srcpattern raw-sentinel-license-LogFileCollector*.data --srcfilehandling rename --trgdir \"${OpeniT.directories.temp}/LogParserSentinel\" --module license --datatype event --resolution PT1H --matchobjects \"${OpeniT.directories.conf}/matchobjects-event-sentinel.oconf\" --type event --disable-statlogging"Change the data transfer schedule, run the command:
Command Syntaxopenit_oconfinit -u "collect_license_sentinel-logs.root.scheduler.jobs.transfer_sentinel_licenselogs.scheduling.start-triggers.trigger#1.job-name=preprocess_sentinel_licenselogs-events"
Go to the bin directory, which is by default in
/opt/openit/bin, run the command:Command Syntaxcd $BIN_DIRExamplecd /opt/openit/binOnce in the directory, deactivate the collection of record log data, run the command:
Command Syntax./openit_oconfinit -u "collect_license_sentinel-logs.root.scheduler.jobs.preprocess_sentinel_licenselogs-records.general.active=false"Change the handling of event logs, run the command:
Command Syntax./openit_oconfinit -u "collect_license_sentinel-logs.root.scheduler.jobs.preprocess_sentinel_licenselogs-events.operations.arguments=--srcdir \"${OpeniT.directories.temp}/LogFileCollector\" --srcpattern raw-sentinel-license-LogFileCollector*.data --srcfilehandling rename --trgdir \"${OpeniT.directories.temp}/LogParserSentinel\" --module license --datatype event --resolution PT1H --matchobjects \"${OpeniT.directories.conf}/matchobjects-event-sentinel.oconf\" --type event --disable-statlogging"Change the data transfer schedule, run the command:
Command Syntax./openit_oconfinit -u "collect_license_sentinel-logs.root.scheduler.jobs.transfer_sentinel_licenselogs.scheduling.start-triggers.trigger#1.job-name=preprocess_sentinel_licenselogs-events"
#
Verifying Log Data Collection
After configuration, you can verify that the data is collected and sent to the server by following these steps:
Open a command prompt with Administrator level privileges.
Go to the bin directory, which is by default in
C:\Program Files\OpeniT\Core\bin, run the command:Command Syntaxcd $BIN_DIRExamplecd C:\Program Files\OpeniT\Core\binRun the command:
Command Syntaxopenit_logfilecollector -c "C:\Program Files\OpeniT\Core\Configuration\logfilecollector-sentinel.conf"Verify that there are
*.datafiles created in the LogFileCollector directory, which is by default inC:\Program Files\OpeniT\Core\Log\temp\LogFileCollector.
Go to the bin directory, which is by default in
/opt/openit/bin, run the command:Command Syntaxcd $BIN_DIRExamplecd /opt/openit/binRun the command:
Command Syntax./openit_logfilecollector -c "/var/opt/openit/etc/logfilecollector-sentinel.conf"Verify that there are
*.datafiles created in the LogFileCollector directory, which is by default inC:\Program Files\OpeniT\Core\Log\temp\LogFileCollector.
#
Next Steps?
Renaming Vendor License Renaming Features Create and Add Report License Monitor