We’re upgrading your documentation experience!
A new doc website is live at docs.openit.cloud — a temporary preview during our transition. This website is now in maintenance-only mode (only critical issues will be addressed).
Explore the new website and send us your feedback!
#
FlexNet License Manager
Recommended reading: Flex vs SimpleFlex
#
Introduction
Open iT supports FlexNet usage reporting through the autoconfigurator by detecting configurations used to automatically set the license manager data collection. On the other hand, if you need to configure its behavior manually, the following sections will guide you on the required configuration for
Apply the configurations shown in the Open iT client.
#
Configuring License Manager Utility Polling
Open iT supports FlexNet usage reporting by polling the license servers at regular intervals to get the current status of its license use and availability.
An Open iT client is installed on your license server for this collection. The data collector/preprocessor gathers the current license usage information from the license manager every hour using a 5-minute sample interval, triggering the data collection process. It also processes the gathered license usage. Once the data is preprocessed, it is transmitted to the Core Server, according to the client's timezone, for further storage, completing the license usage data collection and processing.
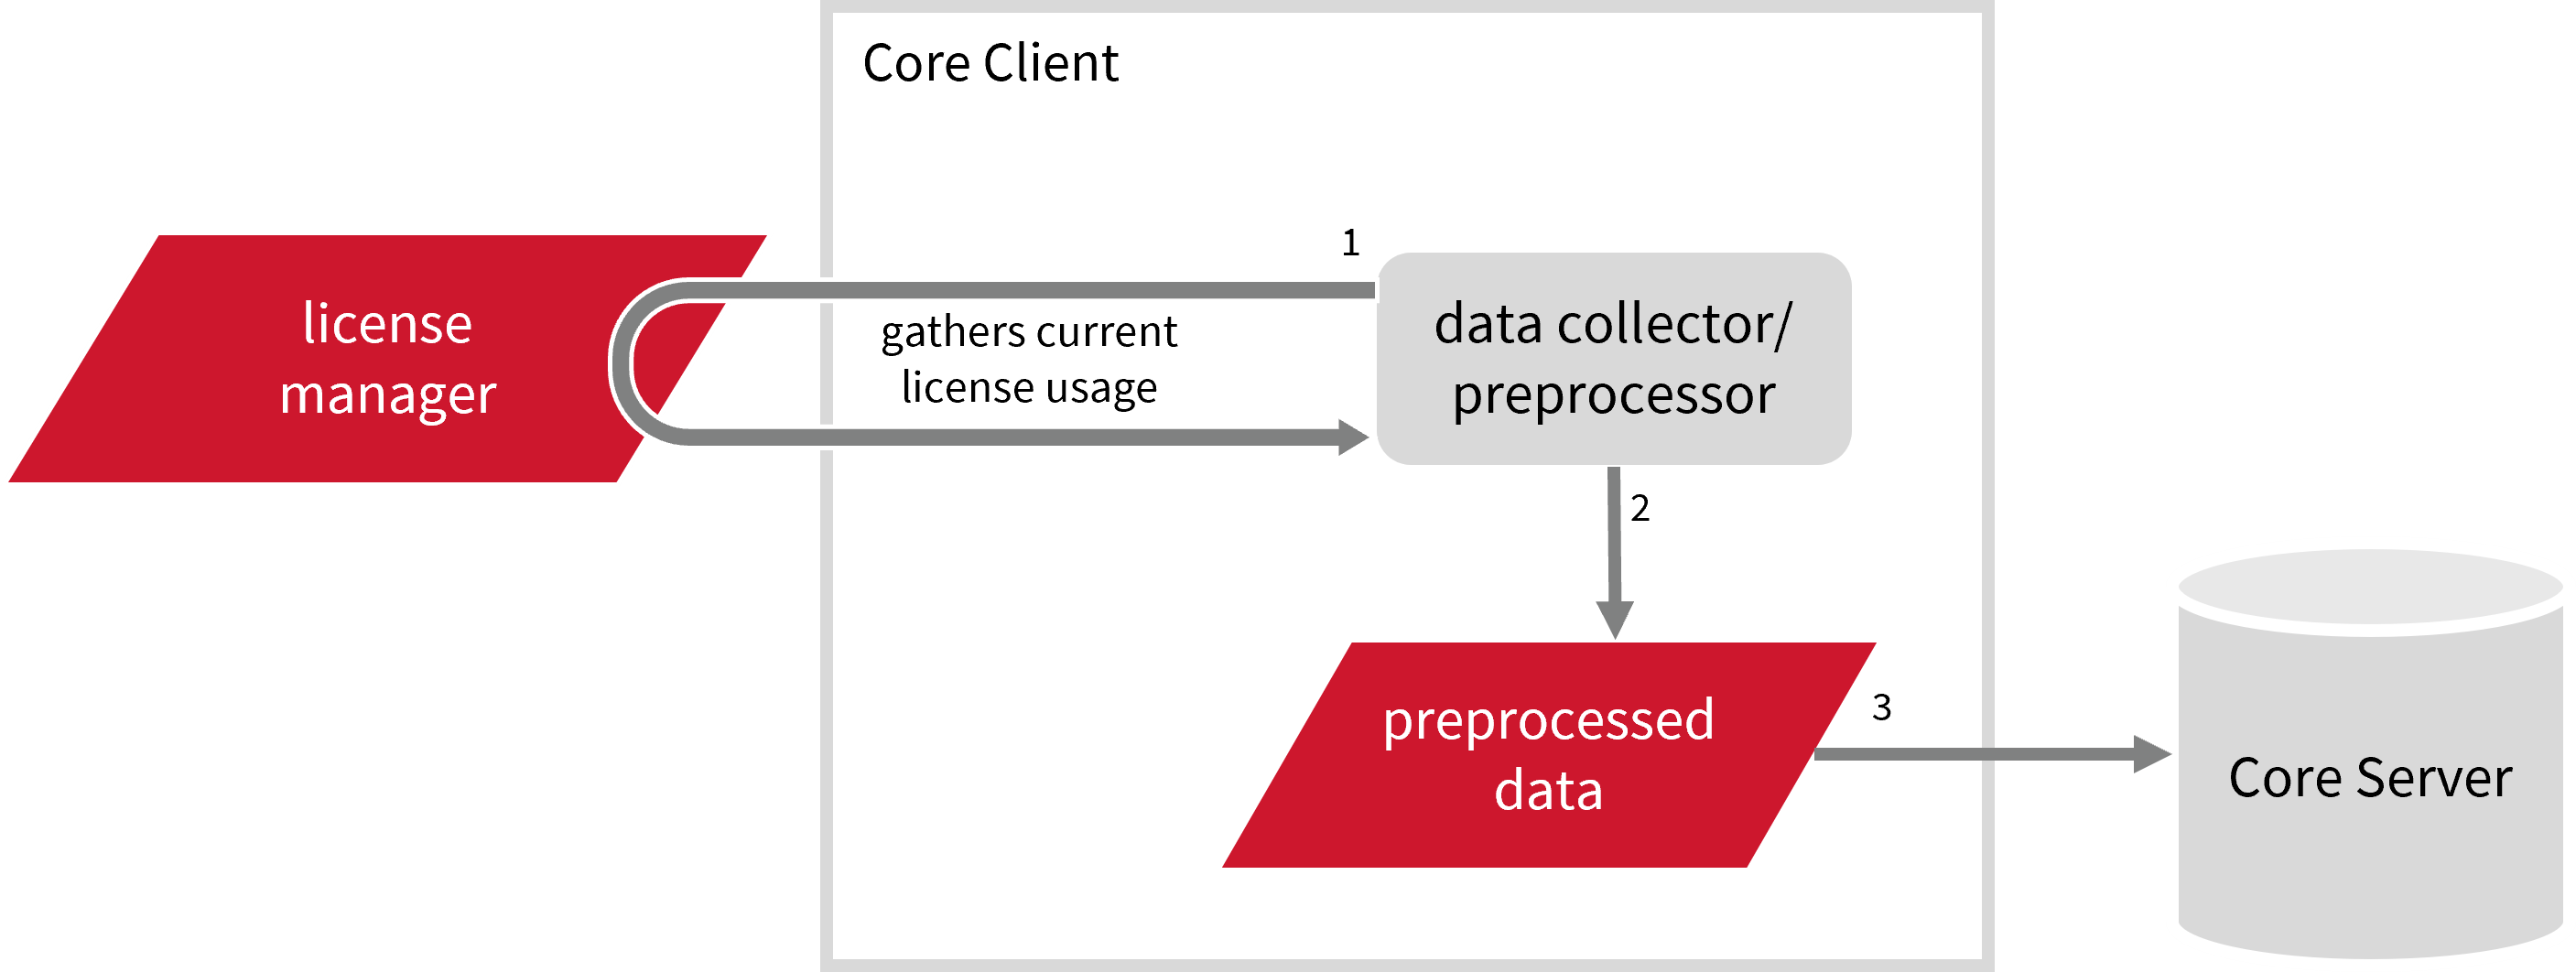
This will produce the following aggregated data types used for historical reporting:
- (49) Host User License Use
- (93) OLAP Raw Hourly
- (94) OLAP User Concurrency
- (95) Usergroup License Use v3.0
- (102) OLAP Total Use
The following sections will guide you in setting up the necessary configuration to collect and send the required data to the server.
#
Requirements
- An Open iT Client connected to an Open iT Server or a coexistent Open iT setup
- Activated LicenseAnalyzer collection and FlexNet poller
- License server administrative rights
- Running license manager utility binary and its
location
#
Getting the License Status Utility Binary Location
This configuration requires the path to the license status utility binary, lmutil, to obtain the license status information. Get this by following these steps:
#
Through the Interface
- Open the Task Manager.
- Go to the Details tab.
- Locate
lmutil. - Right-click and choose Open file location.
The path of the binary will be displayed.
#
Through the Command Line
Open a command prompt with Administrator level privileges.
Run the following command to locate the binary:
Command Syntaxwhere /r <installation_drive> lmutilwhere
<installation_drive>is the drive where the license manager is installed.Examplewhere /r C:\ lmutilThe path of the binary will be displayed.
After verifying the path of the polling program, make sure that it is running.
Open a command prompt in the directory of the license server executable or the polling program and run the following command:
lmutil lmstatMake sure no errors are encountered.
Run the following command to locate the binary:
find . | grep lmutilThe path of the binary will be displayed.
#
Configuring Data Collection
These are the required steps to activate and configure collection of FlexNet usage data.
Go to the Components directory, which is by default in
C:\Program Files\OpeniT\Core\Configuration\Components, and back up thelicpoll.xmlconfiguration file.Open a command prompt with Administrator level privileges.
Go to the bin directory, which is by default in
C:\Program Files\OpeniT\Core\bin, run the command:Command Syntaxcd $BIN_DIRExamplecd C:\Program Files\OpeniT\Core\binOnce in the directory, activate the collection of FlexNet data, run the command:
Command Syntaxopenit_confinit -c "licpoll.license-types.flex-sample.active=true"Set the FlexNet license file location, run the command:
Command Syntaxopenit_confinit -c "licpoll.license-types.flex-sample.license-file=<flex-license-file>"where
<flex-license-file>is the filename, including the path, of the FlexNet license file.Exampleopenit_confinit -c "licpoll.license-types.flex-sample.license-file=C:\Program Files\flex\license.dat"The supported extensions for license files are
.lic,.dat,.txt,.ft, and.mic, with support for the.ftand.micextensions introduced in version 10.2.560.Or set the FlexNet license file directory, run the command:
Command Syntaxopenit_confinit -c "licpoll.license-types.flex-sample.license-dir=<flex-license-dir>"where
<flex-license-dir>is the directory containing the FlexNet license file.Exampleopenit_confinit -c "licpoll.license-types.flex-sample.license-file=C:\Program Files\flex"Set the path to the binary used by the FlexNet License Server, run the command:
Command Syntaxopenit_confinit -c "licpoll.license-types.flex-sample.status-command=<binary_path>"where
<binary_path>is the obtained path inGetting the License Status Utility Binary Path .Exampleopenit_confinit -c "licpoll.license-types.flex-sample.status-command=C:\flexnet\bin\lmutil"Update the configuration file, run the command:
Command Syntaxopenit_confbuilder --clientMake sure no errors are encountered.
Refer to the FlexNet Data Collection Configuration table to learn more about FlexNet configuration in licpoll.xml.
These instructions assume your configuration directory is /var/opt/openit/etc.
Go to the Components directory, which is by default in
/var/opt/openit/etc/Components, and back up thelicpoll.xmlconfiguration file.Go to the bin directory, which is by default in
/opt/openit/bin, run the command:Command Syntaxcd $BIN_DIRExamplecd /opt/openit/binOnce in the directory, activate the collection of FlexNet data, run the command:
Command Syntax./openit_confinit -r /var/opt/openit/ -d /var/opt/openit/etc/ -c "licpoll.license-types.flex-sample.active=true"Set the FlexNet license file location, run the command:
Command Syntax./openit_confinit -r /var/opt/openit/ -d /var/opt/openit/etc/ -c "licpoll.license-types.flex-sample.license-file=<flex-license-file>"where
<flex-license-file>is the filename, including the path, of the FlexNet license file.Example./openit_confinit -r /var/opt/openit/ -d /var/opt/openit/etc/ -c "licpoll.license-types.flex-sample.license-file=/var/flex/license.dat"The supported extensions for license files are
.lic,.dat,.txt,.ft, and.mic, with support for the.ftand.micextensions introduced in version 10.2.560.Or set the FlexNet license file directory, run the command:
Command Syntax./openit_confinit -r /var/opt/openit/ -d /var/opt/openit/etc/ -c "licpoll.license-types.flex-sample.license-dir=<flex-license-dir>"where
<flex-license-dir>is the directory containing the FlexNet license file.Example./openit_confinit -r /var/opt/openit/ -d /var/opt/openit/etc/ -c "licpoll.license-types.flex-sample.license-file=/var/flex"Set the path to the binary used by the FlexNet License Server, run the command:
Command Syntax./openit_confinit -r /var/opt/openit/ -d /var/opt/openit/etc/ -c "licpoll.license-types.flex-sample.status-command=<binary_path>"where
<binary_path>is the obtained path inGetting the License Status Utility Binary Path .Example./openit_confinit -r /var/opt/openit/ -d /var/opt/openit/etc/ -c "licpoll.license-types.flex-sample.status-command=/var/flexnet/bin/lmutil"Update the configuration file, run the command:
Command Syntax./openit_confbuilder --clientMake sure no errors are encountered.
Refer to the FlexNet Data Collection Configuration table to learn more about FlexNet configuration in licpoll.xml.
#
Verifying Data Collection
After configuration, you can verify that the data is collected by following these steps:
Open a command prompt with Administrator level privileges.
Go to the bin directory, which is by default in
C:\Program Files\OpeniT\Core\bin, run the command:Command Syntaxcd $BIN_DIRExamplecd C:\Program Files\OpeniT\Core\binRun the command:
Command Syntaxopenit_licpoll -# 1Verify that the temp directory, which is by default in
C:\ProgramData\OpeniT\Data\temp, contains aLicPolldirectory containing.dataandstatus-*.logfiles.
Go to the bin directory, which is by default in
/opt/openit/bin, run the command:Command Syntaxcd $BIN_DIRExamplecd /opt/openit/binRun the command:
Command Syntax./openit_licpoll -# 1Verify that the temp directory, which is by default in
/var/opt/openit/temp, contains aLicPolldirectory containing.dataandstatus-*.logfiles.
Continue reading if you need to configure log file parsing. If not, here are some
#
Configuring Log File Parsing
Open iT collects log files and converts them to Open iT format.
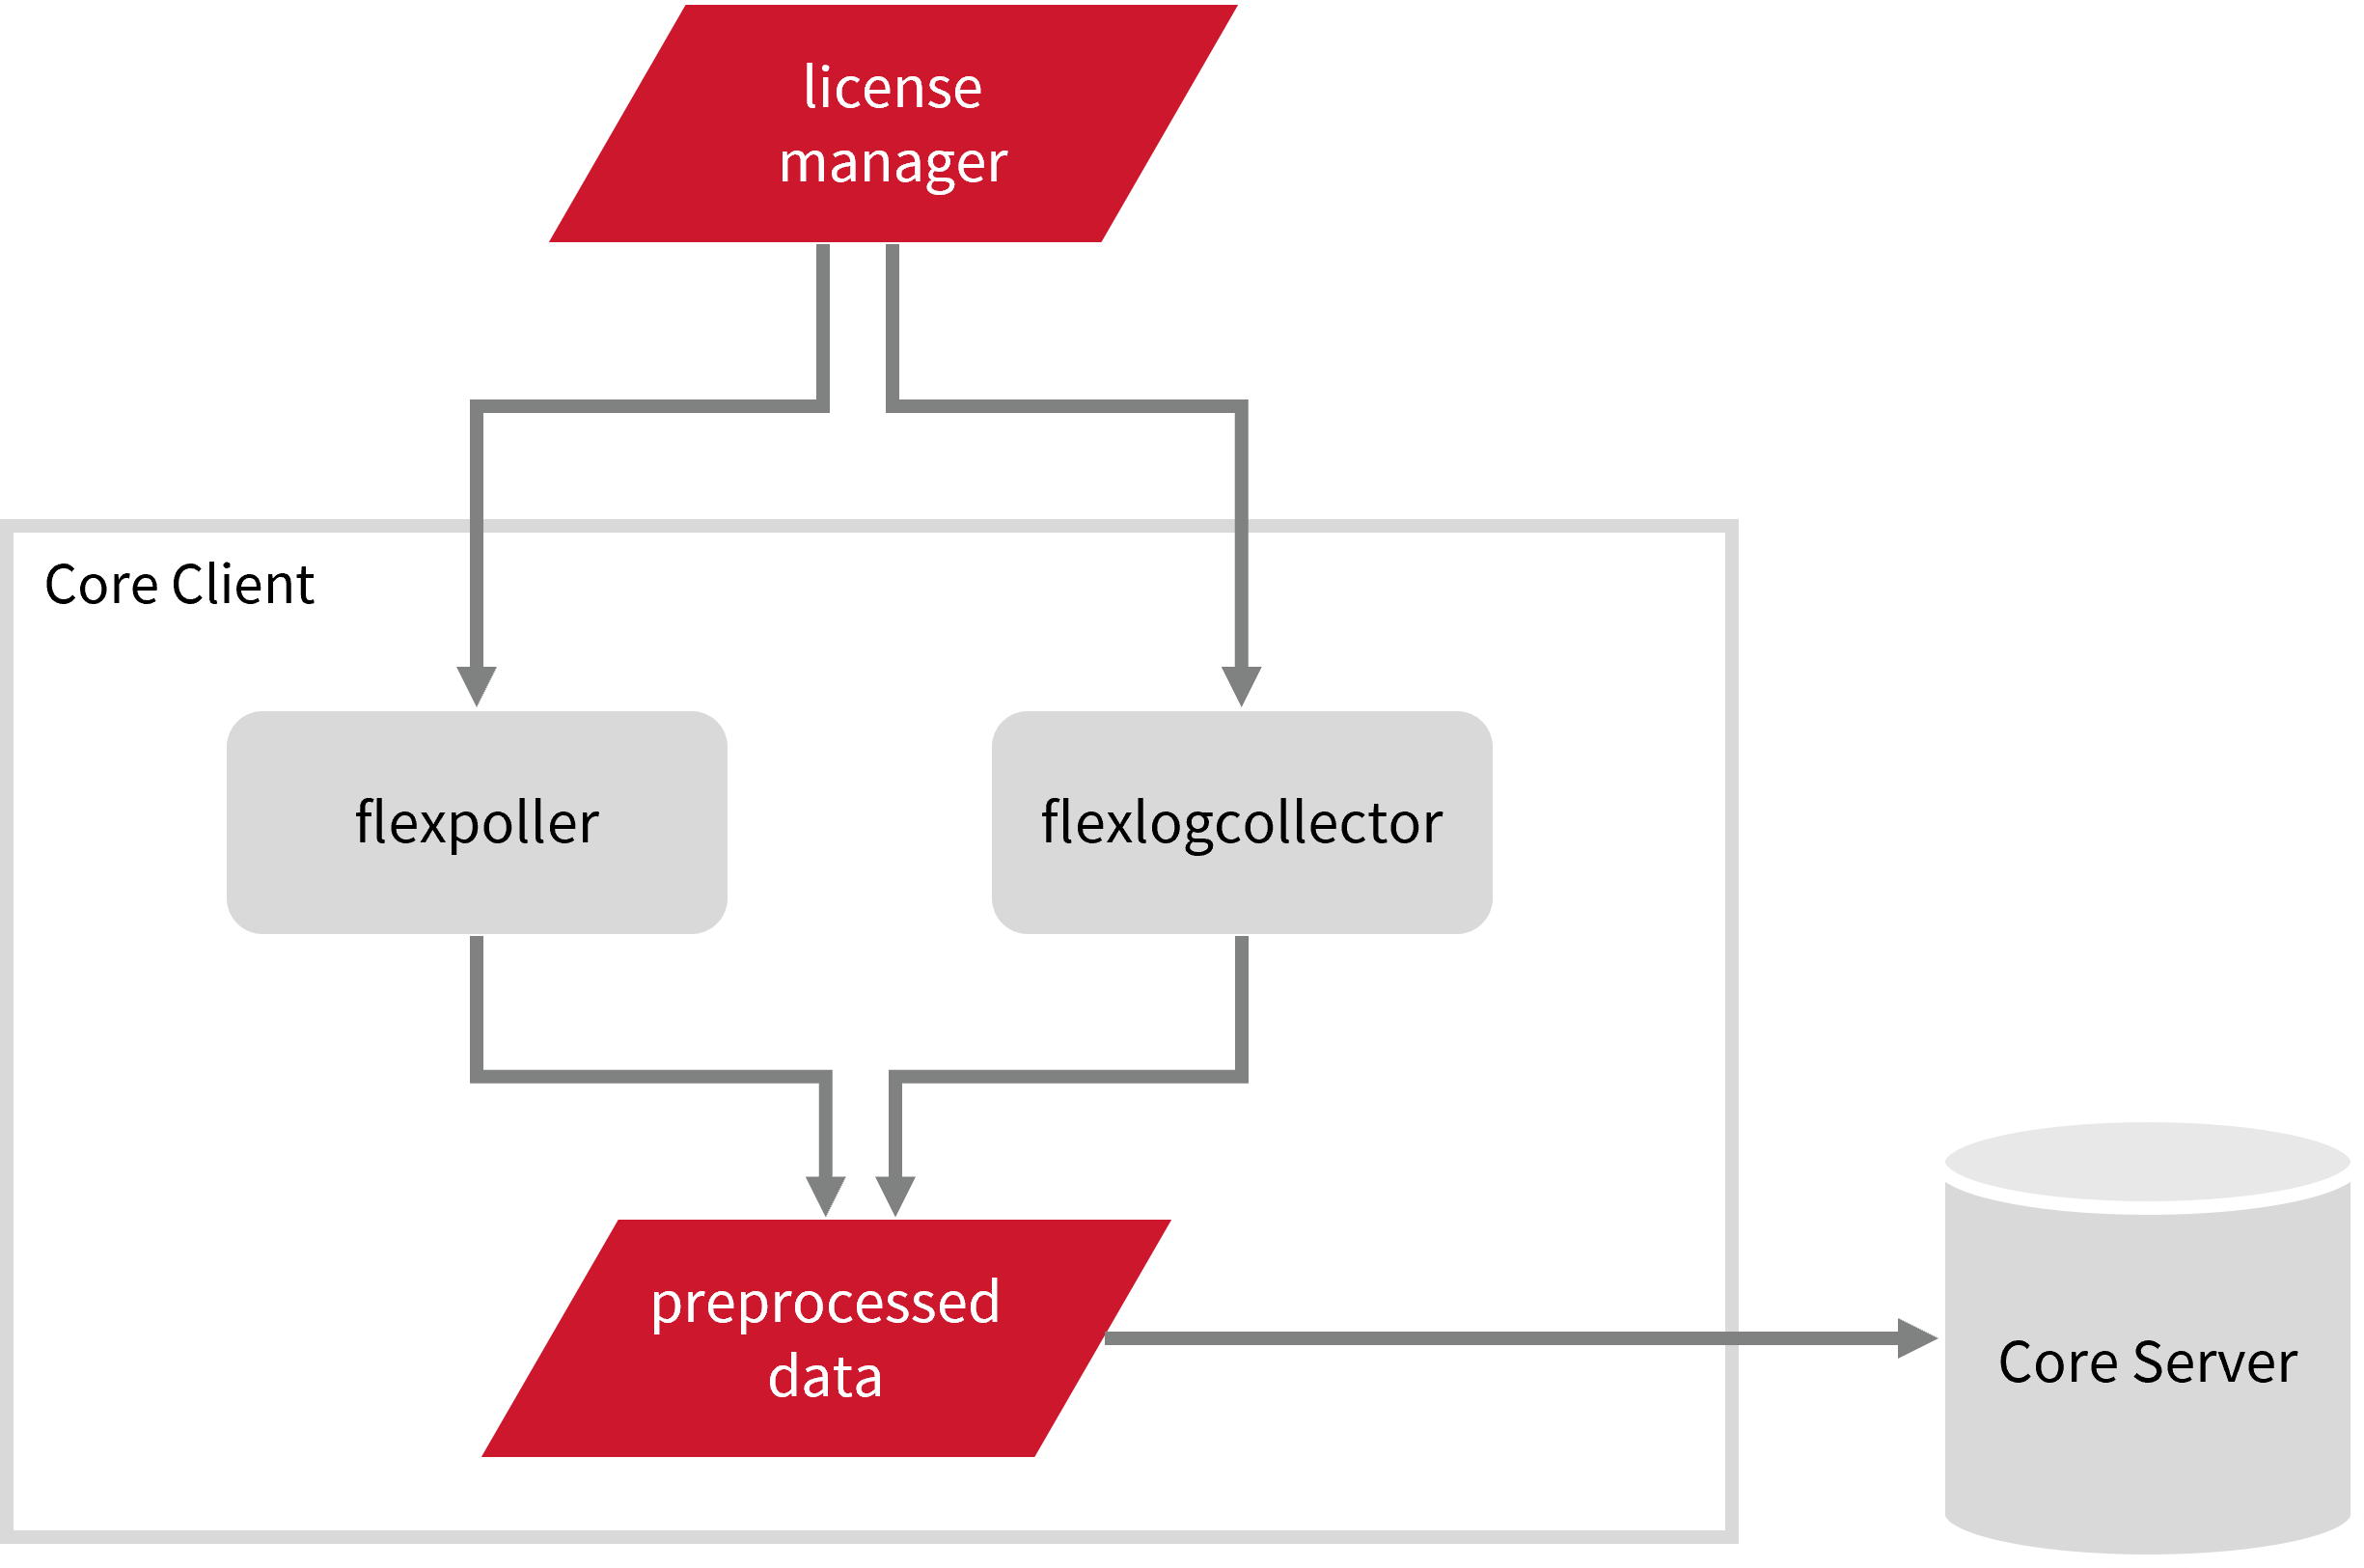
The logfile-based data collection for FlexNet data uses two binaries for data collection: flexlogcollector2 and flex-poller. The data collected by flexlogcollector2 is the primary data, and the flexpoller data assist in processing and fixing any issues/errors in the debug log. Without the flexpoller input, we can only start processing from the licenseserver startup/restarts, where we can start counting from 0 usages.
This will produce the following aggregated data types used for historical reporting:
The following sections will guide you in setting up the necessary configuration to collect and send the required data to the server.
#
Requirements
- An Open iT Client connected to an Open iT Server or a coexistent Open iT setup
- Activated LicenseAnalyzer collection and FlexNet log collection
- License server administrative rights
- Full path to the debug log file
#
Activating Log Data Collection
These are the required steps to activate collection of FlexNet log data.
Open a command prompt with Administrator level privileges.
Go to the bin directory, which is by default in
C:\Program Files\OpeniT\Core\bin, run the command:Command Syntaxcd $BIN_DIRExamplecd C:\Program Files\OpeniT\Core\binOnce in the directory, activate the collection of FlexNet log data, run the command:
Command Syntaxopenit_oconfinit -u "collect_license_flexnet.root.scheduler.jobs.collect_flexlog.general.active=true"
These instructions assume your configuration directory is /var/opt/openit/etc.
Go to the bin directory, which is by default in
/opt/openit/bin, run the command:Command Syntaxcd $BIN_DIRExamplecd /opt/openit/binOnce in the directory, activate the collection of FlexNet log data, run the command:
Command Syntax./openit_oconfinit -u "collect_license_flexnet.root.scheduler.jobs.collect_flexlog.general.active=true"
The collection runs every midnight by default. To configure the intervals, locate the instances attribute under collect_flexlog, collect_flexpoller, transfer_flexlog, or transfer_flexpoll in the same file and configure the attributes.
Refer to the FlexNet Log Job Scheduler Instances Configuration table to learn the attributes used to configure FlexNet data collection and transfer.
#
Configuring Log File Collection
#
Configuring FlexLogCollector2
These are the required steps to configure collection of FlexNet log files.
Go to the Components directory, which is by default in
C:\Program Files\OpeniT\Core\Configuration\Components, and openflexlogcollector2.xml.Locate and rename
flexlog-sample. Make sure that the new name is unique to avoid errors.flexlogcollector2.xml... 61| <Object> 62| <Name>flexlog-sample</Name> 63| <Description>Name of this object is product name.</Description> 64| <SubObjects> ...Example: flexlogcollector2.xml... 61| <Object> 62| <Name>flexlog-source</Name> 63| <Description>Name of this object is product name.</Description> 64| <SubObjects> ...Locate object node
product-nameand set its value toserver;daemon.flexlogcollector2.xml... 70| <Object> 71| <Name>product-name</Name> 72| <Description>Name of product to assign this FLEXlm debug file to</Description> 73| <Value type="String">Flexlog</Value 74| <Object>> ...Example: flexlogcollector2.xml... 70| <Object> 71| <Name>product-name</Name> 72| <Description>Name of product to assign this FLEXlm debug file to</Description> 73| <Value type="String">server;daemon</Value 74| <Object>> ...Locate object node
debug-fileand change its value to the full path, including the file name, of the FlexNet debug file.flexlogcollector2.xml... 80| <Object> 81| <Name>debug-file</Name> 82| <Description>Full path to the FLEXlm debug file. file to</Description> 83| <Value type="String">[debugfile]</Value 84| <Object>> ...Example: flexlogcollector2.xml... 80| <Object> 81| <Name>debug-file</Name> 82| <Description>Full path to the FLEXlm debug file. file to</Description> 83| <Value type="String">C:ProgramData\flexlm\logs\license.log</Value 84| <Object>> ...You can add more source blocks if you want to add more data sources.
Save the changes.
Open a command prompt with Administrator level privileges.
Go to the bin directory, which is by default in
C:\Program Files\OpeniT\Core\bin, run the command:Command Syntaxcd $BIN_DIRExamplecd C:\Program Files\OpeniT\Core\binUpdate the configuration file, run the command:
Command Syntaxopenit_confbuilder --clientMake sure no errors are encountered.
Refer to the Flexlogcollector2 Log File Collection Configuration table to learn more about Flexlogcollector2 configuration.
These instructions assume your configuration directory is /var/opt/openit/etc.
Go to the Components directory, which is by default in
/var/opt/openit/etc/Components, and openflexlogcollector2.xml.Locate and rename
flexlog-sample. Make sure that the new name is unique to avoid errors.flexlogcollector2.xml... 61| <Object> 62| <Name>flexlog-sample</Name> 63| <Description>Name of this object is product name.</Description> 64| <SubObjects> ...Example: flexlogcollector2.xml... 61| <Object> 62| <Name>flexlog-source</Name> 63| <Description>Name of this object is product name.</Description> 64| <SubObjects> ...Locate object node
product-nameand set its value toserver;daemon.flexlogcollector2.xml... 70| <Object> 71| <Name>product-name</Name> 72| <Description>Name of product to assign this FLEXlm debug file to</Description> 73| <Value type="String">Flexlog</Value 74| <Object>> ...Example: flexlogcollector2.xml... 70| <Object> 71| <Name>product-name</Name> 72| <Description>Name of product to assign this FLEXlm debug file to</Description> 73| <Value type="String">server;daemon</Value 74| <Object>> ...Locate object node
debug-fileand change its value to the full path, including the file name, of the FlexNet debug file.flexlogcollector2.xml... 80| <Object> 81| <Name>debug-file</Name> 82| <Description>Full path to the FLEXlm debug file. file to</Description> 83| <Value type="String">[debugfile]</Value 84| <Object>> ...Example: flexlogcollector2.xml... 80| <Object> 81| <Name>debug-file</Name> 82| <Description>Full path to the FLEXlm debug file. file to</Description> 83| <Value type="String">/var/flexlm/logs/license.log</Value 84| <Object>> ...You can add more source blocks if you want to add more data sources.
Save the changes.
Open a command prompt with Administrator level privileges.
Go to the bin directory, which is by default in
/opt/openit/bin, run the command:Command Syntaxcd $BIN_DIRExamplecd /opt/openit/binUpdate the configuration file, run the command:
Command Syntax./openit_confbuilder --clientMake sure no errors are encountered.
Refer to the Flexlogcollector2 Log File Collection Configuration table to learn more about Flexlogcollector2 configuration.
#
Configuring FlexPoller
Flexpoller collects snapshot views of license use through lmstat, which is set to match the debug log data collected by the flexlogcollector2.
These are the required steps to add vendor daemon debug logs as data source.
Go to the Components directory, which is by default in
C:\Program Files\OpeniT\Core\Configuration\Components, and openflexpoller.xml.Locate and rename
flexpoller-sampleto the name of the source to poll. Make sure that the new name is unique to avoid errors.flexpoller.xml... 87| <Object> 88| <Name>flexpoller-sample</Name> 89| <Description>Source to poll.</Description> ...Example:flexpoller.xml... 87| <Object> 88| <Name>flexpoller-source</Name> 89| <Description>Source to poll.</Description> ...Locate object node
product-nameand set its value toserver;daemon.flexpoller.xml... 96| <Object> 97| <Name>product-name</Name> 98| <Description>Name of product under which to group the data of this poll</Description> 99| <Value type="String">Flexlog</Value 100| <Object>> ...Example: flexpoller.xml... 96| <Object> 97| <Name>product-name</Name> 98| <Description>Name of product under which to group the data of this poll</Description> 99| <Value type="String">server;daemon</Value 100| <Object>> ...Locate object node
license-fileand change its value to the full path, including the file name, of the FlexNet license file.flexpoller.xml... 101| <Object> 102| <Name>license-file</Name> 103| <Description>Full path to a license file for features on the license server in question.</Description> 104| <Value type="String">[license-file]</Value 105| <Object>> ...Example: flexpoller.xml... 101| <Object> 102| <Name>license-file</Name> 103| <Description>Full path to a license file for features on the license server in question.</Description> 104| <Value type="String">C:ProgramData\flexlm\license.dat</Value 105| <Object>> ...You can add more source blocks if you want to add more data sources.
Save the changes.
Open a command prompt with Administrator level privileges.
Go to the bin directory, which is by default in
C:\Program Files\OpeniT\Core\bin, run the command:Command Syntaxcd $BIN_DIRExamplecd C:\Program Files\OpeniT\Core\binUpdate the configuration file, run the command:
Command Syntaxopenit_confbuilder --clientMake sure no errors are encountered.
Refer to the Flexpoller Data Collection Configuration table to learn more about Flexpoller configuration.
These instructions assume your configuration directory is /var/opt/openit/etc.
Go to the Components directory, which is by default in
/var/opt/openit/etc/Components, and openflexpoller.xml.Locate and rename
flexpoller-sampleto the name of the source to poll. Make sure that the new name is unique to avoid errors.flexpoller.xml... 87| <Object> 88| <Name>flexpoller-sample</Name> 89| <Description>Source to poll.</Description> ...Example: flexpoller.xml... 87| <Object> 88| <Name>flexpoller-source</Name> 89| <Description>Source to poll.</Description> ...Locate object node
product-nameand set its value toserver;daemon.flexpoller.xml... 96| <Object> 97| <Name>product-name</Name> 98| <Description>Name of product under which to group the data of this poll</Description> 99| <Value type="String">Flexlog</Value 100| <Object>> ...Example: flexpoller.xml... 96| <Object> 97| <Name>product-name</Name> 98| <Description>Name of product under which to group the data of this poll</Description> 99| <Value type="String">server;daemon</Value 100| <Object>> ...Locate object node
license-fileand change its value to the full path, including the file name, of the FlexNet license file.flexpoller.xml... 101| <Object> 102| <Name>license-file</Name> 103| <Description>Full path to a license file for features on the license server in question.</Description> 104| <Value type="String">[license-file]</Value 105| <Object>> ...Example: flexpoller.xml... 101| <Object> 102| <Name>license-file</Name> 103| <Description>Full path to a license file for features on the license server in question.</Description> 104| <Value type="String">/var/flexlm/license.dat</Value 105| <Object>> ...You can add more source blocks if you want to add more data sources.
Save the changes.
Open a command prompt with Administrator level privileges.
Go to the bin directory, which is by default in
/opt/openit/bin, run the command:Command Syntaxcd $BIN_DIRExamplecd /opt/openit/binUpdate the configuration file, run the command:
Command Syntax./openit_confbuilder --clientMake sure no errors are encountered.
Refer to the Flexpoller Data Collection Configuration table to learn more about Flexpoller configuration.
#
Verifying Log Data Collection
After configuration, you can verify that the data is collected and sent to the server by following these steps:
Open a command prompt with Administrator level privileges.
Go to the bin directory, which is by default in
C:\Program Files\OpeniT\Core\bin, run the command:Command Syntaxcd $BIN_DIRExamplecd C:\Program Files\OpeniT\Core\binRun the command:
Command Syntaxopenit_executor -r collect_license_flexnetVerify that there are
archiver*.infiles created in the server in the archiver directory, which is by default inC:\ProgramData\OpeniT\Data\incoming\archiver.
Go to the bin directory, which is by default in
/opt/openit/bin, run the command:Command Syntaxcd $BIN_DIRExamplecd /opt/openit/binRun the command:
Command Syntax./openit_executor -r collect_license_flexnetVerify that there are
archiver*.infiles created in the incoming directory in your defined data_dir($ROOT_DATA_DIR)upon Open iT server installation.
#
Configuring Reserved Licenses Parsing
Open iT collects and parses options files, then merges the processed data to the server.
#
Historical
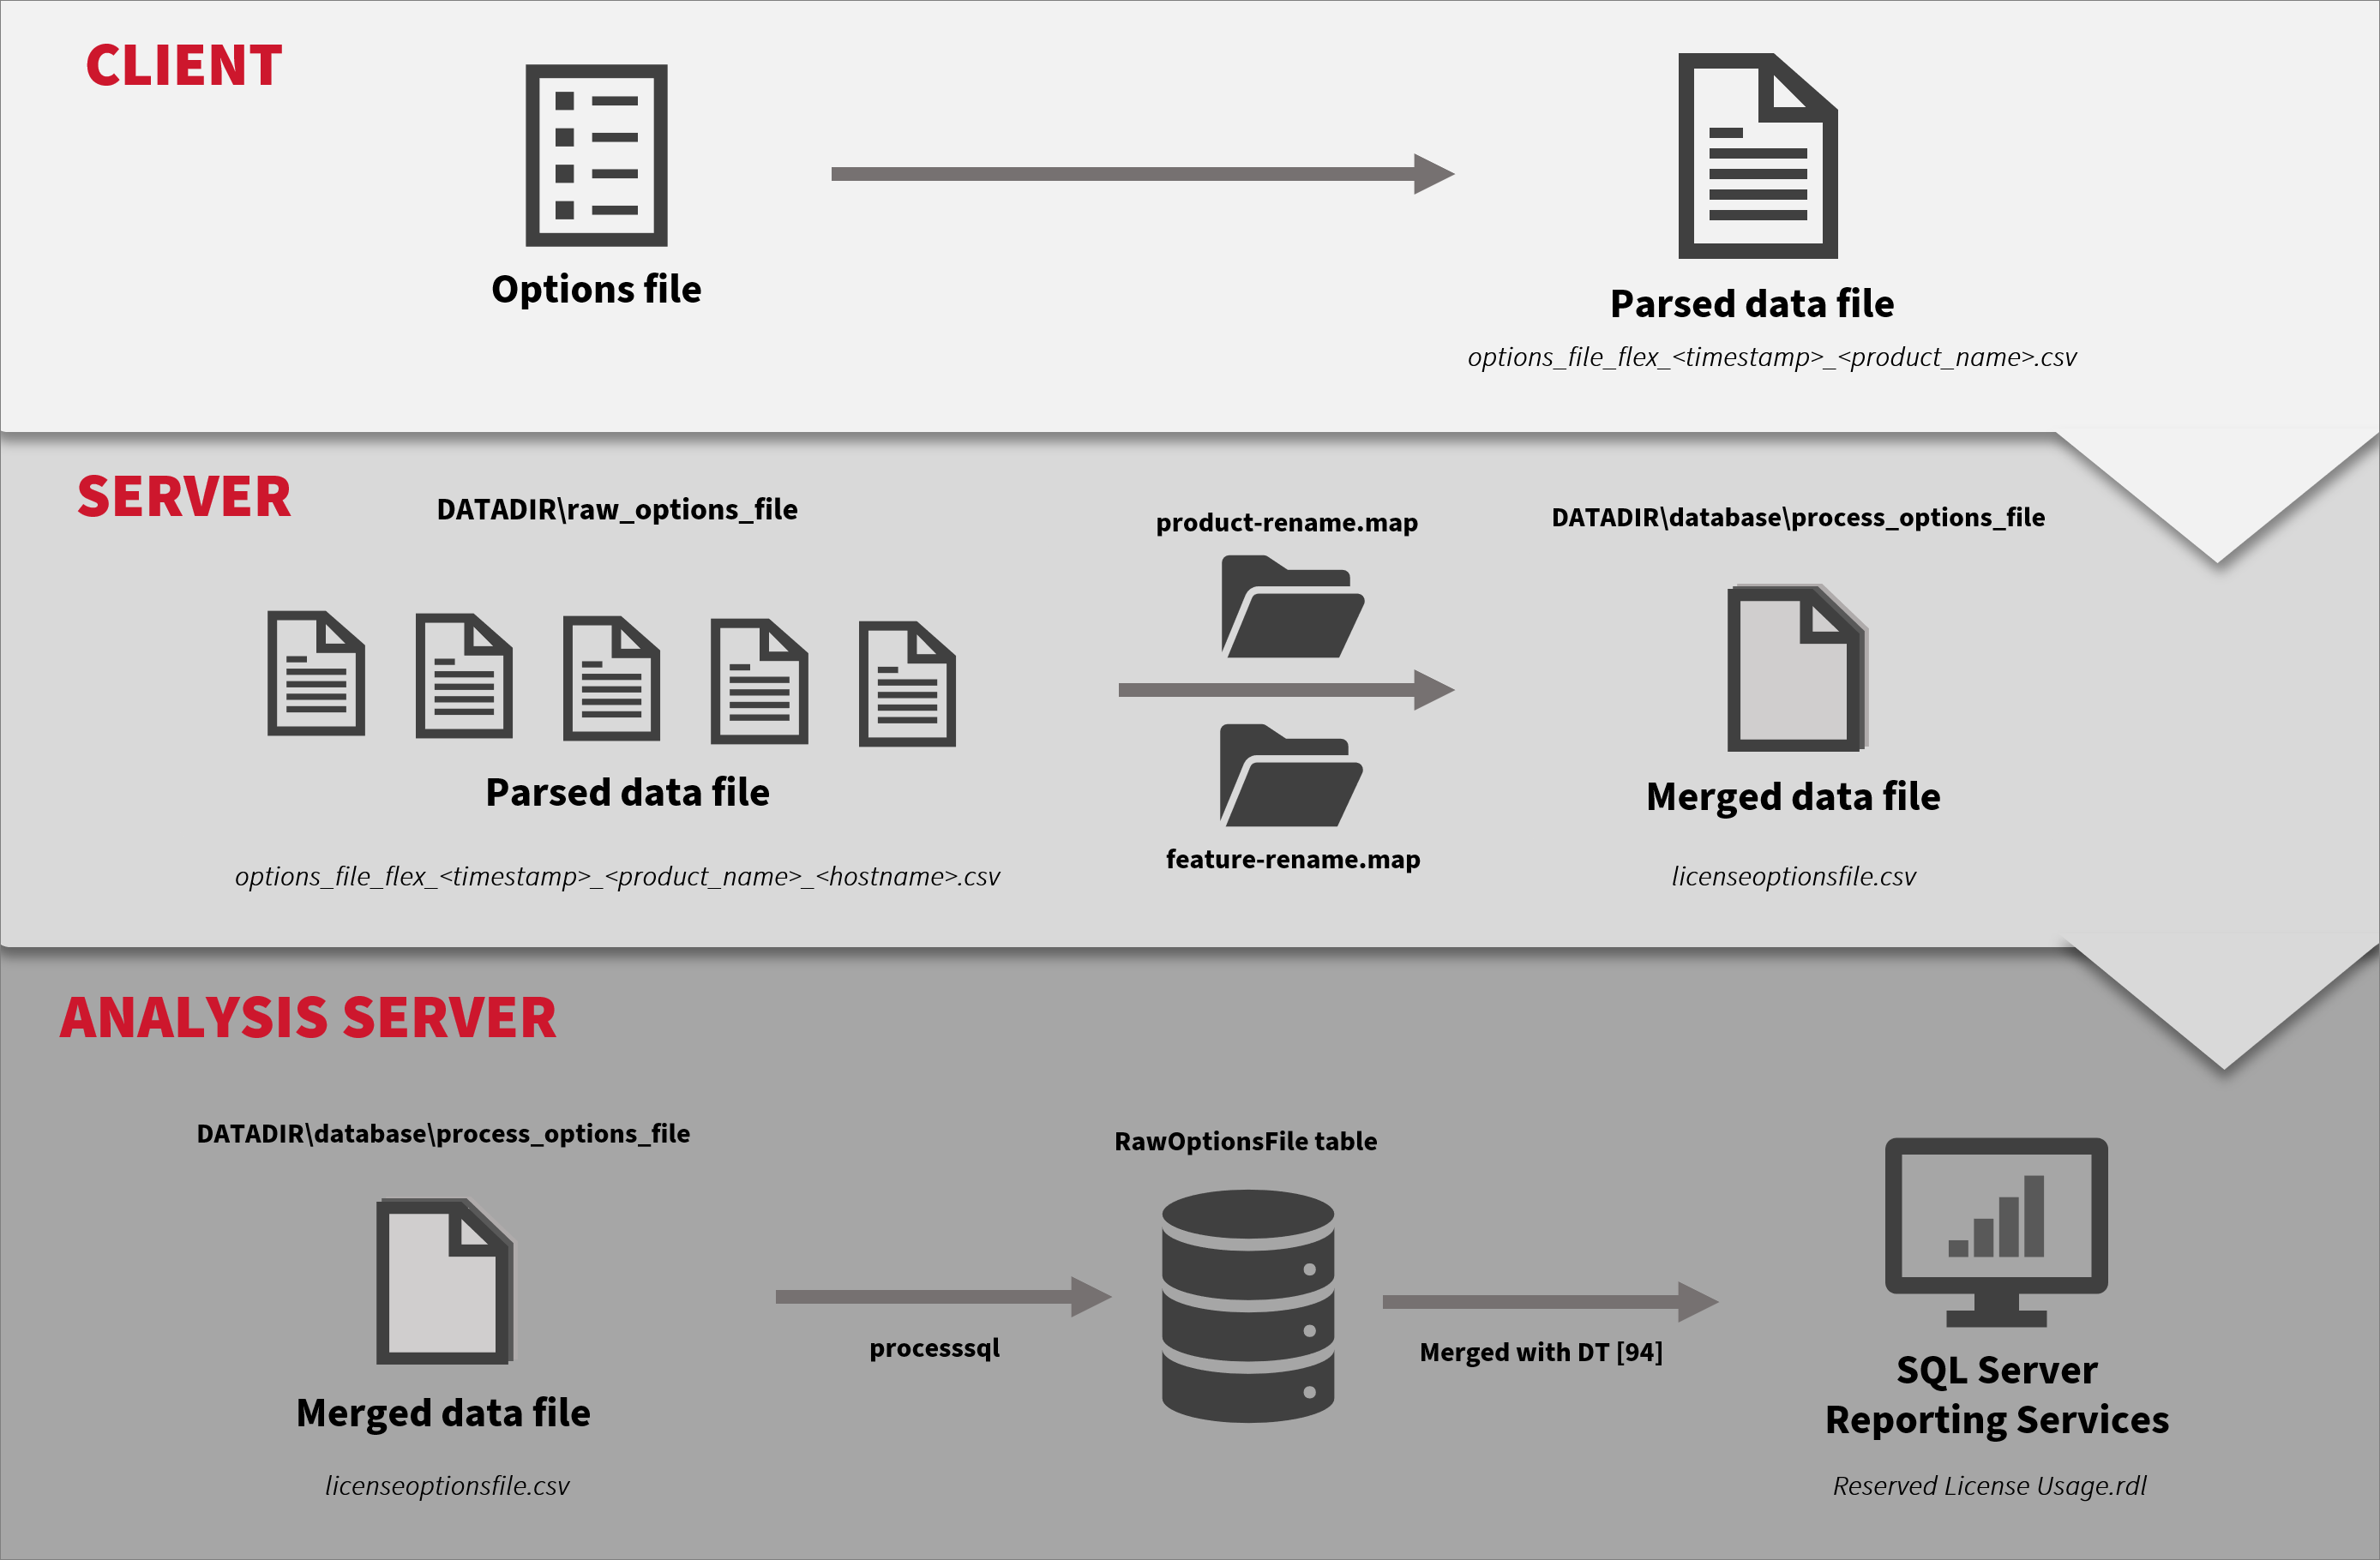
The client reads the configured options file in the license manager. All parsed data are formatted to generate a comma-separated value (CSV) file named options_file_flex_<timestamp>_<vendor_license_name>, which the client sends to the server for data merging and processing.
The server stores the parsed data from various clients in the server, which is by default in C:\ProgramData\OpeniT\Data\raw_options_file. The received files are then processed and merged into one CSV file named licenseoptionsfile.csv, stored in C:\ProgramData\OpeniT\Data\processed_options_file by default.
The Analysis Server's daily processing will load the merged CSV file from C:\ProgramData\OpeniT\Data to the SQL Server database in the RawOptionsFile table. Once loaded, the data can be reported through the SQL Reporting Services using the Reserved License Usage Template.
#
Real-time
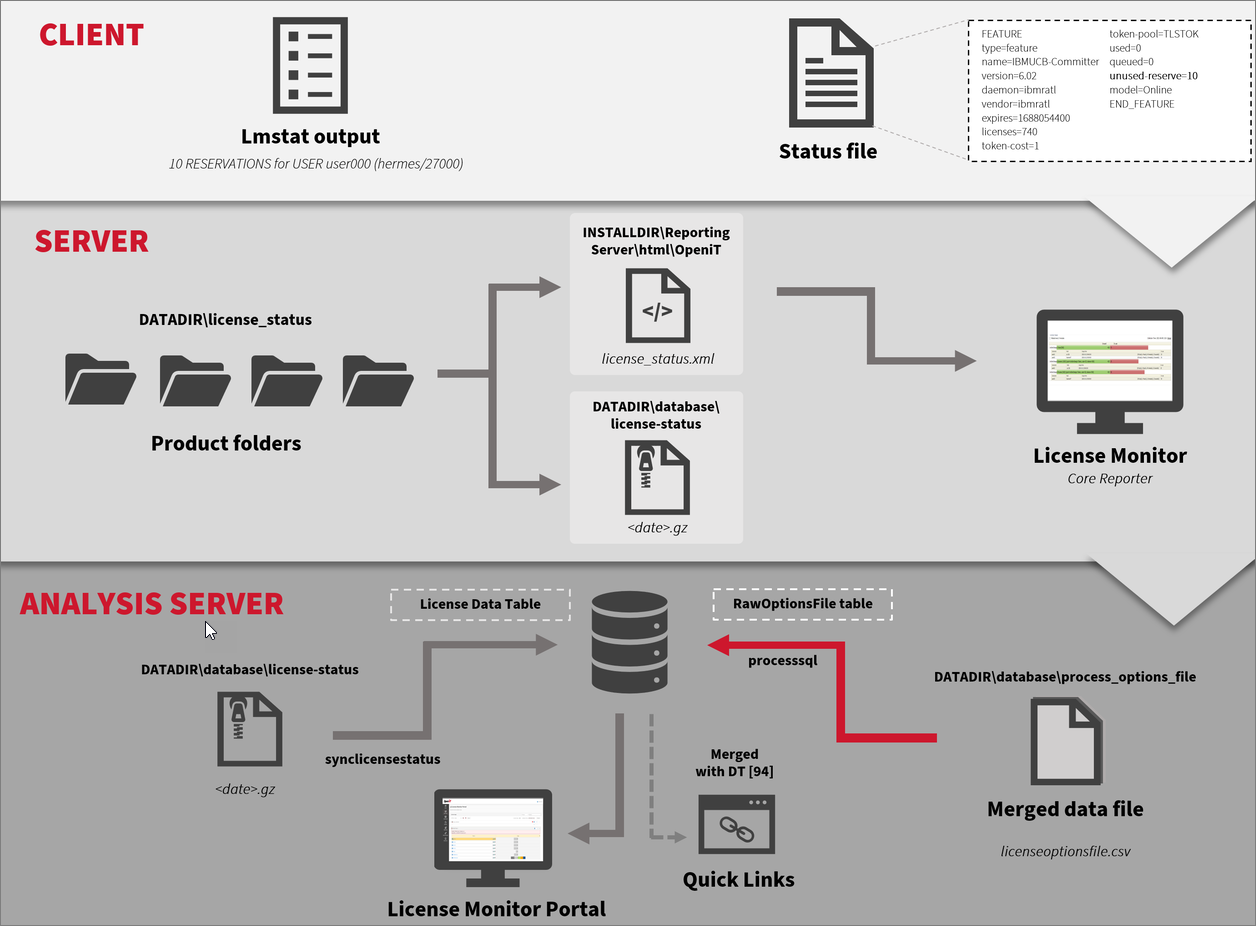
The client polls the license status output to get the reservation lines for each configured feature in the options file. This information is then added to the status data as a new line, unused-reserve. Once the status data is sent to the server, it is processed to generate the license_status.xml file used by the Open iT Core Reporter License Monitor and the license status data file used by the Open iT Analysis Server License Monitor Portal, with additional information about the current total reserved licenses of each feature.
All newly added information in license status data in the Analysis Server is synchronized and stored in the SQL Server database. The License Monitor Portal displays information on reserved license usage for each feature. The new quick link for Reserved License Utilization Trend uses the processed data for historical reporting.
#
Requirements
- Options file in the license manager
- (94) OLAP User Concurrency in the Core Server database
- SQL Server Reporting Services
#
Activating Options File Parsing
Apply the configurations shown in the Open iT client.
Go to the scheduler directory, which is by default in
C:\Program Files\OpeniT\Core\Configuration\scheduler, and opencollect_options_flex.oconf.Locate and set
root.scheduler.jobs.parse_optionsfile.general.activeto true to activate the parsing of the options file.collect_options_flex.oconf15| general 16| { 17| active 18| { 19| type=bool 20| value=trueLocate and set
root.scheduler.jobs.parse_optionsfile.operations.argumentsand set the value of the following parameters:--srcdir- the valid path of the options file.--srcpattern- the file name and extension of the options file.--product-name- the vendor license name to use.
Note that
product-nameshould be the same as the value ofproductinlicense_status.Example: collect_options_flex.oconf46| arguments 47| { 48| description=Details for collection 49| type=string 50| value=--srcdir "C:/Program Files/ANSYS/Shared Files/license_files" --srcpattern "*.opt" --trgdir "${OpeniT.directories.temp}/RawOptions" --product-name "host557;ansyslmd" 51| }Save the changes.
The parsing runs hourly. To configure the intervals, locate the instances attribute under parse_optionsfile or transfer_optionsfile_flex in the same file and configure the attributes.
Refer to the FlexNet Options File Parsing Scheduler Instances Configuration table below to learn more about the attributes used to configure FlexNet options file parsing.
#
Activating Options File Merging
Apply the configurations shown in the Open iT server.
Go to the scheduler directory, which is by default in
C:\Program Files\OpeniT\Core\Configuration\scheduler, and opencore_optionsfile.oconf.Locate and set
root.scheduler.jobs.core_merge_optionsfile.general.activeto true to activate merging of the options file.core_optionsfile.oconf14| general 15| { 16| active 17| { 18| type=bool 19| value=trueSave the changes.
The processing runs every five (5) minutes. To configure the intervals, locate the instances attribute under core_merge_optionsfile, core_map_optionsfile or core_summzarize_optionsfile in the same file and configure the attributes.
Refer to the FlexNet Options File Merging Scheduler Instances Configuration table below to learn more about the attributes used to configure FlexNet options file parsing.
#
Loading Data in Analysis Server
- Include the processing of raw options file with the
RunETLcommand. Including Raw Options File Processing with RunETL Command - Process the loaded SQL data with the
/fullwipeparameter. Process SQL Data
#
Troubleshooting
#
Empty Reserved Licenses Column
#
Problem
This issue may occur when the reserved license information processing is not activated in the license status converter.
#
Resolution
Apply the configurations shown in the Open iT server.
Go to the Components directory, which is by default in
C:\Program Files\OpeniT\Core\Configuration\Components, and openlicensestatusconverter.xml.Locate the
process-reserveobject node and set its subobject nodeactivetotrueto activate the processing of reserved license information.licensestatusconverter.xml509| <Object> 510| <Name>process-reserve</Name> 511| <Description>Process Unused and Total Reserve Licenses</Description> 512| <SubObjects> 513| <Object> 514| <Name>active</Name> 515| <Description>Set whether processing reserve licenses is active.</Description> 516| <Value type="Bool">true</Value> 517| </Object>Save the changes.
#
Next Steps?
Renaming Vendor License Renaming Features Create and Add Report License Monitor Reporting