We’re upgrading your documentation experience!
A new doc website is live at docs.openit.cloud — a temporary preview during our transition. This website is now in maintenance-only mode (only critical issues will be addressed).
Explore the new website and send us your feedback!
#
Configuring Web Components
This section shows the step-by-step configuration of the keys related to specific web interface components.
#
Setting Admin Portal URL
This feature is discontinued in v10.2.
Use this key to set a valid URL of an Open iT Admin Portal for API connection. Follow these instructions:
Go to the Configuration page of Analysis Server web interface.
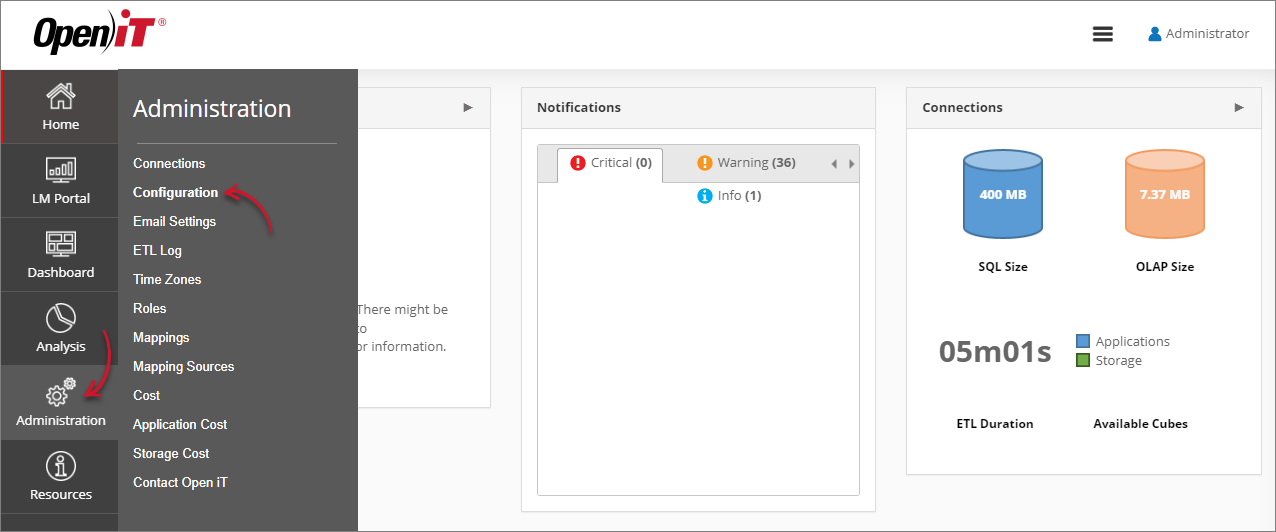 Navigating to the Configuration Page
Locate the Root.Etl.AdminPortalUri key and set its value to a valid URL to an Open iT Admin Portal.
Click Save.
 Setting Root.Etl.AdminPortalUri
Click the Reset Session button at the bottom of the configuration table.
#
Setting Open iT License File Location
Use this key to set a different Open iT license file location than the default C:\Program Files\OpeniT\Core\Configuration\license. Follow these instructions:
Go to the Configuration page of Analysis Server web interface.
Navigating to the Configuration PageLocate the Root.Etl.OpeniTLicensePath key, click it, then set its value to the location of the Open iT license file.
Click Save.
 Setting Root.Etl.OpeniTLicensePath
Click the Reset Session button at the bottom of the configuration table.
#
Setting Open iT Level
Use this key to set the Open iT level you use. Follow these instructions:
Go to the Configuration page of Analysis Server web interface.
Navigating to the Configuration PageLocate the Root.Level key, click it, then choose a level from the dropdown.
Click Save.
 Setting Root.Level
Click the Reset Session button at the bottom of the configuration table.
#
Limiting License Monitor Portal Access
This key is inactive by default; you must activate it to limit License Monitor Portal access to users based on their role and how you configured it under the Roles Configuration page. Follow these instructions to activate:
Go to the Configuration page of Analysis Server web interface.
Navigating to the Configuration PageLocate the Root.LicenseMonitor.Restricted key, click it, then set its value to true.
Click Save.
 Activating Root.LicenseMonitor.Restricted
Click the Reset Session button at the bottom of the configuration table.
#
Displaying Token Information in the License Monitor Portal
This key is inactive by default; you must activate it to display the token information, such as token cost, in the License Monitor Portal. It also entails that the computation for max available and max in use values depends on the token information in the license status. Follow these instructions to activate:
Go to the Configuration page of Analysis Server web interface.
Navigating to the Configuration PageLocate the Root.LicenseMonitorTokenInfo.Enabled key, click it, then set its value to true.
Click Save.
 Activating Root.LicenseMonitorTokenInfo.Enabled
Click the Reset Session button at the bottom of the configuration table.
#
Activating the SAM Import Page
This feature is discontinued in v10.2.
This key is active by default; make sure it is activated to access the SAM Import page. Follow these instructions to activate:
Go to the Configuration page of Analysis Server web interface.
Navigating to the Configuration PageLocate the Root.SamImport.Active key, click it, then set its value to true.
Click Save.
 Activating Root.SamImport.Active
Click the Reset Session button at the bottom of the configuration table.
#
Setting Administrator for SAM Import Page
This feature is discontinued in v10.2.
Use this key to set the administrator for the SAM Import page. Follow these instructions:
Go to the Configuration page of Analysis Server web interface.
Navigating to the Configuration PageLocate the Root.SamImport.Administrators key, click it, then set the value to the
DOMAIN\Usernameof the user you want to set as the SAM Import page administrator.Click Save.
 Setting Root.SamImport.Administrators
Click the Reset Session button at the bottom of the configuration table.
#
Setting SAM Import Upload Directory
This feature is discontinued in v10.2.
Use this key to set the upload directory for the SAM Import data. Follow these instructions:
Go to the Configuration page of Analysis Server web interface.
Navigating to the Configuration PageLocate the Root.SamImport.UploadDirectory key, click it, then set the value to the upload directory of the SAM Import data.
Click Save.
 Setting Root.SamImport.UploadDirectory
Click the Reset Session button at the bottom of the configuration table.
#
Displaying the Copyright Banner
This key is inactive by default; you must activate it to display the copyright banner. Follow these instructions to activate:
Go to the Configuration page of Analysis Server web interface.
Navigating to the Configuration PageLocate the Root.Web.CopyrightBanner key, click it, then set its value to true.
Click Save.
 Activating Root.Web.CopyrightBanner
Click the Reset Session button at the bottom of the configuration table.
#
Setting Analysis Server Home Page
Use this key to set the landing page of your Analysis Server. Follow these instructions:
Go to the Configuration page of Analysis Server web interface.
Navigating to the Configuration PageLocate the Root.Web.HomePage key and set its value to the URI of the page you want to use as a landing page.
For example, typing in Portal/Index means your landing page is the License Monitor Portal.Click Save.
 Setting Root.Web.HomePage
Click the Reset Session button at the bottom of the configuration table.
#
Displaying Time in the License Expiry Column
This key is inactive by default; you must activate it to display the time component in the Expiry column in the License Expiration page. Follow these instructions to activate:
Go to the Configuration page of Analysis Server web interface.
Navigating to the Configuration PageLocate the Root.Web.LicenseExpiration.DisplayTime key, click it, then set its value to true.
Click Save.
 Activating Root.Web.LicenseExpiration.DisplayTime
Click the Reset Session button at the bottom of the configuration table.
#
Setting Default Expired Threshold for License Expiration Page
Use this key to set the default expired threshold filter in the License Expiration page. Follow these instructions:
Go to the Configuration page of Analysis Server web interface.
Navigating to the Configuration PageLocate the Root.Web.LicenseExpiration.ExpiredDays key and set its value to the number of days the license(s) should be expired to show them in the License Expiration table.
Click Save.
 Setting Root.Web.LicenseExpiration.ExpiredDays
Click the Reset Session button at the bottom of the configuration table.
#
Setting Maximum License Age for License Expiration Page
Use this key to set the maximum age in days of the licenses after expiration before they are removed from the license expiry data. Follow these instructions:
Go to the Configuration page of Analysis Server web interface.
Navigating to the Configuration PageLocate the Root.Web.LicenseExpiration.MaxAge key and set its value to the number of days the license(s) should be expired before they are removed from the license expiry data.
Click Save.
 Setting Root.Web.LicenseExpiration.MaxAge
Click the Reset Session button at the bottom of the configuration table.
#
Setting Default License Expiration Page View
Use this key to set the default view of the License Expiration page. Follow these instructions:
Go to the Configuration page of Analysis Server web interface.
Navigating to the Configuration PageLocate the Root.Web.LicenseExpiration.View key, click it, then choose a view from the dropdown.
Options:
- View | Description
-
---- | :----- All | All items will be displayed. Expired | Only items with expired license will be displayed. Valid | Only items with valid license will be displayed.
License Expiration - Views
Click Save.
 Setting Root.Web.LicenseExpiration.View
Click the Reset Session button at the bottom of the configuration table.
#
Setting Default License Age for Expiration Warning
Use this key to set the age of the license(s) to include in the orange feature expiry count. Follow these instructions:
Go to the Configuration page of Analysis Server web interface.
Navigating to the Configuration PageLocate the Root.Web.LicenseExpiration.WarningDays key and set its value to the number of days before the license(s) expire so that their count can be included in the orange feature expiry count.
Click Save.
 Setting Root.Web.LicenseExpiration.WarningDays
Click the Reset Session button at the bottom of the configuration table.
#
Activating the License Metadata Page
This key is inactive by default; you must activate it to access the License Metadata page, which allows administrators to add metadata to the license information. Follow these instructions to activate:
Go to the Configuration page of Analysis Server web interface.
Navigating to the Configuration PageLocate the Root.Web.LicenseMetaData key, click it, then set its value to true.
Click Save.
 Activating Root.Web.LicenseMetaData
Click the Reset Session button at the bottom of the configuration table.
#
Activating the Contract Management Page
This key is inactive by default; you must activate it to access the Contract Management page. Follow these instructions to activate:
Go to the Configuration page of Analysis Server web interface.
Navigating to the Configuration PageLocate the Root.Web.LicensePlanner key, click it, then set its value to true.
Click Save.
 Activating Root.Web.LicensePlanner
Click the Reset Session button at the bottom of the configuration table.
#
Activating Automatic Reload of License Monitor Portal
This feature is discontinued in v10.2.
This key is inactive by default; you must activate it for the License Monitor Portal to reload automatically based on the set
Go to the Configuration page of Analysis Server web interface.
Navigating to the Configuration PageLocate the Root.Web.LMP.AutoReload key, click it, then set its value to true.
Click Save.
 Activating Root.Web.LMP.AutoReload
Click the Reset Session button at the bottom of the configuration table.
#
Setting Aggregation Type for License Monitor Portal
Use this key to set the aggregation type for the License Monitor Portal display. Follow these instructions:
Go to the Configuration page of Analysis Server web interface.
Navigating to the Configuration PageLocate the Root.Web.LMP.FeatureAggregation key, click it, then choose a level from the dropdown.
Click Save.
 Setting Root.Web.LMP.FeatureAggregation
Click the Reset Session button at the bottom of the configuration table.
#
Setting License Monitor Portal Automatic Reload Interval
Use this key to set the interval between License Monitor Portal reloads.
This feature is discontinued in v10.2.
Make sure that the
Follow these instructions:
Go to the Configuration page of Analysis Server web interface.
Navigating to the Configuration PageLocate the Root.Web.LMP.IntervalStartsAt key and set its value to your desired License Monitor Portal reload interval in milliseconds(ms).
Click Save.
 Setting Root.Web.LMP.IntervalStartsAt
Click the Reset Session button at the bottom of the configuration table.
#
Displaying Data in Percentage in the License Monitor Portal
This key is active by default; make sure it is activated to display the License Monitor Portal Level 2 data in percentage. If it is inactive, follow these instructions to activate:
Go to the Configuration page of Analysis Server web interface.
Navigating to the Configuration PageLocate the Root.Web.LMP.Level2UsagePercentage key, click it, then set its value to true.
Click Save.
 Activating Root.Web.LMP.Level2UsagePercentage
Click the Reset Session button at the bottom of the configuration table.
#
Loading Data in the Server Side
This key is inactive by default; you must activate it to load the data in the server side. Follow these instructions to activate:
Go to the Configuration page of Analysis Server web interface.
Navigating to the Configuration PageLocate the Root.Web.LMP.ServerSidePagination key, click it, then set its value to true.
Click Save.
 Activating Root.Web.LMP.ServerSidePagination
Click the Reset Session button at the bottom of the configuration table.
#
Displaying Feature Version in the License Monitor Portal
This key is inactive by default; you must activate it to display the feature version in the License Monitor Portal. Follow these instructions to activate:
Go to the Configuration page of Analysis Server web interface.
Navigating to the Configuration PageLocate the Root.Web.LMP.UseFeatureVersion key, click it, then set its value to true.
Click Save.
 Activating Root.Web.LMP.UseFeatureVersion
Click the Reset Session button at the bottom of the configuration table.
#
Setting Alternative OLAP Cube Access
Use this key to set an alternate to directly accessing the cube. Follow these instructions:
Go to the Configuration page of Analysis Server web interface.
Navigating to the Configuration PageLocate the Root.Web.OlapHttpAccess key and set its value to the URL of a configured MSMDPUMP.
Click Save.
 Setting Root.Web.OlapHttpAccess
Click the Reset Session button at the bottom of the configuration table.
#
Setting Reporting Server URL
Use this key to set a Reporting Server URL to display its License Monitor and Status Monitor in the LM Portal tab.
If you want to display the License Monitor and Status Monitor from a different server, make sure to set up displaying Core Server tracking pages in the Analysis Server.
Follow these instructions:
Go to the Configuration page of Analysis Server web interface.
Navigating to the Configuration PageLocate the Root.Web.ReportingServerUri key and set its value to the Reporting Server URL.
Click Save.
 Setting Root.Web.ReportingServerUri
Click the Reset Session button at the bottom of the configuration table.
#
Displaying Package in the Dashboard and License Monitor Portal
This key is inactive by default; you must activate it to display the package in the Dashboard and License Monitor Portal. Follow these instructions to activate:
Go to the Configuration page of Analysis Server web interface.
Navigating to the Configuration PageLocate the Root.Web.ShowPackage key, click it, then set its value to true.
Click Save.
 Activating Root.Web.ShowPackage
Click the Reset Session button at the bottom of the configuration table.
#
Setting SSRS Report Builder Download URI
Use this key to set a different URL for downloading the SSRS Report Builder than the default https://www.microsoft.com/en-us/download/details.aspx?id=53613. Follow these instructions:
Go to the Configuration page of Analysis Server web interface.
Navigating to the Configuration PageLocate the Root.Web.SSRS2016ReportBuilderDownloadLink key, click it, then set its value to the location of the Open iT license file.
Click Save.
 Setting Root.Web.SSRS2016ReportBuilderDownloadLink
Click the Reset Session button at the bottom of the configuration table.