We’re upgrading your documentation experience!
A new doc website is live at docs.openit.cloud — a temporary preview during our transition. This website is now in maintenance-only mode (only critical issues will be addressed).
Explore the new website and send us your feedback!
#
Configuring Data Processing
This section shows the step-by-step configuration of the keys related to database loading and processing (ETL).
#
Activating the Processing of Data for the Consumption-based Licensing Dashboard
This key is inactive by default; activate it to enable the processing of the consumption data used for the Consumption Based Licensing Dashboard. Follow these instructions to activate:
Go to the Configuration page of Analysis Server web interface.
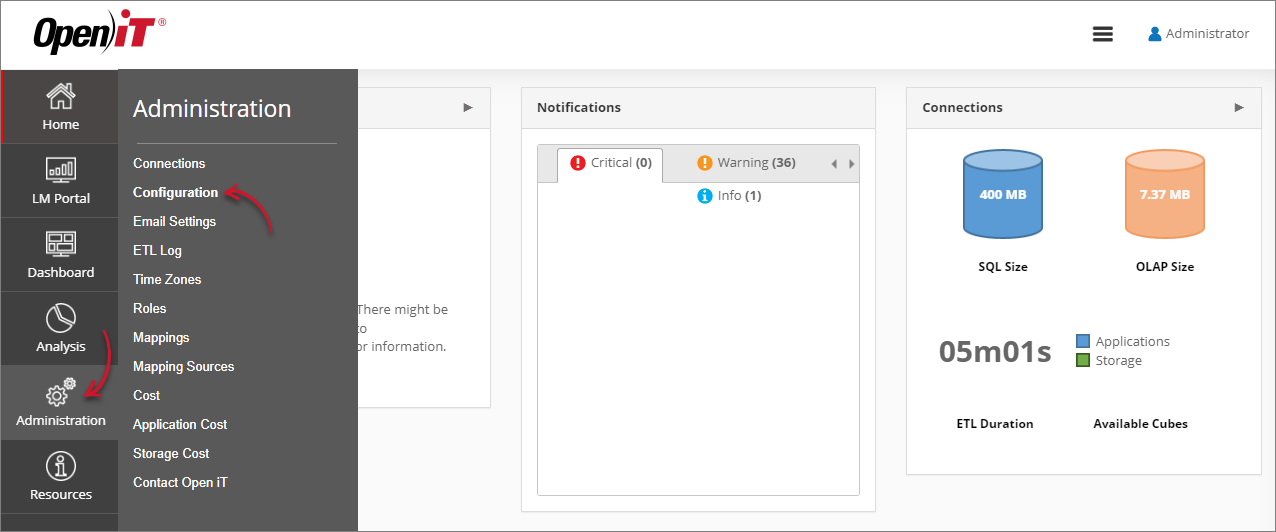 Navigating to the Configuration Page
Locate the Root.Datawarehouse.ProcessConsumption key, click it, then set its value to true.
Click Save.
 Activating Root.Datawarehouse.ProcessConsumption
Click the Reset Session button at the bottom of the configuration table.
#
Activating the Processing of the Application Cost Catalog
This key is inactive by default; activate it to enable the processing of the Application Cost catalog. Follow these instructions to activate:
Go to the Configuration page of Analysis Server web interface.
Navigating to the Configuration PageLocate the Root.Datawarehouse.ProcessCostCatalogLabel key, click it, then set its value to true.
Click Save.
 Activating Root.Datawarehouse.ProcessCostCatalogLabel
Click the Reset Session button at the bottom of the configuration table.
#
Activating the Processing of the Storage Cost Catalog
This key is inactive by default; activate it to enable the processing of the Storage Cost catalog. Follow these instructions to activate:
Go to the Configuration page of Analysis Server web interface.
Navigating to the Configuration PageLocate the Root.Datawarehouse.ProcessStorageCostLabel key, click it, then set its value to true.
Click Save.
 Activating Root.Datawarehouse.ProcessStorageCostLabel
Click the Reset Session button at the bottom of the configuration table.
#
Activating the Processing of Distinct Users per Day
This key is inactive by default; activate it to enable the processing of distinct users per day (User Days measure). Follow these instructions to activate:
Go to the Configuration page of Analysis Server web interface.
Navigating to the Configuration PageLocate the Root.Datawarehouse.ProcessUserDays key, click it, then set its value to true.
Click Save.
 Activating Root.Datawarehouse.ProcessUserDays
Click the Reset Session button at the bottom of the configuration table.
#
Activating the Processing of the Work Break Event
This key is inactive by default; activate it to enable the processing of the Work Break Event. Follow these instructions to activate:
Go to the Configuration page of Analysis Server web interface.
Navigating to the Configuration PageLocate the Root.Datawarehouse.ProcessWorkBreakEvent key, click it, then set its value to true.
Click Save.
 Activating Root.Datawarehouse.ProcessWorkBreakEvent
Click the Reset Session button at the bottom of the configuration table.
#
Activating the SQL OLAP Cube Partitioning when Processing
This key is inactive by default; activate it to enable the partitioning of the SQL OLAP cube during processing. Follow these instructions to activate:
Go to the Configuration page of Analysis Server web interface.
Navigating to the Configuration PageLocate the Root.Etl.AsCubePartition.Active key, click it, then set its value to true.
Click Save.
 Activating Root.Etl.AsCubePartition.Active
Click the Reset Session button at the bottom of the configuration table.
#
Setting the Concurrency Group Mapping File Location
Use this key to set a different concurrency group mapping file location than the default C:\Program Files\OpeniT\Core\Configuration\user-to-groups.map. Follow these instructions:
Go to the Configuration page of Analysis Server web interface.
Navigating to the Configuration PageLocate the Root.Etl.ConcurrencyGroupMappingFile key, click it, then set its value to the location of the
user-to-groups.mapconfiguration file.Click Save.
 Setting Root.Etl.ConcurrencyGroupMappingFile
Click the Reset Session button at the bottom of the configuration table.
#
Setting the Core Server File Database Location
Use this key to set a different location than the default C:\ProgramData\OpeniT\Data\database. Follow these instructions:
Go to the Configuration page of Analysis Server web interface.
Navigating to the Configuration PageLocate the Root.Etl.CoreDatabasePath key, click it, then set its value to the location of the Core Server file database.
Click Save.
 Setting Root.Etl.CoreDatabasePath
Click the Reset Session button at the bottom of the configuration table.
#
Setting the Maximum Age of Data to Load
This feature is discontinued in v10.2.
Use this key to set the maximum age of the data to load. Follow these instructions:
Go to the Configuration page of Analysis Server web interface.
Navigating to the Configuration PageLocate the Root.Etl.DailyResolutionAge key, click it, then set its value to the maximum age of the data to load. The default value
0means all the data will be loaded.Click Save.
 Setting Root.Etl.DailyResolutionAge
Click the Reset Session button at the bottom of the configuration table.
#
Activating the Database Cleanup Processing
This key is inactive by default; activate it to enable the processing of Database Cleanup. Follow these instructions to activate:
Go to the Configuration page of Analysis Server web interface.
Navigating to the Configuration PageLocate the Root.Etl.DbCleanUp.Active key, click it, then set its value to true.
Click Save.
 Activating Root.Etl.DbCleanUp.Active
Click the Reset Session button at the bottom of the configuration table.
#
Activating the Feature Labeling Page
This key is inactive by default; activate it to access the Feature Labeling page, which allows administrators to configure labels for feature fields. Follow these instructions to activate:
Go to the Configuration page of Analysis Server web interface.
Navigating to the Configuration PageLocate the Root.Etl.FeatureLabeling key, click it, then set its value to true.
Click Save.
 Activating Root.Etl.FeatureLabeling
Click the Reset Session button at the bottom of the configuration table.
#
Setting the File Status Table
This feature is discontinued in v10.2.
Use this key to set the file status table. Follow these instructions:
Go to the Configuration page of Analysis Server web interface.
Navigating to the Configuration PageLocate the Root.Etl.FileStatusTable key, click it, then set its value to the table that contains information on loaded data.
Click Save.
 Setting Root.Etl.FileStatusTable
Click the Reset Session button at the bottom of the configuration table.
#
Filtering Data to Only Display Denied Events
This key is active by default; make sure it is activated to only process and report events with type Denied. If it is inactive, follow these instructions to activate:
Go to the Configuration page of Analysis Server web interface.
Navigating to the Configuration PageLocate the Root.Etl.FilterDeniedEventsOnly.Active key, click it, then set its value to true.
Click Save.
 Activating Root.Etl.FilterDeniedEventsOnly.Active
Click the Reset Session button at the bottom of the configuration table.
#
Activating the Old Version of License Monitor Portal
This feature is discontinued in v10.2.
This key is active by default; make sure it is activated to use the old version of the License Monitor Portal. If it is inactive, follow these instructions to activate:
Go to the Configuration page of Analysis Server web interface.
Navigating to the Configuration PageLocate the Root.Etl.LicenseMonitorCube.Active key, click it, then set its value to true.
Click Save.
 Activating Root.Etl.LicenseMonitorCube.Active
Click the Reset Session button at the bottom of the configuration table.
#
Activating Role-Based Data Display on License Monitor Portal
This key is inactive by default; activate it to display the License Monitor Portal data based on the Roles Configuration. Follow these instructions to activate:
Go to the Configuration page of Analysis Server web interface.
Navigating to the Configuration PageLocate the Root.Etl.LicenseMonitorCube.RoleBased key, click it, then set its value to true.
Click Save.
 Activating Root.Etl.LicenseMonitorCube.RoleBased
Click the Reset Session button at the bottom of the configuration table.
#
Setting Mapping File Encoding
Use this key to set a different encoding for the mapping files to handle special characters, formatting, and styles other than UTF8. Follow these instructions:
Go to the Configuration page of Analysis Server web interface.
Navigating to the Configuration PageLocate the Root.Etl.MapFileEncoding key, click it, then choose a format from the dropdown.
Click Save.
 Setting Root.Etl.MapFileEncoding
Click the Reset Session button at the bottom of the configuration table.
#
Setting Max Parallel Processes for Data Sync and OLAP Processing
Use this key to set the maximum number of parallel processes for data loading when running the SyncDataType command and for tasks when running the ProcessOLAP command.
The default number of threads, which is the number of cores that the SQL Server will utilize, is set to zero (0).
Follow these instructions:
Go to the Configuration page of Analysis Server web interface.
Navigating to the Configuration PageLocate the Root.Etl.NumberOfThreads key, click it, then set it to your desired value.
Click Save.
 Setting Root.Etl.NumberOfThreads
Click the Reset Session button at the bottom of the configuration table.
#
Including OLAP Processing with RunETL Command
This key is active by default; make sure it is activated to run the ProcessOLAP command when running the RunETL command. If it is inactive, follow these instructions to activate:
Go to the Configuration page of Analysis Server web interface.
Navigating to the Configuration PageLocate the Root.Etl.ProcessAs key, click it, then set its value to true.
Click Save.
 Activating Root.Etl.ProcessAs
Click the Reset Session button at the bottom of the configuration table.
#
Including SQL Processing with RunETL Command
This key is active by default; make sure it is activated to run the ProcessSQL command when running the RunETL command. If it is inactive, follow these instructions to activate:
Go to the Configuration page of Analysis Server web interface.
Navigating to the Configuration PageLocate the Root.Etl.ProcessSql key, click it, then set its value to true.
Click Save.
 Activating Root.Etl.ProcessSql
Click the Reset Session button at the bottom of the configuration table.
#
Setting SQL Command Query Timeout
Use this key to set a different duration in seconds of the SQL command query before it times out, rather than the default 600. Follow these instructions:
Go to the Configuration page of Analysis Server web interface.
Navigating to the Configuration PageLocate the Root.Etl.SqlCommandTimeout key, click it, then set it to your desired value.
Click Save.
 Setting Root.Etl.SqlCommandTimeout
Click the Reset Session button at the bottom of the configuration table.
#
Including Mapping File Processing with RunETL Command
This feature is discontinued in v10.2.
This key is active by default; make sure it is activated to process the mapping files when running the RunETL command. If it is inactive, follow these instructions to activate:
Go to the Configuration page of Analysis Server web interface.
Navigating to the Configuration PageLocate the Root.Etl.SyncActiveDirectoryInfo key, click it, then set its value to true.
Click Save.
 Activating Root.Etl.SyncActiveDirectoryInfo
Click the Reset Session button at the bottom of the configuration table.
#
Activating Client List Processing from Core Server Database
This key is inactive by default; activate it to enable the processing of the client list from Core Server database. Follow these instructions to activate:
Go to the Configuration page of Analysis Server web interface.
Navigating to the Configuration PageLocate the Root.Etl.SyncClientList key, click it, then set its value to true.
Click Save.
 Activating Root.Etl.SyncClientList
Click the Reset Session button at the bottom of the configuration table.
#
Including User Group Mapping from SQL Database with RunETL Command
This key is inactive by default; activate it to include creating user group mapping file(s) based on the SQL database when running the RunETL command. Follow these instructions to activate:
Go to the Configuration page of Analysis Server web interface.
Navigating to the Configuration PageLocate the Root.Etl.SyncConcurrencyGroupMappingFile key, click it, then set its value to true.
Click Save.
 Activating Root.Etl.Root.Etl.SyncConcurrencyGroupMappingFile
Click the Reset Session button at the bottom of the configuration table.
#
Loading All Enabled Data Types from Core Server to SQL with RunETL Command
This key is active by default; make sure it is activated to load all enabled data types from the Core Server to SQL when running the RunETL command. If it is inactive, follow these instructions to activate:
Go to the Configuration page of Analysis Server web interface.
Navigating to the Configuration PageLocate the Root.Etl.SyncCoreServerDatabase key, click it, then set its value to true.
Click Save.
 Activating Root.Etl.SyncCoreServerDatabase
Click the Reset Session button at the bottom of the configuration table.
#
Including Cost Information Processing with RunETL Command
This key is inactive by default; activate it to include the processing of cost information from the Core Server database when running the RunETL command. Follow these instructions to activate:
Go to the Configuration page of Analysis Server web interface.
Navigating to the Configuration PageLocate the Root.Etl.SyncCostInformation key, click it, then set its value to true.
Click Save.
 Activating Root.Etl.SyncCostInformation
Click the Reset Session button at the bottom of the configuration table.
#
Including Raw Options File Processing with RunETL Command
This key is inactive by default; activate it to include processing of cost information from Core Server database when running the RunETL command. Follow these instructions to activate:
Go to the Configuration page of Analysis Server web interface.
Navigating to the Configuration PageLocate the Root.Etl.SyncRawOptionsFile key, click it, then set its value to true.
Click Save.
 Activating Root.Etl.SyncRawOptionsFile
Click the Reset Session button at the bottom of the configuration table.
#
Setting Report Element to Anonymize
Use this key to set which element of the reports to anonymize. Follow these instructions:
Go to the Configuration page of Analysis Server web interface.
Navigating to the Configuration PageLocate the Root.Etl.UserAnonymization.Source key, click it, then choose what to anonymize from the dropdown.
Click Save.
 Setting Root.Etl.UserAnonymization.Source
Click the Reset Session button at the bottom of the configuration table.
#
Setting Display for Anonymized Report Elements
Use this key to set what to display for the anonymized report element. Follow these instructions:
Go to the Configuration page of Analysis Server web interface.
Navigating to the Configuration PageLocate the Root.Etl.UserAnonymization.SourceValue key, click it, then set the value to what you want to display instead of the anonymized. This accepts asterisks
(*)as wildcards and can have multiple values by providing pipe-delimited entries.Example:
virtual*|mnl*win|*linThis will get all the data starting with virtual (e.g., virtual003win), starting with mnl, ending in win (e.g., win-host01), and ending with lin (e.g., host01).
Click Save.
 Setting Root.Etl.UserAnonymization.SourceValue
Click the Reset Session button at the bottom of the configuration table.
#
Activating the Vendor License Labeling Page
This key is inactive by default; activate it to access the Vendor License Labeling page, which allows administrators to configure labels for Vendor License fields. Follow these instructions to activate:
Go to the Configuration page of Analysis Server web interface.
Navigating to the Configuration PageLocate the Root.Etl.VendorLicenseLabeling key, click it, then set its value to true.
Click Save.
 Activating Root.Etl.VendorLicenseLabeling
Click the Reset Session button at the bottom of the configuration table.