We’re upgrading your documentation experience!
A new doc website is live at docs.openit.cloud — a temporary preview during our transition. This website is now in maintenance-only mode (only critical issues will be addressed).
Explore the new website and send us your feedback!
#
Migrating to another computer with another Analysis Server version
#
Using the same database
This guide covers the migration of Analysis Server to another machine with different Open iT Version but still using the same SQL Server database connection.
#
Prerequisites
Take note of the modifications in the following components:
Task Scheduler - the command that runs daily. Sometimes there is an applied filter in the data loaded. Use the instructions in the Checking the Task Scheduler Modifications section.
SSRS URI - the configured SQL Server Reporting Services URI in the Reporting page. Use the instructions in the Checking the SSRS URI section.
Service Account – the domain account used to run services and connect to the databases. Use the instructions in the Configuring the Application Settings section and be guided in accessing the configuration file. Take note of the key RunAsUser.
Take note of the following information:
- SQL Server (Database Engine and Analysis Services) with instance
- Deployed databases names (SQL and OLAP)
Use the instructions in the Configuring Database Connection Strings section to see and take note of the SQL Server connection properties of the Analysis Server.
Gather screenshots of the following web interface pages:
#
Instructions
In the new machine, install and setup all the software requirements of Analysis Server. Use the instructions in the Installation Requirements section.
Once all the requirements are set up, excluding the installation of SQL Server, install the Analysis Server. In this case, install the latest or higher version of Analysis Server as per the previous installation. Do the following sequentially to install and set up the Analysis Server.
-
When prompted for the SQL and OLAP server and database connection, use the information noted from the Prerequisites section.
-
Update the database schema. Do the following instructions sequentially to update the schema of the previous database:
Compare the properties of the scheduled job in the Task Scheduler from the noted configuration of the previous installation. If the two properties differ, choose whether to apply the previous configuration or retain the default settings. Use the instructions in the Checking the Task Scheduler Modifications section to see the current properties of the scheduled job.
If Reporting Services is configured, create the reporting link in the Analysis Server web interface. Use the instructions in the CreateLinkToAs as guide to properly execute the correct command.
Provide the noted SSRS URI in the Prerequisites section when executing the command. This ensures that it will use the previous configuration of Reporting Services.
#
Using a new SQL Server locally
This guide covers the migration of the Analysis Server with SQL Server to another machine.
#
Prerequisites
Take note of the modifications in the following components:
Task Scheduler - the command that runs daily. Sometimes there is an applied filter in the data loaded. Use the instructions in the Checking the Task Scheduler Modifications section.
Service Account – the domain account used to run services and connect to the databases. Use the instructions in the Configuring the Application Settings section and be guided in accessing the configuration file. Take note of the key RunAsUser.
Gather screenshots of the following web interface pages:
#
Instructions
In the new machine, install all the software requirements of Analysis Server. Use the instructions in the Installation Requirements section.
Once all the requirements are set up, excluding the installation of SQL Server, install the Analysis Server. In this case, install the latest or higher version of Analysis Server as per the previous installation. Do the following sequentially to install and set up the Analysis Server.
Post-Installation Configuration
When setting the core database path and configuring mapping sources and time zones, get the configurations from the previous Analysis Server installation or be guided by the screenshots taken from the Prerequisites section.
If Email Settings is configured in the previous installation, accomplish the following instructions:
- Go to the Email Settings page of the new Analysis Server installation
- Apply the configuration from the screen shot taken in the Prerequisites section for Email Settings page. Use the instructions in the Email Settings section as guide.
If Cost, Application Cost or Storage Cost is configured in the previous installation, follow these instructions to migrate the configurations:
Generate Scripts for Cost Pages - Connect to the SQL database of the old Analysis Server installation using SQL Server Management Studio (SSMS).
- Right-click the database name and select Task > Generate Scripts.
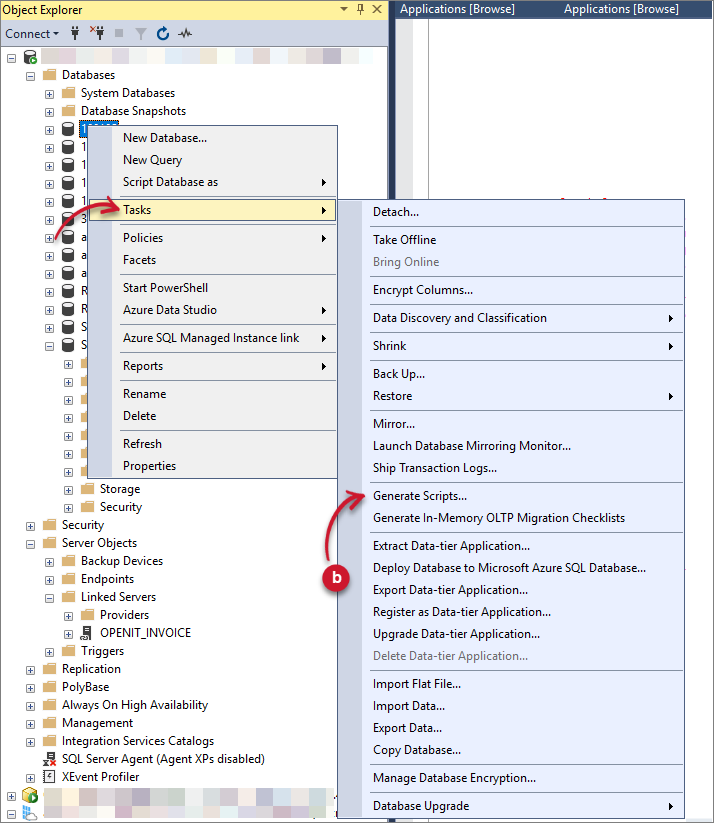 Analysis Server Migration: Generate Scripts
- The Generate Scripts dialog will be displayed. Click Next.
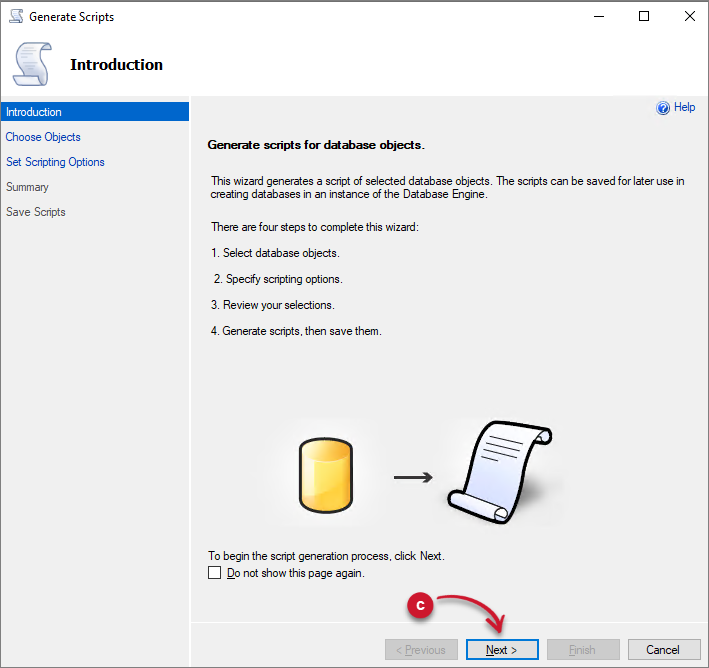 Analysis Server Migration: Generate Scripts Dialog
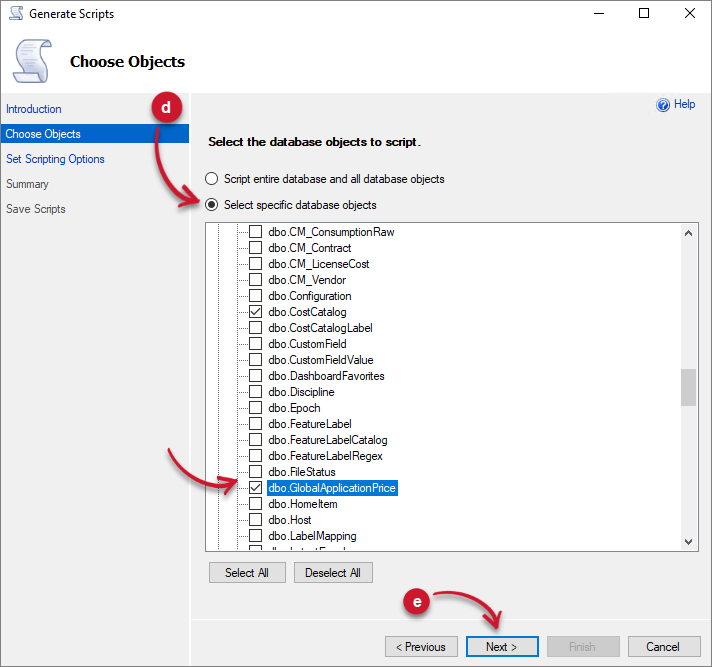
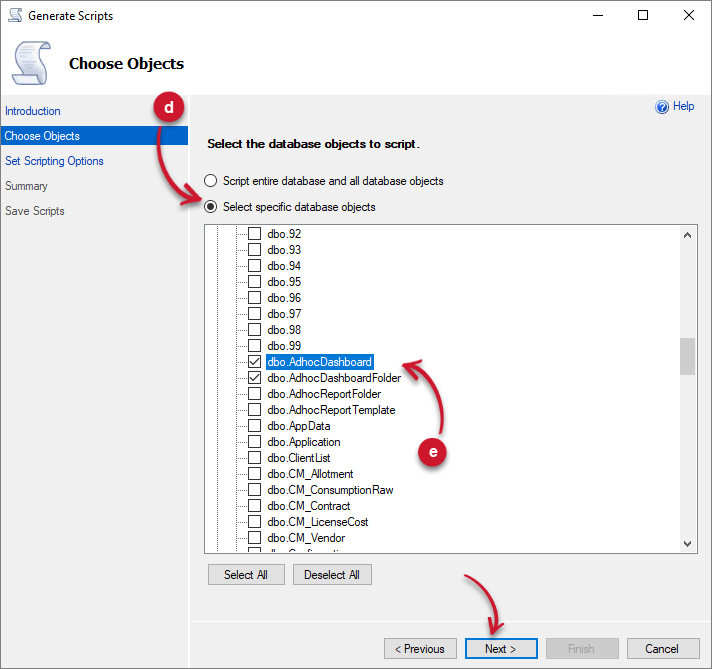
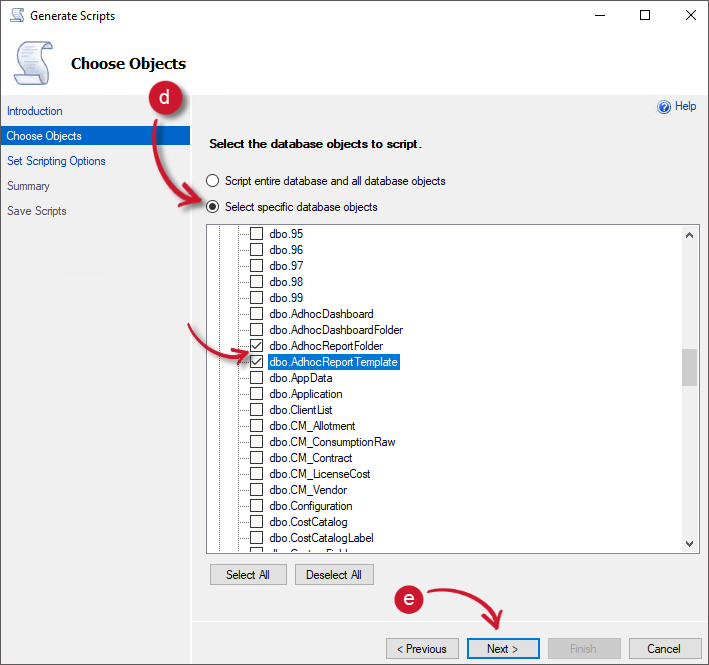
Choose the Select specific database objects option.
Expand the Tables option and select the table counterpart if the page is configured:
- GlobalApplicationPrice - Cost
- CostCatalog – Application Cost
- StorageCost – Storage Cost
Click Next.
 Analysis Server Migration: Generate Scripts Tables
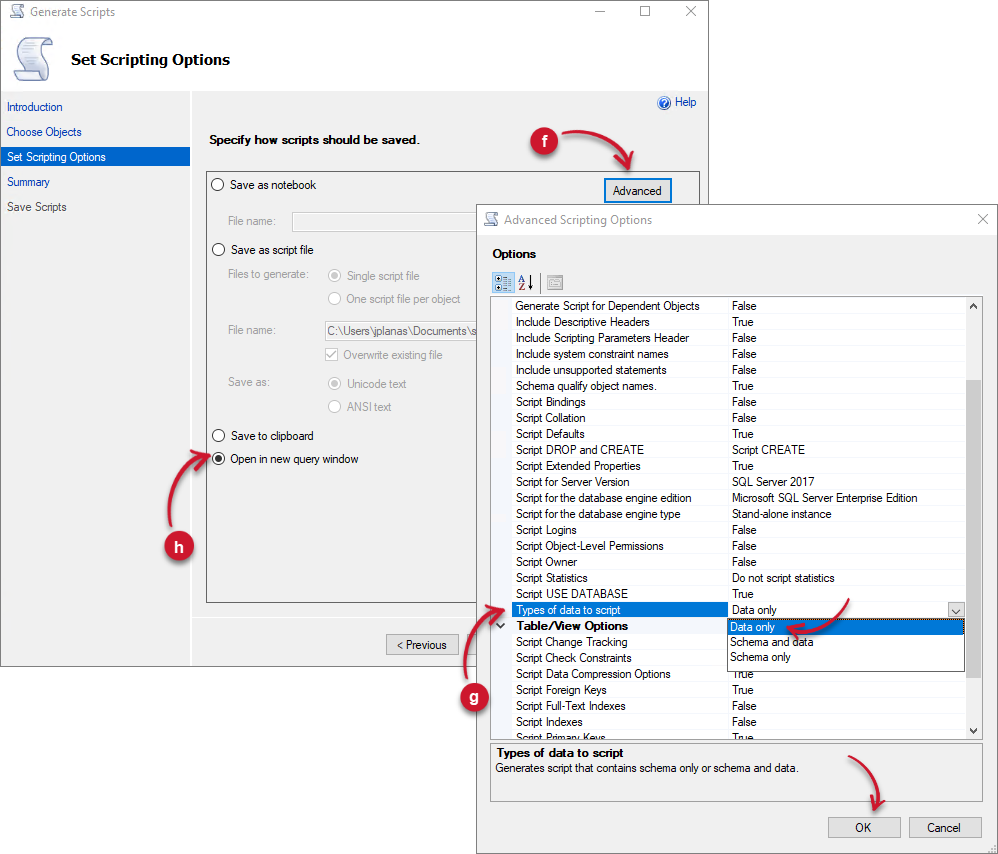
- Click the Advanced button. The Advanced Scripting Options will be displayed.
- Under the General options, look for Types of data to script, then select Data only. Click OK.
- Select the Open in New Query Window option. Click Next.
 Analysis Server Migration: Generate Scripts Advanced
- Review the configurations, then click Next.
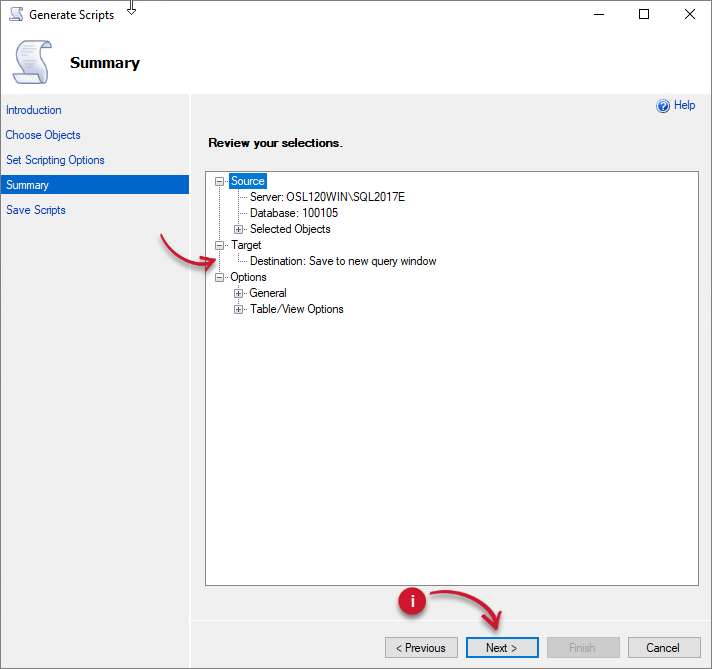 Analysis Server Migration: Generate Scripts Review
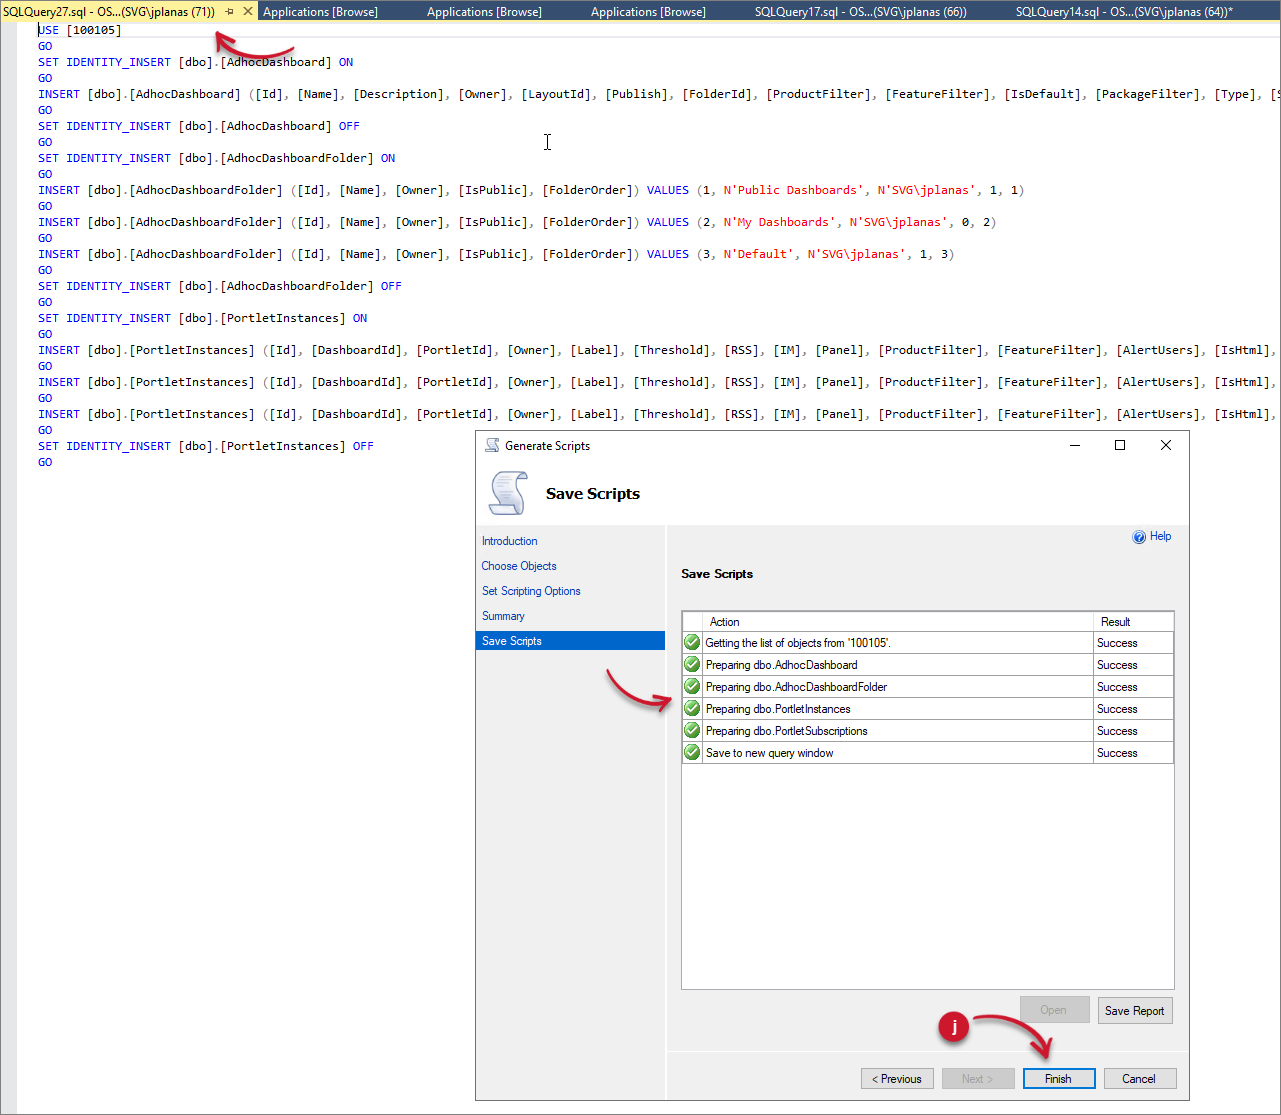
- Wait until the process is finished. Click Finish. A new query window will open containing INSERT SQL queries.
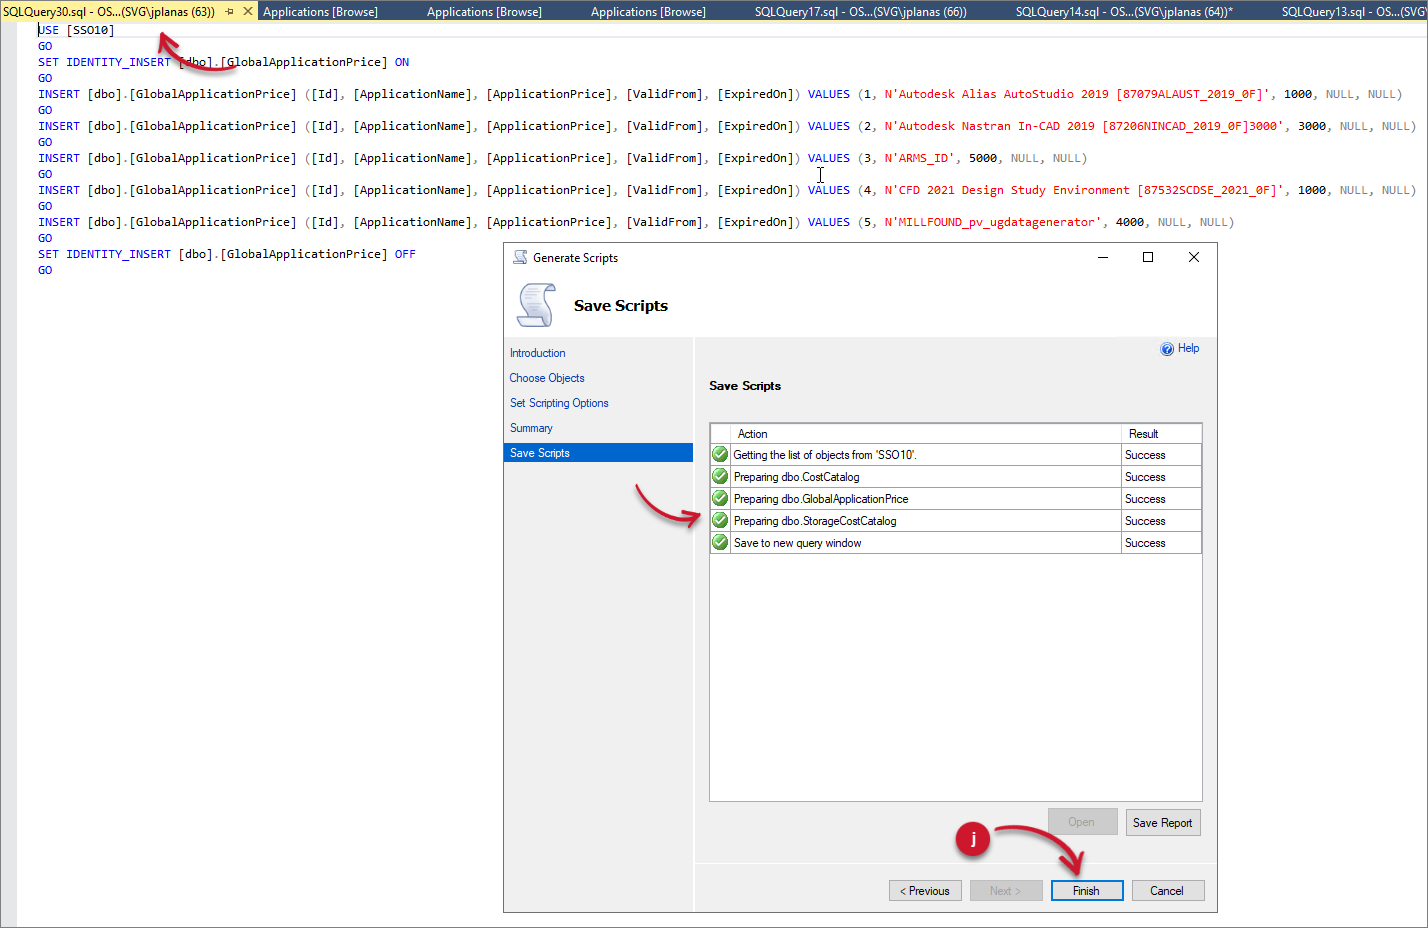 Analysis Server Migration: Generate Scripts Completed
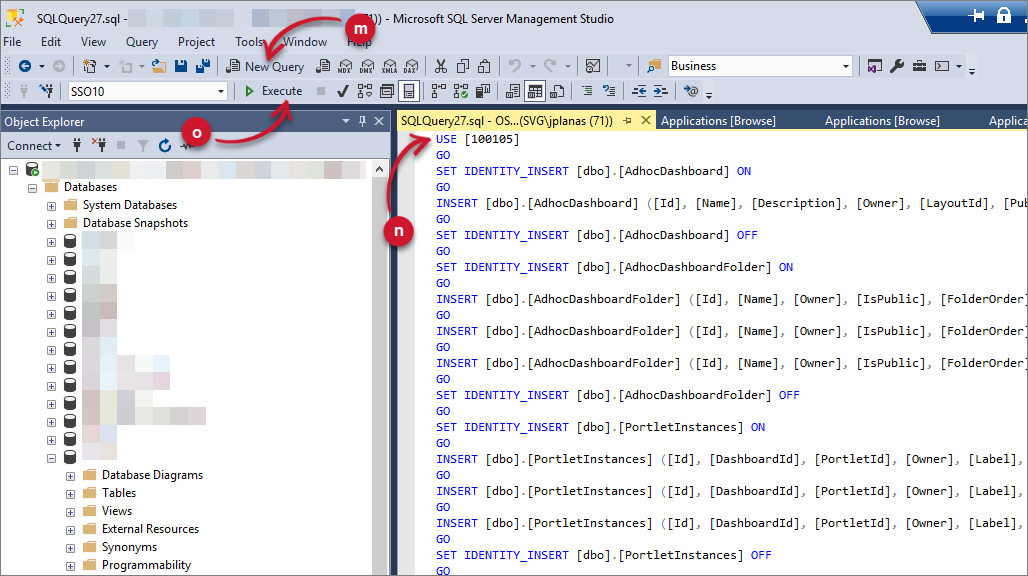
Connect to the SQL database of the new Analysis Server installation using SQL Server Management Studio (SSMS).
Click the New Query button in the upper-left corner of the window. This will open a new query window.
Copy the generated script from step j. Replace the [database_name] in the query at the start of the script with the newly created database name.
USE [database_name]
Click the Execute button in the upper left corner of the window. This will execute the query and insert data from the old Analysis Server installation to the new installation.
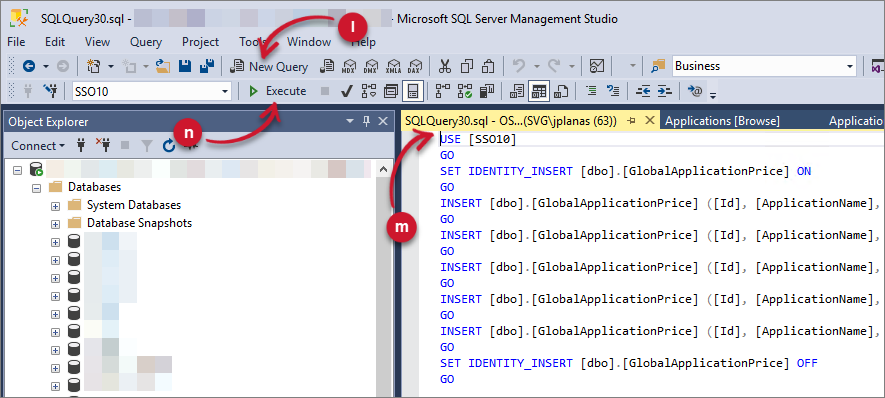 Analysis Server Migration: Executing Generated Scripts
- Once successful, go to the pages of the new Analysis Server installation and verify that there is data displayed.
If there were created dashboards in the Dashboard page in the old Analysis Server installation, follow these instructions to migrate all the created dashboards and subscriptions:
Generate Scripts for Dashboard - Connect to the SQL database of the old Analysis Server installation using SQL Server Management Studio (SSMS).
- Right-click the database name and select Task > Generate Scripts.
Analysis Server Migration: Generate Scripts
- The Generate Scripts dialog will be displayed. Click Next.
Analysis Server Migration: Generate Scripts Dialog
Choose the Select specific database objects option.
Expand the Tables option and select the following related tables to Dashboard:
- dbo.AdhocDashboard
- dbo.AdhocDashboardFolder
- dbo.PortletInstances
- dbo.PortletSubscriptions
Click Next.
 Analysis Server Migration: Generate Scripts Tables
- Click the Advanced button. The Advanced Scripting Options will be displayed.
- Under the General options, look for Types of data to script, then select Data only. Click OK.
- Select the Open in New Query Window option. Click Next.
Analysis Server Migration: Generate Scripts Advanced
- Review the configurations, then click Next.
Analysis Server Migration: Generate Scripts Review
- Wait until the process is finished. Click Finish. A new query window will open containing INSERT SQL queries.
 Analysis Server Migration: Generate Scripts Completed
In the generated query, please remove the following lines:
AdhocDashboard
Default DashboardINSERT [dbo].[AdhocDashboard] ([Id], [Name], [Description], [Owner], [LayoutId], [Publish], [FolderId], [ProductFilter], [FeatureFilter], [IsDefault], [PackageFilter], [Type], [StartDateFIlter], [EndDateFilter]) VALUES (1, N'Default Dashboard', N'', N'PortalAdmin', 2, 1, 1, NULL, NULL, 1, NULL, 0, NULL, NULL)
AdhocDashboardFolder
Default Dashboard FoldersINSERT [dbo].[AdhocDashboardFolder] ([Id], [Name], [Owner], [IsPublic], [FolderOrder]) VALUES (1, N'Public Dashboards', N'SVG\johndoe', 1, 1) INSERT [dbo].[AdhocDashboardFolder] ([Id], [Name], [Owner], [IsPublic], [FolderOrder]) VALUES (2, N'My Dashboards', N'SVG\johndoe', 0, 2) INSERT [dbo].[AdhocDashboardFolder] ([Id], [Name], [Owner], [IsPublic], [FolderOrder]) VALUES (3, N'Default', N'SVG\johndoe', 1, 3)
PortletInstances
Default Portlet InstancesINSERT [dbo].[PortletInstances] ([Id], [DashboardId], [PortletId], [Owner], [Label], [Threshold], [RSS], [IM], [Panel], [ProductFilter], [FeatureFilter], [AlertUsers], [IsHtml], [Flood], [CustomTemplate], [Title], [Subtitle], [Message], [IsAlertCustom], [OrderInPanel], [UOM], [Height], [PackageFilter], [OfflineData], [InstanceCondition], [CustomFilter1], [CustomFilter2], [IsSubsAlertCustom], [SubsCustomTemplate], [SubscriberTitle], [SubscriberSubtitle], [SubscriberMessage], [Source], [Schedule], [Start], [DataCheck], [ReportType], [TimeZone]) VALUES (1, 1, 1, N'PortalAdmin', N'Approaching Max: Max Utilization >= 90 %', 90, NULL, NULL, N'secondContainer', NULL, NULL, 0, 1, 0, NULL, NULL, NULL, NULL, 0, 0, N'%', 10, NULL, 0, N'Max Utilization >=', NULL, NULL, 0, NULL, NULL, NULL, NULL, 0, N'Immediate', NULL, N'every 5 minutes and 10 seconds', 1, NULL) INSERT [dbo].[PortletInstances] ([Id], [DashboardId], [PortletId], [Owner], [Label], [Threshold], [RSS], [IM], [Panel], [ProductFilter], [FeatureFilter], [AlertUsers], [IsHtml], [Flood], [CustomTemplate], [Title], [Subtitle], [Message], [IsAlertCustom], [OrderInPanel], [UOM], [Height], [PackageFilter], [OfflineData], [InstanceCondition], [CustomFilter1], [CustomFilter2], [IsSubsAlertCustom], [SubsCustomTemplate], [SubscriberTitle], [SubscriberSubtitle], [SubscriberMessage], [Source], [Schedule], [Start], [DataCheck], [ReportType], [TimeZone]) VALUES (2, 1, 4, N'PortalAdmin', N'License Expiration: Expiration <= 60 Days', 60, NULL, NULL, N'firstContainer', NULL, NULL, 0, 1, 0, NULL, NULL, NULL, NULL, 0, 1, N'Days', 10, NULL, 0, N'Expiration <=', NULL, NULL, 0, NULL, NULL, NULL, NULL, 0, N'Immediate', NULL, N'every day at 7:00:10', 1, NULL) INSERT [dbo].[PortletInstances] ([Id], [DashboardId], [PortletId], [Owner], [Label], [Threshold], [RSS], [IM], [Panel], [ProductFilter], [FeatureFilter], [AlertUsers], [IsHtml], [Flood], [CustomTemplate], [Title], [Subtitle], [Message], [IsAlertCustom], [OrderInPanel], [UOM], [Height], [PackageFilter], [OfflineData], [InstanceCondition], [CustomFilter1], [CustomFilter2], [IsSubsAlertCustom], [SubsCustomTemplate], [SubscriberTitle], [SubscriberSubtitle], [SubscriberMessage], [Source], [Schedule], [Start], [DataCheck], [ReportType], [TimeZone]) VALUES (3, 1, 6, N'PortalAdmin', N'License Daemon Down: Minutes >= 10', 10, NULL, NULL, N'thirdContainer', NULL, NULL, 0, 1, 0, NULL, NULL, NULL, NULL, 0, 2, N'Minutes', 10, NULL, 0, N'Minutes >=', NULL, NULL, 0, NULL, NULL, NULL, NULL, 0, N'Immediate', NULL, N'every 5 minutes and 10 seconds', 1, NULL)
Removing these entries avoid conflicts with the entries in the newly deployed database.
Connect to the SQL database of the old Analysis Server installation using SQL Server Management Studio (SSMS).
Click the New Query button in the upper-left corner of the window. This will open a new query window.
Copy the generated script from step j with modifications from step k. Replace the [database_name] in the query at the start of the script with the newly created database name.
USE [database_name]
Click the Execute button in the upper left corner of the window. This will execute the query and insert data from the old Analysis Server installation to the new installation.
 Analysis Server Migration: Executing Generated Scripts
- Once successful, go to the Dashboard page of the new Analysis Server installation and verify that there is displayed.
If there were saved Templates in the Analysis page in the old Analysis Server installation, follow these instructions to migrate all the saved templates and folders:
Generate Scripts for Analysis Page Templates - Connect to the SQL database of the old Analysis Server installation using SQL Server Management Studio (SSMS).
- Right-click the database name and select Task > Generate Scripts.
Analysis Server Migration: Generate Scripts
- The Generate Scripts dialog will be displayed. Click Next.
Analysis Server Migration: Generate Scripts Dialog
Choose the Select specific database objects option.
Expand the Tables option and select the following related tables to Analysis page:
- AdhocReportTemplates
- AdhocReportFolder
Click Next.
 Analysis Server Migration: Generate Scripts Tables
- Click the Advanced button. The Advanced Scripting Options will be displayed.
- Under the General options, look for Types of data to script, then select Data only. Click OK.
- Select the Open in New Query Window option. Click Next.
Analysis Server Migration: Generate Scripts Advanced
- Review the configurations, then click Next.
Analysis Server Migration: Generate Scripts Review
- Wait until the process is finished. Click Finish. A new query window will open containing INSERT SQL queries.
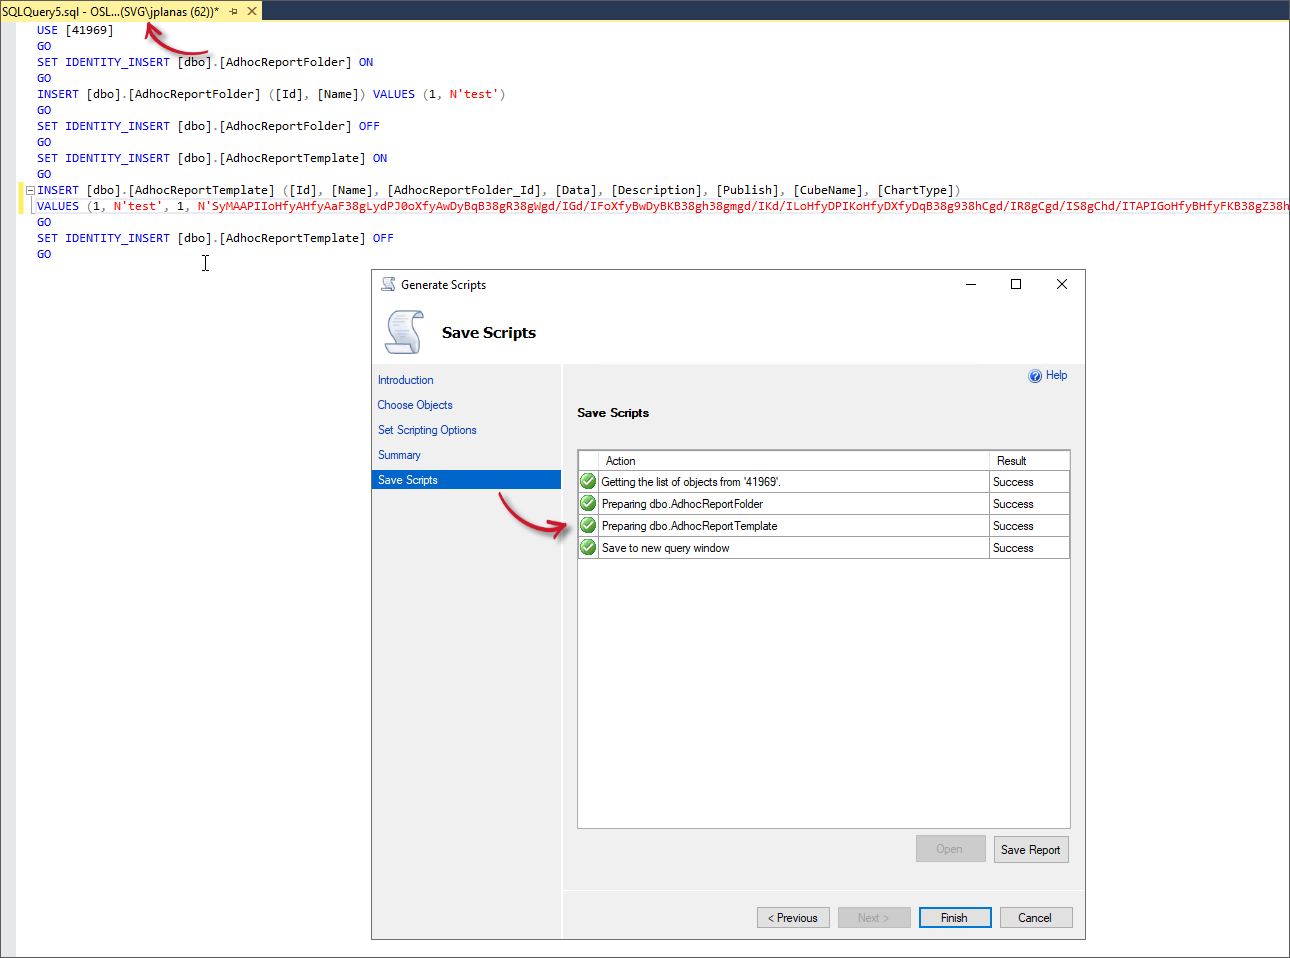 Analysis Server Migration: Generate Scripts Completed
The query generated will include all the folders and templates created in the Analysis page. If you have many folders and templates saved, the query will be longer.
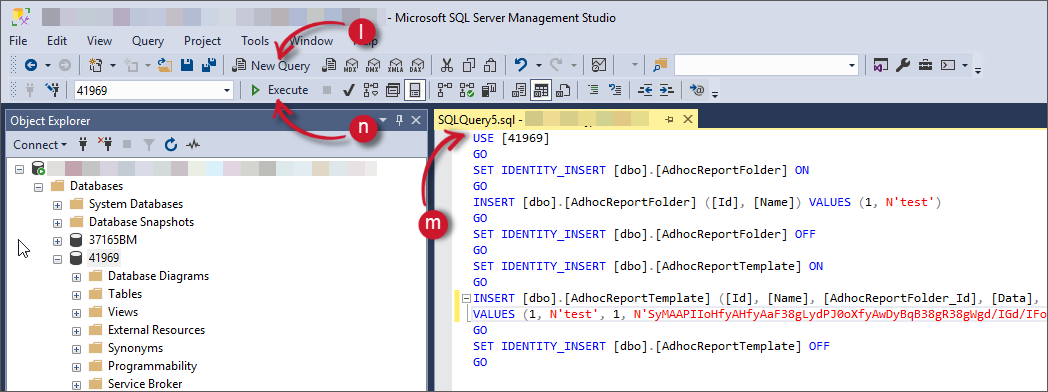
Connect to the SQL database of the new Analysis Server installation using SQL Server Management Studio (SSMS).
Click the New Query button in the upper-left corner of the window. This will open a new query window.
Copy the generated script from step j. Replace the
[database_name]in the query at the start of the script with the newly created database name.USE [database_name]
Click the Execute button in the upper left corner of the window. This will execute the query and insert data from the old Analysis Server installation to the new installation.
 Analysis Server Migration: Executing Generated Scripts
- Once successful, go to the Analysis page of the new Analysis Server installation and verify that the Templates can be loaded.
If a new SQL Server Reporting Services instance has been set up, and Reporting Services was previously configured, you must reconfigure it within the Analysis Server installation. Follow the instructions in ConfigureAll to reconfigure Reporting Services to the new SQL Server.
#
Further Verification
Once all important configurations from the old Analysis Server installation are migrated, follow these steps to verify that the migration is successful:
- Access the Analysis Server web interface and navigate through each of the pages. This is to make sure that the migration did not break any page and that the migrated configurations are still present. Use the instructions in the Accessing the Web Interface section. Compare the screenshots taken in the Prerequisites section to validate the configurations.
- Run the scheduled job in the Task Scheduler and check if there are errors encountered in the logs. This is to make sure that the processing will be successful in the succeeding executions. Use the instructions in the Running the Scheduled Job in Task Scheduler Manually section.
- If Reporting Services is configured, access any report template in the Home page. Make sure that it redirects to the Reporting Services Web Portal, and the report template can be generated.