We’re upgrading your documentation experience!
A new doc website is live at docs.openit.cloud — a temporary preview during our transition. This website is now in maintenance-only mode (only critical issues will be addressed).
Explore the new website and send us your feedback!
#
Installation
Analysis Server with Single Sign-On is not supported with Ingress setup.
#
Installing through the Windows Installer Interface
Right-click the
openit_[version]_asee_windows_x64.msiinstaller file, then click Run as Administrator.Allow the app to make changes to the device to begin. A setup wizard will be displayed. Click Next.
 Analysis Server Installation: Welcome Screen
Read the License Agreement before accepting the terms. Click Next.
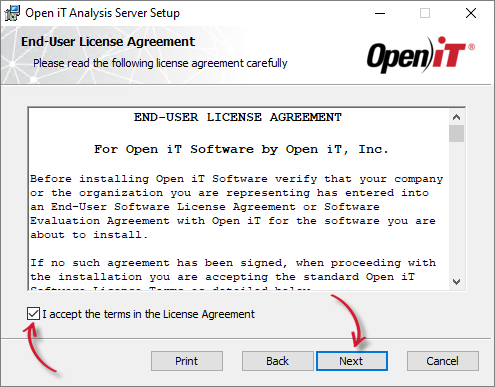 Analysis Server Installation: End-user License Agreement
Specify where the Open iT software will be installed. Click Change to specify a different directory and click OK. Clicking Next without doing any changes will use the default installation path.
Click Next.
 Analysis Server Installation: Destination Folder
Specify the TCP/IP port number. This option enables access to the Open iT Analysis Server web application. The default value, 80, may also be used.
Specify the path to a valid Open iT Analysis Server license key. This location may be changed at a later time on the configuration page of the Open iT Analysis Server web interface.
Click Next.
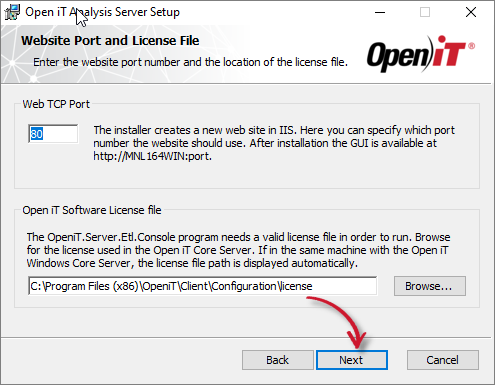 Analysis Server Installation: Web Server TCP Port Number and License File
Skip this dialog to avoid connecting the installation to Ingress. Click Next.
This dialog will not display if the machine you are installing the Analysis Server has Ingress installed.
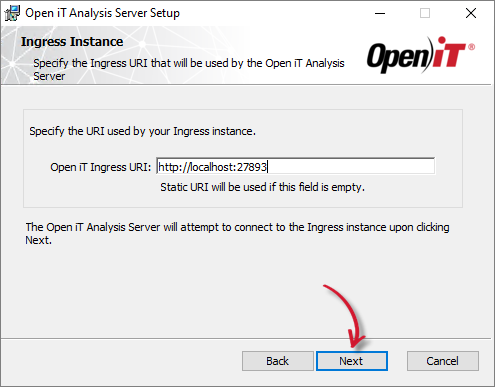 Analysis Server Installation: Ingress Instance URI
Click Yes to continue the installation process.
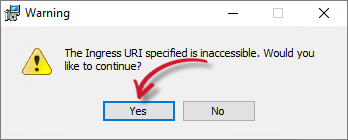 Analysis Server Installation: Ingress Warning
Specify the Service Account User Name and Password. The user name must include the Active Directory domain.
Select Enable Single-Sign-On and click Next
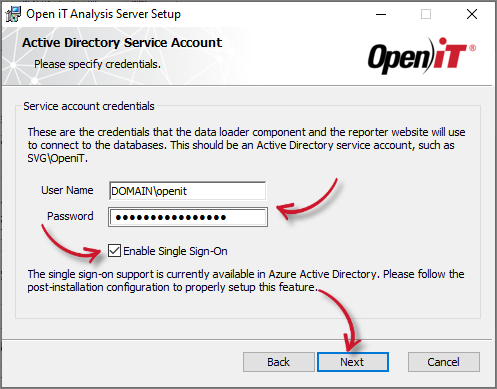 Analysis Server Installation: Service Account Credentials
Specify the Administrator Group. Click Next.
The group should be an existing group in Azure Active Directory or an individual email address. This accepts a comma-separated list.
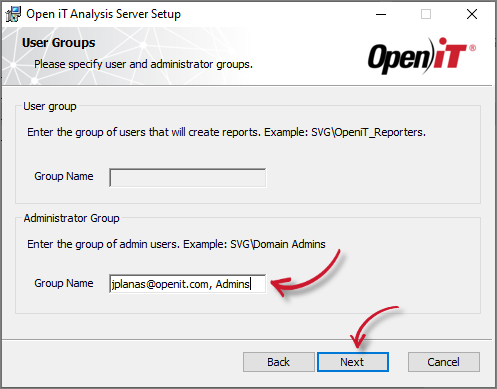 Analysis Server Installation: Administrator Group
Specify the SQL Server Database and instance name where the SQL data warehouse will be created and deployed. Click Browse to look for available SQL Servers on the network.
Specify the SQL Server Analysis Services database and instance name which will hold the reporting cube.
Click Next.
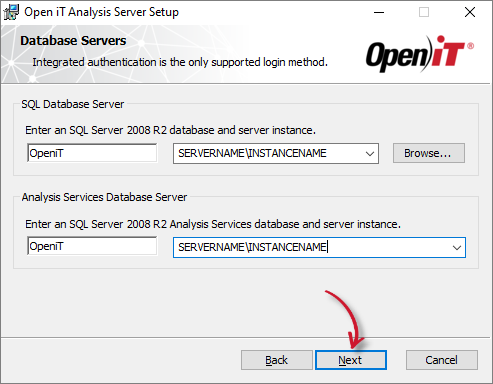 Analysis Server Installation: Database Servers
If the installer detects that the SQL Server provided is an Azure SQL Server and/or the Tabular Server is an Azure Analysis Services, another dialog will appear.
This will require you to provide the Azure SQL Server Login credentials pre-created in the server. This is required since the credentials will be used to connect to the server. Make sure that the user has a DBMANAGER server role.
For further details in connecting to Azure SQL Server, please read the article How to Connect to Azure SQL Server.
Click Next.
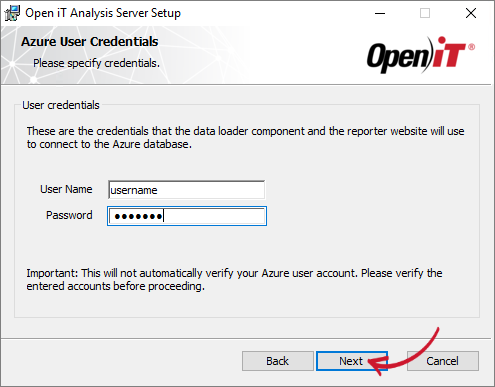 Analysis Server Installation: Server Login
Click Install to start the installation process. If you need to review the entries, click Back.
 Analysis Server Installation: Ready to Install
The installer will set up all necessary files on the computer.
After the installation, the View Release Notes option will be automatically selected. This option will show a list of updates and fixes included on the installer through a web browser. Deselect this option as needed.
Click Finish to complete the installation.
 Analysis Server Installation: Installation Complete
#
Installing through the Command Line
Open a command prompt with Administrator level privilege.
Execute the following command:
Examplemsiexec /i [msi_file] /l*v [log_file] [options] LICENSEFILE=[license_file] RUNASUSER=[domain\user] RUNASPASSWORD=[password] ADMINGROUP=[admingroup_name] ENABLESSO=1Required Parameters:
Installing through Command Line: Required Parameters
Optional Parameters:
The installer will use the Windows Installer Interface process when the installation option is not specified.
Installing through Command Line: Optional Parameters
Required Properties:
Installing through Command Line: Required Properties
Examplemsiexec /i C:\AS_installer\openit_10_2_500_asee_windows_x64.msi /l*v C:\AS_install_logs\AS_logs.txt /quiet LICENSEFILE=C:\AS_license\license RUNASUSER=SVG\johndoe RUNASPASSWORD=password ADMINGROUP=AS_Admins ENABLESSO=1
Optional Properties:
Use the optional properties to further customize the installation. The default values are used when not specified.
INSTALLDIR=$INSTALL_DIR
The path where the Open iT files will be installed. This value is set toC:\Program Files\OpeniT\Analysis Serverby default.Examplemsiexec /i C:\AS_installer\openit_10_2_500_asee_windows_x64.msi /l*v C:\AS_install_logs\AS_logs.txt /quiet LICENSEFILE=C:\AS_license\license RUNASUSER=SVG\johndoe RUNASPASSWORD=password ADMINGROUP=AS_Admins ENABLESSO=1 INSTALLDIR="C:\OpeniT\Analysis Server\"IISPORTNUMBER=[portnumber]
The TCP/IP port number used by the reporter website. This is set to 80 by default.Examplemsiexec /i C:\AS_installer\openit_10_2_500_asee_windows_x64.msi /l*v C:\AS_install_logs\AS_logs.txt /quiet LICENSEFILE=C:\AS_license\license RUNASUSER=SVG\johndoe RUNASPASSWORD=password ADMINGROUP=AS_Admins ENABLESSO=1 IISPORTNUMBER=8088SQLSERVER=[sqlserver\instance_name]
The SQL Server including the instance name where the SQL database is created.Examplemsiexec /i C:\AS_installer\openit_10_2_500_asee_windows_x64.msi /l*v C:\AS_install_logs\AS_logs.txt /quiet LICENSEFILE=C:\AS_license\license RUNASUSER=SVG\johndoe RUNASPASSWORD=password ADMINGROUP=AS_Admins ENABLESSO=1 SQLSERVER=WIN-HOST01\SQL2019SQLDATABASE=[database_name]
The name of the SQL database.Examplemsiexec /i C:\AS_installer\openit_10_2_500_asee_windows_x64.msi /l*v C:\AS_install_logs\AS_logs.txt /quiet LICENSEFILE=C:\AS_license\license RUNASUSER=SVG\johndoe RUNASPASSWORD=password ADMINGROUP=AS_Admins ENABLESSO=1 SQLDATABASE=OpeniT2022OLAPSERVER=[olapserver\instance_name]
The OLAP (SQL Server Analysis Services) Server including the instance name where the OLAP database is created.Examplemsiexec /i C:\AS_installer\openit_10_2_500_asee_windows_x64.msi /l*v C:\AS_install_logs\AS_logs.txt /quiet LICENSEFILE=C:\AS_license\license RUNASUSER=SVG\johndoe RUNASPASSWORD=password ADMINGROUP=AS_Admins ENABLESSO=1 OLAPSERVER=WIN-HOST01\SQL2019OLAPDATABASE=[database_name]
The name of the OLAP database where the OLAP cubes are created.Examplemsiexec /i C:\AS_installer\openit_10_2_500_asee_windows_x64.msi /l*v C:\AS_install_logs\AS_logs.txt /quiet LICENSEFILE=C:\AS_license\license RUNASUSER=SVG\johndoe RUNASPASSWORD=password ADMINGROUP=AS_Admins ENABLESSO=1 OLAPDATABASE=OpeniT2022Combine or use optional parameters at the same time to achieve necessary capabilities.
Examplemsiexec /i C:\AS_installer\openit_10_2_500_asee_windows_x64.msi /l*v C:\AS_install_logs\AS_logs.txt /quiet LICENSEFILE=C:\AS_license\license RUNASUSER=SVG\johndoe RUNASPASSWORD=password ADMINGROUP=AS_Admins ENABLESSO=1 INSTALLDIR="C:\OpeniT\AnalysisServer\" IISPORTNUMBER=8088 SQLSERVER=WIN-HOST01\SQL2019 SQLDATABASE=OpeniT2022 OLAPSERVER=WIN-HOST01\SQL2019 OLAPDATABASE=OpeniT2022
When using the passive mode, wait until the process bar dialog disappears. When using the quiet mode, verify if the installation is complete by opening the Task Manager and checking in the Details tab if the msiexec process is still running.
#
Next Steps?
After an installation, it is recommended to run through all the Installation Verification to verify that the installation is successful.
Analysis Server Installation Verification

