We’re upgrading your documentation experience!
A new doc website is live at docs.openit.cloud — a temporary preview during our transition. This website is now in maintenance-only mode (only critical issues will be addressed).
Explore the new website and send us your feedback!
#
Configuring SSRS Subscription
SQL Server Reporting Services (SSRS) subscriptions provide a way to automate the delivery of reports on a scheduled basis. It offers several features and capabilities that enable users to customize how, when, and where reports are delivered.
This article will guide you to efficiently manage the SSRS subscription. It covers the Standard and Data-driven subscriptions, scheduling, and delivery methods via E-mail and Windows File Share. It also addresses report formatting and overwriting options.
#
Prerequisites
#
Minimum Requirements
Make sure that you installed and configured SQL Server Reporting Services and SQL Server Management Studio before proceeding.
SSRS provides two primary subscription types: Standard Subscriptions, offering a manual approach for fixed recipients and parameters, and Data-Driven Subscriptions, dynamically determining recipients and parameters based on retrieved data, offering a more flexible and automated delivery method. Each subscription type caters to different scenarios, providing users with options tailored to their specific reporting needs.
It has the following parts:
Standard subscription Data-driven subscription
#
Standard Subscription
SSRS Standard Subscriptions provide a manual yet straightforward way to automate report delivery, allowing users to specify fixed recipients and parameters for consistent, scheduled delivery via email or file share.
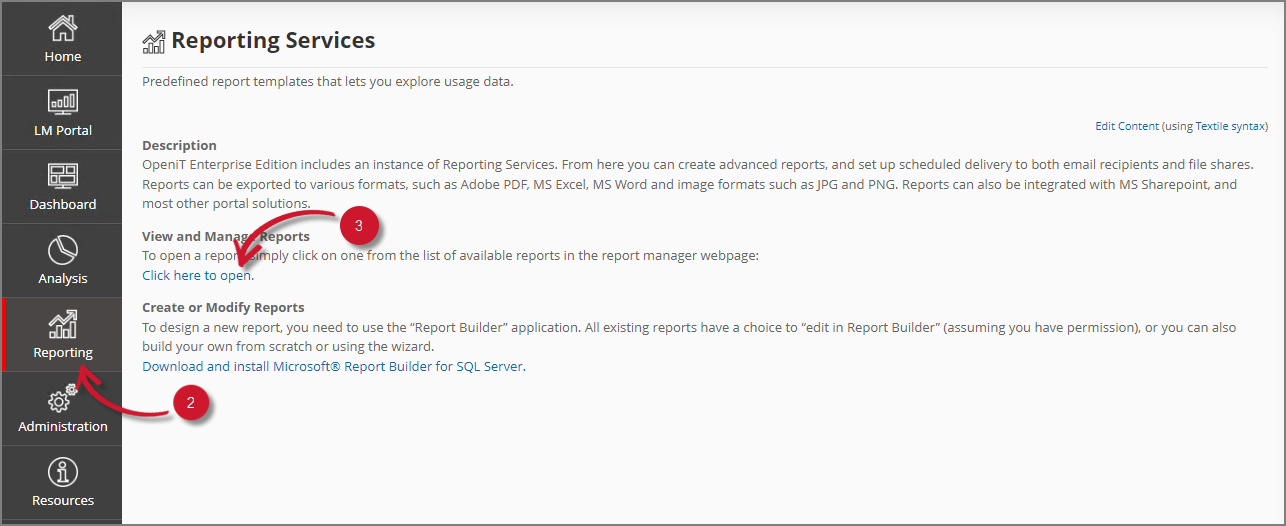
Open the Analysis Server Web Interface.
Go to the Reporting Services page. Access this by clicking Reporting in the left pane.
Under the View and Manage Reports section, click the link Click here to open. The page will redirect to the Open iT Reporting Services reports portal.
 Open iT Reporting Services
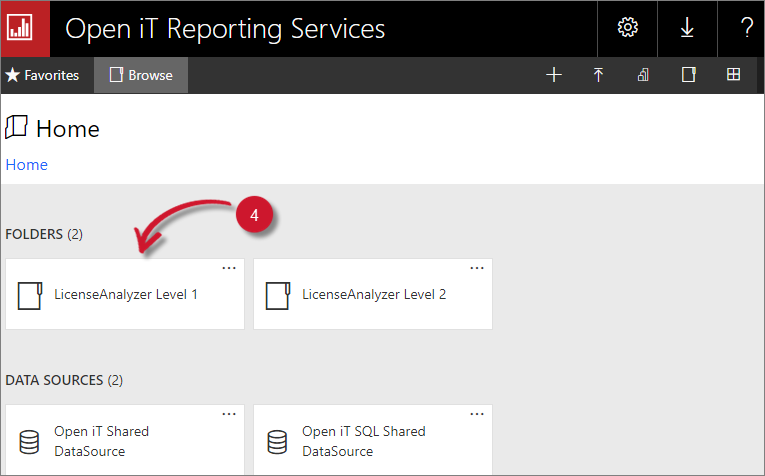
On the Folders section, click LicenseAnalyzer Level 1. This will display the available folders and paginated reports you can configure.
 LicenseAnalyzer Level 1
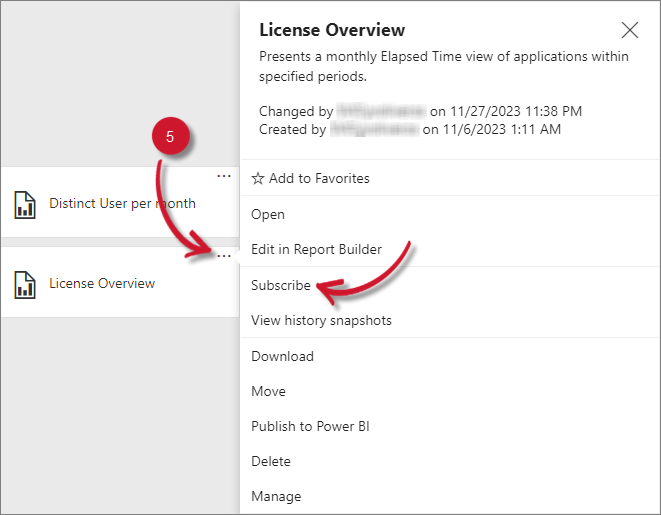
To manage report subscriptions, click the icon on a paginated report and select the Subscribe option.
 Manage Reports
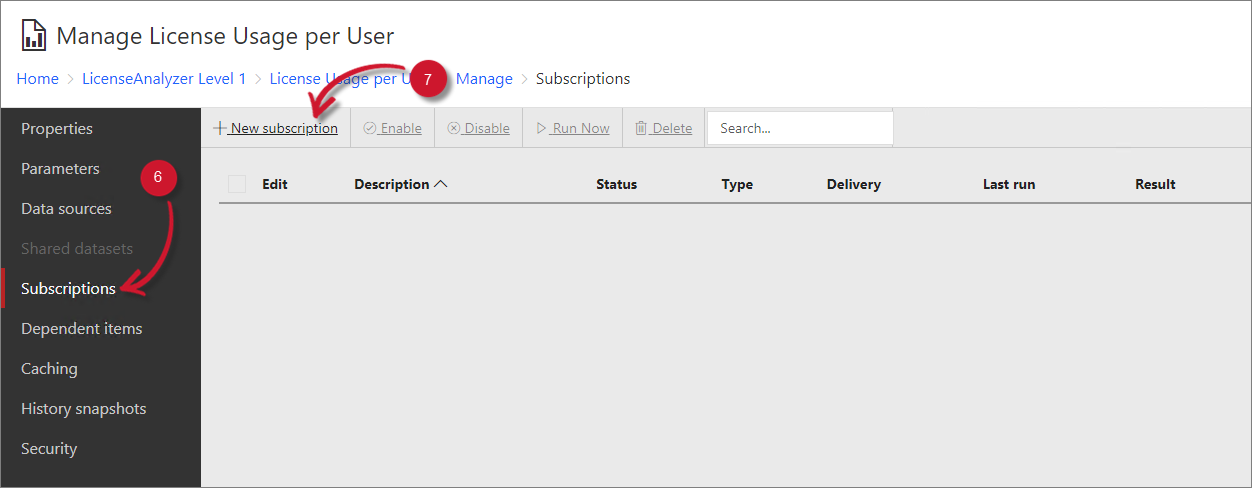
Select Subscriptions from the left pane. This page lists created report subscriptions. Suppose there are no report subscriptions created. This page will be empty.
Create a new subscription by clicking the New subscription button.
 Manage Subscription
Under the Type of subscription, select Standard subscription.
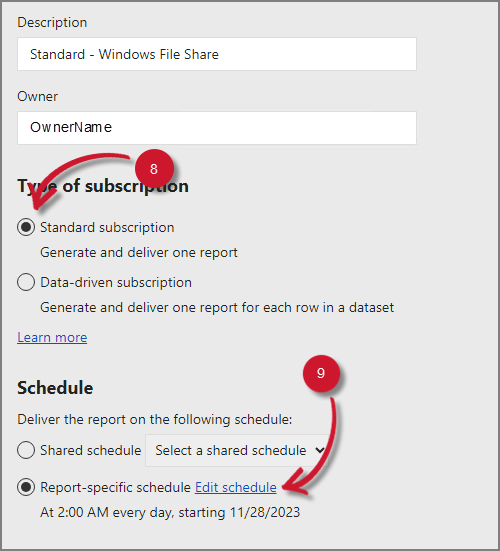 Standard Subscription
Configure the Report-specific schedule by clicking on
Edit schedule .Choose a delivery method between,
Windows File Share orE-mail .Choose among the Render Format options to determine how the report will be formatted and presented in the saved file when it is delivered.
Render Format - Options
Click Create subscription. If the SQL Agent service is not running in your machine, an error will show. Follow the instructions from this link to start the SQL Agent Service.
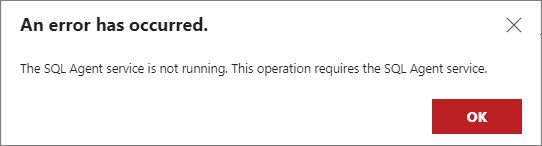 SQL Agent service is not running
You will be directed to a page displaying all available subscriptions upon creation. Selecting a subscription will allow you to modify it, providing options to Enable, Disable, Run, and Delete options.
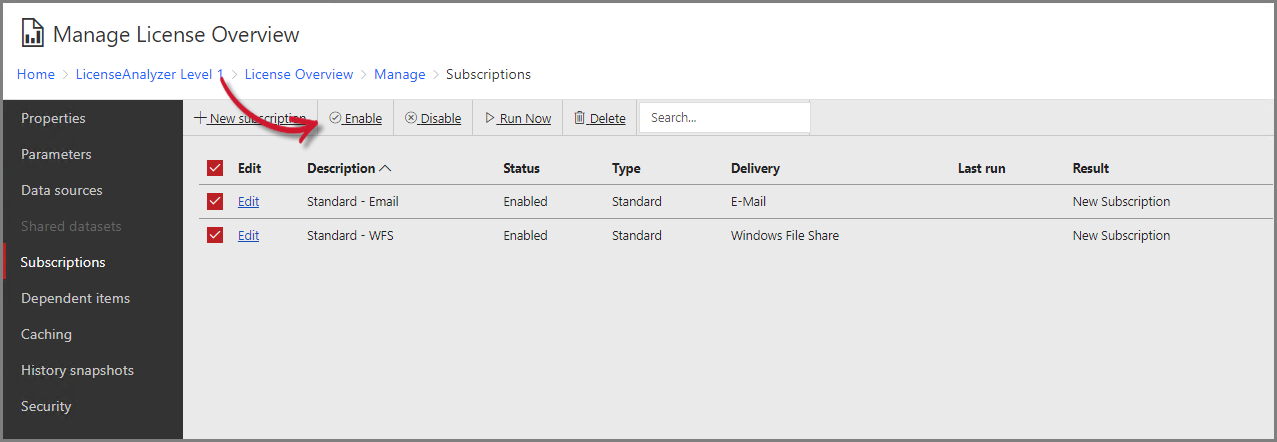 Subscriptions
#
Data-driven subscription
You can use a data-driven subscription to populate data or report parameter values to manage subscriptions for a large number of reports and change configurations, such as recipient email addresses, which require accessing individual report properties.
Open the Analysis Server Web Interface.
Go to the Reporting Services page. Access this by clicking Reporting in the left pane.
Under the View and Manage Reports section, click the link Click here to open. The page will redirect to the Open iT Reporting Services reports portal.
Open iT Reporting Services
On the Folders section, click LicenseAnalyzer Level 1. This will display the available folders and paginated reports you can configure.
LicenseAnalyzer Level 1
To manage report subscriptions, click the icon on a paginated report and select the Subscribe option.
Manage Reports
Select Subscriptions from the left pane. This page lists created report subscriptions. Suppose there are no report subscriptions created. This page will be empty.
Create a new subscription by clicking the New subscription button.
Manage Subscription
Under the Type of subscription, select Data-driven subscription.
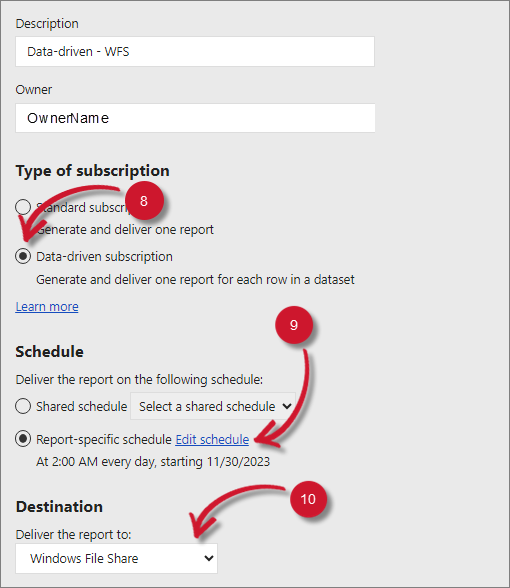 Data-driven Subscription
Configure the Report-specific schedule by clicking on
Edit schedule .Choose a delivery method between, Windows File Share and E-mail.
Choose among the Render Format options to determine how the report will be formatted and presented in the saved file when it is delivered.
Render Format - Options
Click on Edit dataset.
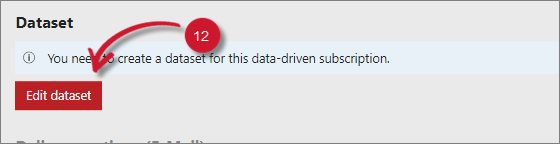 Edit dataset
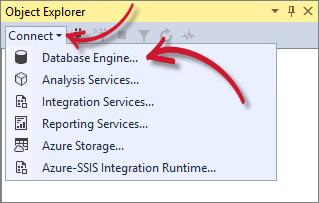
Create a table in SSMS before you proceed. Do this by following these instructions.
Instructions - On your machine, open SSMS and click on Connect then select the Database Engine. Put the Server name and select an Authentication type.
 Connect to Database Engine
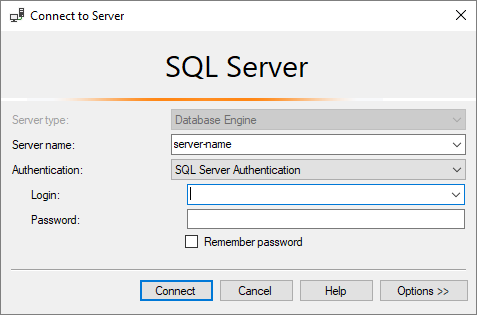 Connect to Server
- Select New Query from the top panel.
 New Query
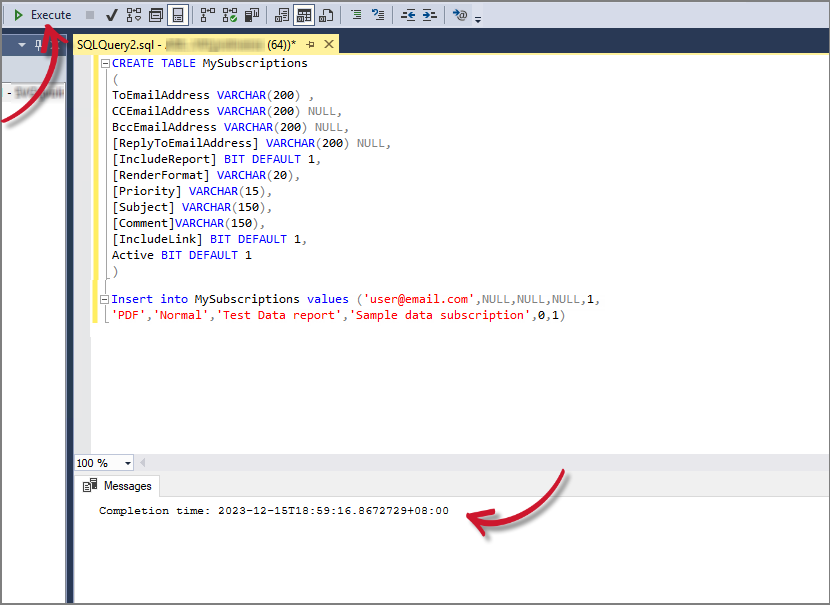
Run the following query.
ExampleCREATE TABLE MySubscriptions ( ToEmailAddress VARCHAR(200) , CCEmailAddress VARCHAR(200) NULL, BccEmailAddress VARCHAR(200) NULL, [ReplyToEmailAddress] VARCHAR(200) NULL, [IncludeReport] BIT DEFAULT 1, [RenderFormat] VARCHAR(20), [Priority] VARCHAR(15), [Subject] VARCHAR(150), [Comment]VARCHAR(150), [IncludeLink] BIT DEFAULT 1, Active BIT DEFAULT 1 ) Insert into MySubscriptions values ('user@email.com',NULL,NULL,NULL,1, 'PDF','Normal','Test Data report','Sample data subscription',0,1)A dialog confirming a successful query will appear below.
 Run Query
Select between A shared data source or A custom data source. Put the following in the Conection String.
ExampleData Source=<localhost>; Initial Catalog=<database>; Integrated Security=True;
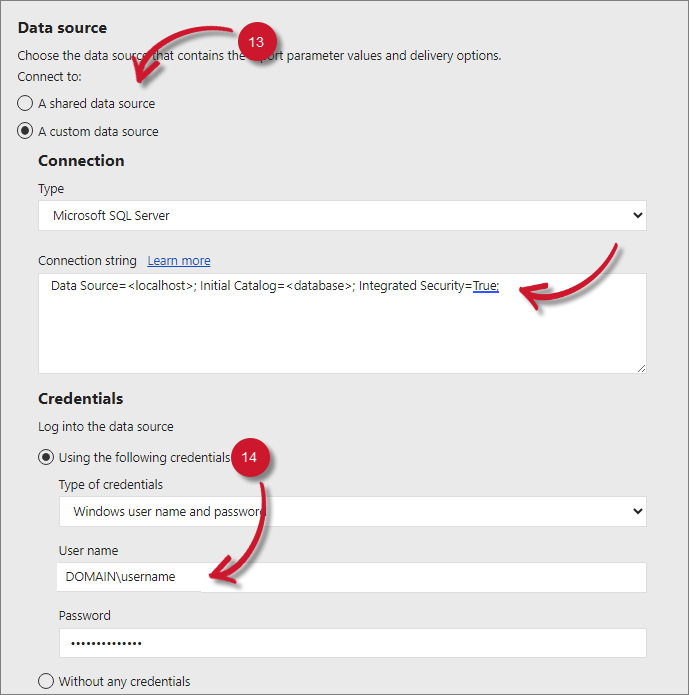
Choose the type of credentials to use and fill in the User name and Password.
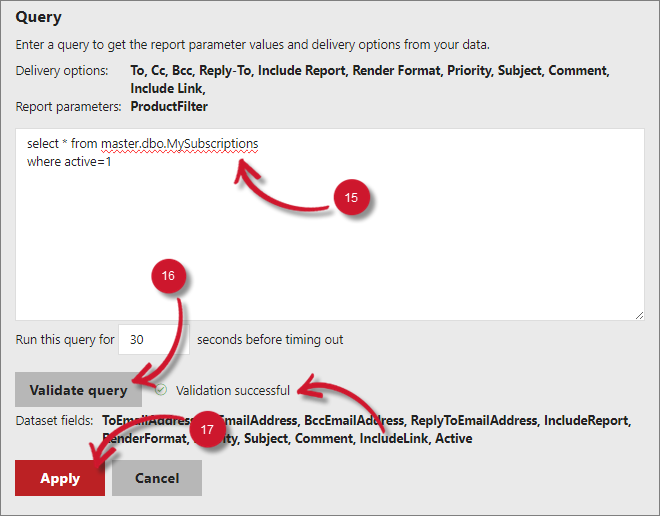
To use data-driven subscription values, validate the following query from the one you made earlier in SSMS.
Exampleselect * from master.dbo.MySubscriptions where active=1Click on Validate Query, then wait for a Validation successful prompt.
Click Apply.
Configure the Delivery options according to the delivery method you chose.
Windows File Share orE-mail .Click Create subscription. If the SQL Agent service is not running in your machine, an error will show. Follow the instructions from this link to start the SQL Agent Service.
SQL Agent service is not running
You will be directed to a page displaying all available subscriptions upon creation. Selecting a subscription will allow you to modify it, providing options to Enable, Disable, Run, and Delete options.
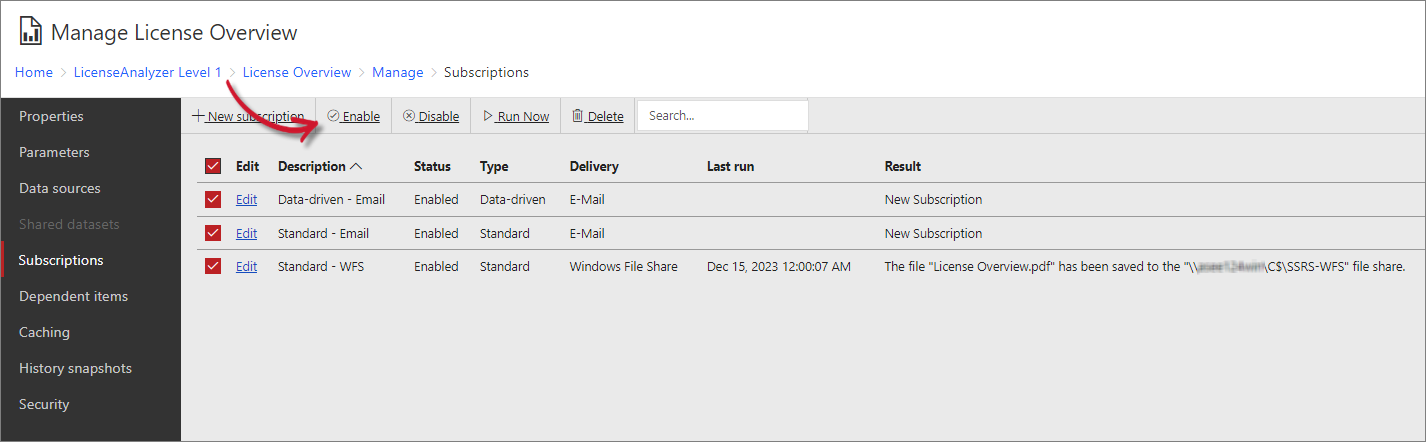 Subscriptions
#
Report-specific Schedule
SSRS has a Report-specific schedule where you can set up a schedule for a subscription to run at specific intervals, such as daily, weekly, or monthly. This allows you to automate the report generation and delivery process.
To configure, follow these instructions:
Click on Edit schedule and configure the following details:
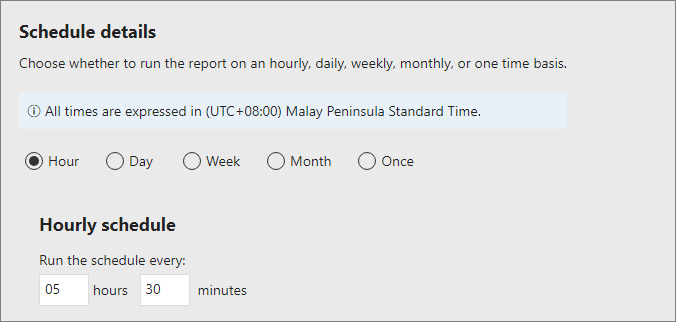
Hourly Schedule
Run the schedule every certain amount of hours and minutes.
 Hourly Schedule
Daily Schedule
Run the report on specific days only.
Run the report every weekday (Monday - Friday).
Repeat after certain number of days.
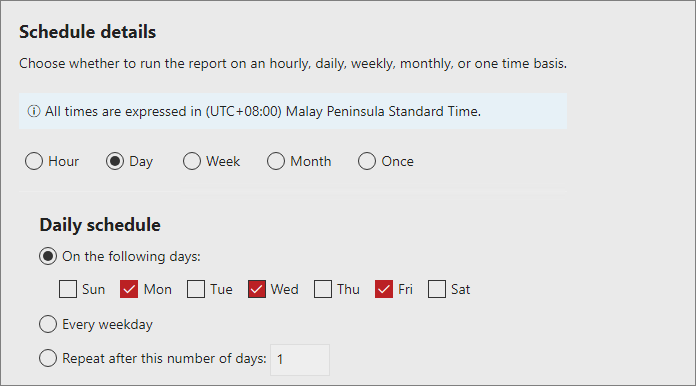 Daily Schedule
Weekly Schedule
Repeat after certain number of weeks.
Run the report on specific days only.
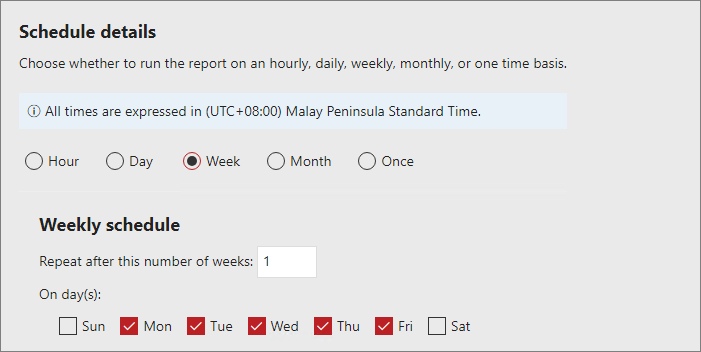 Weekly Schedule
Monthly Schedule
Run the report on specific months only.
Select on what week of the month and what day of the week to run scheduled report.
Run the report on certain calendar day(s) only.
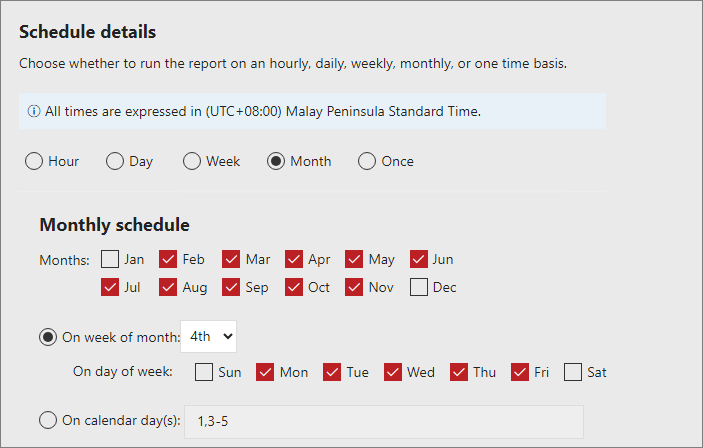 Monthly Schedule
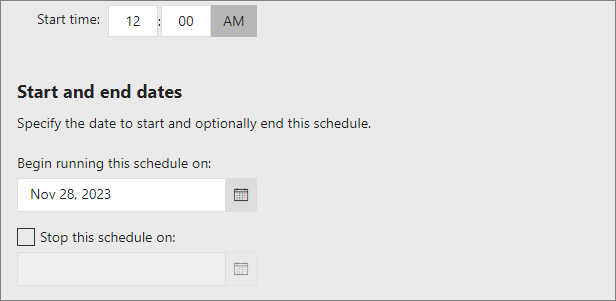
One-time schedule
Run the scheduled report once.
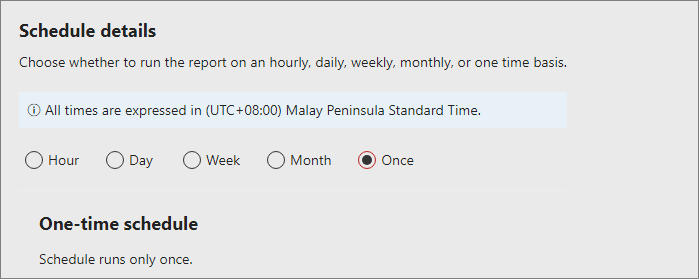 One-time Schedule
Set the designated time to run the report, as well as the start and end dates for the report subscription. You can also choose to stop the scheduled report on a specific date.
#
Delivery Method
SSRS Subscriptions offers two types of delivery method for where the report will be delivered:
Windows File Share E-mail
#
Windows File Share
The Windows File Share delivery method distributes reports by saving them to a shared network folder. This method allows you to specify a shared folder as the destination for the delivered reports.
#
Prerequisites
#
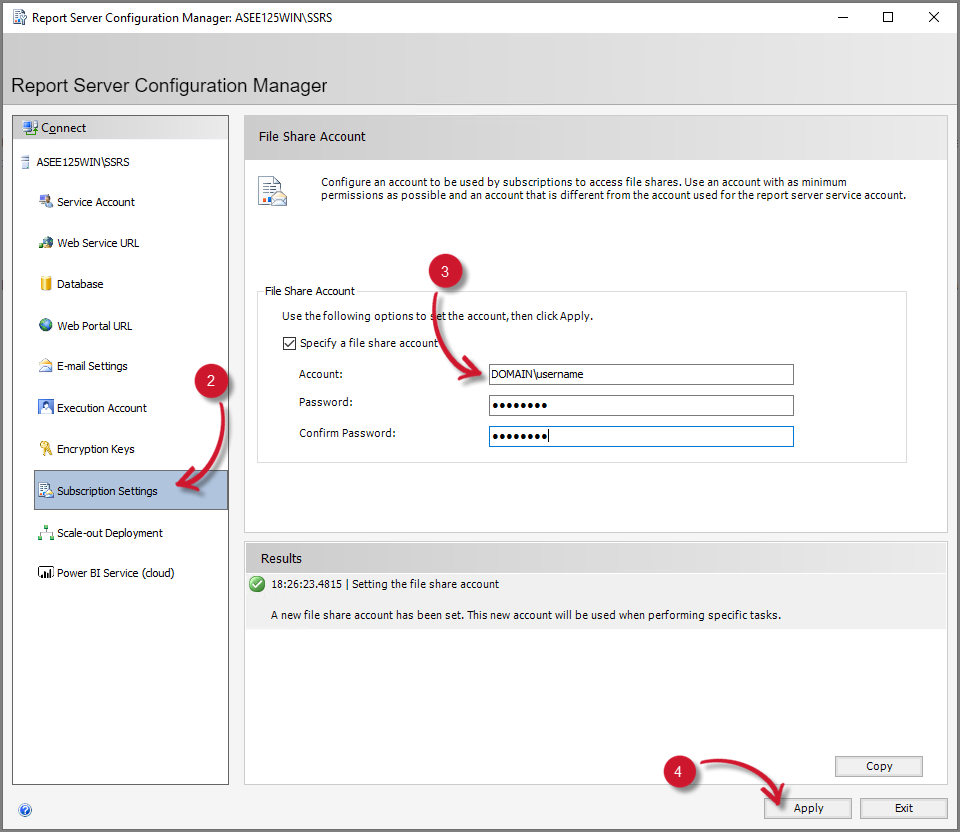
Configuring File Share Account
In the Report Server Configuration Manager, the Subscription Settings section allows administrators to configure the details of the account used for file share delivery, specifying the necessary credentials and permissions for storing reports on a shared file system in the SSRS.
Open the
Report Server Configuration Manager. Access this by typing Report Server Configuration Manager in the Windows Search Box.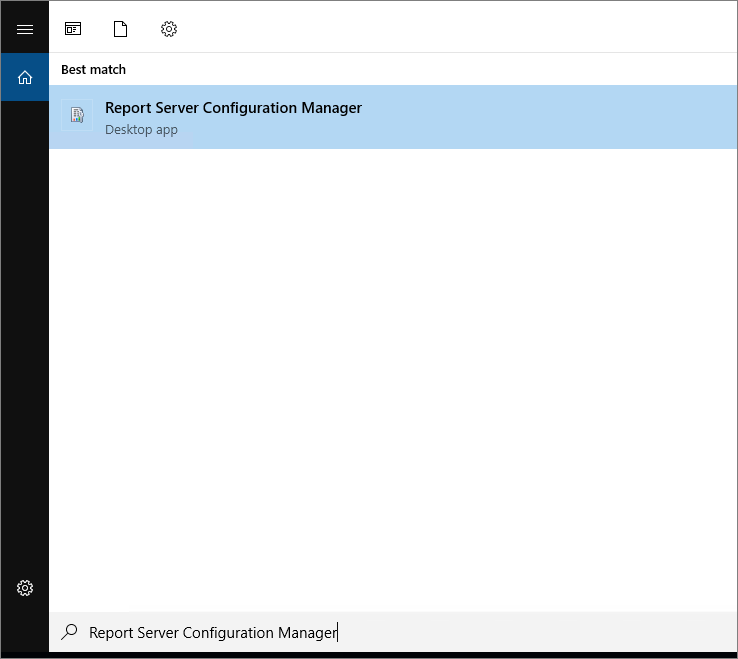 Report Server Configuration Manager
Go to the Subscription Settings in the left pane.
 Subscription Settings
Provide the Account and Password.
Click Apply, then wait for a confirmation message indicating a successful configuration.
In Standard subscription, follow these instructions:
Specify a file name for the exported SSRS report.
Provide a valid Windows file share path with appropriate permissions that can access the path. It must be in UNC format.
Select from the drop-down which format the report should be in.
Choose whether to use the
file share account or provide a Windows user credentials.Decide what to do to an existing file if a previous version exists.
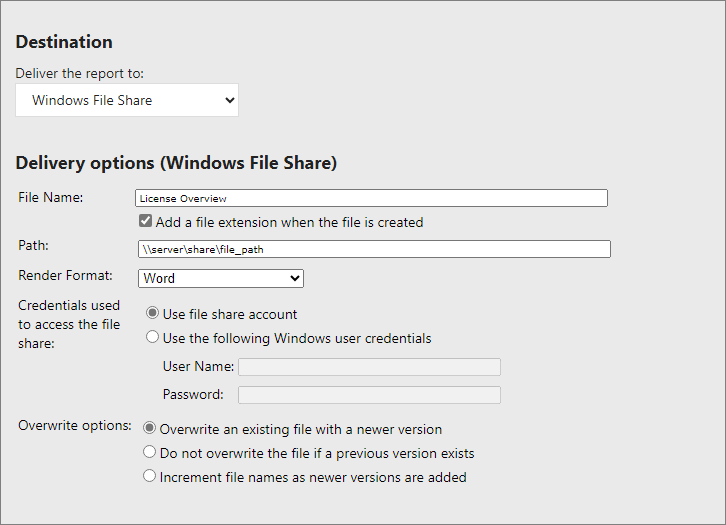 Windows File Share - Configuration
In Data-driven subscription, map the columns and their values with the report parameters. Follow these instructions:
To connect values from your database table, choose Get Value from dataset as the source of value.
Choose a Value/field from the dropdown.
You can leave the values of the Reply-To and Comment fields as is.
#
E-mail
Reports can be sent and distributed as email attachments to specified recipients through the SQL Server Reporting Services(SSRS) email delivery method.
#
Prerequisites
#
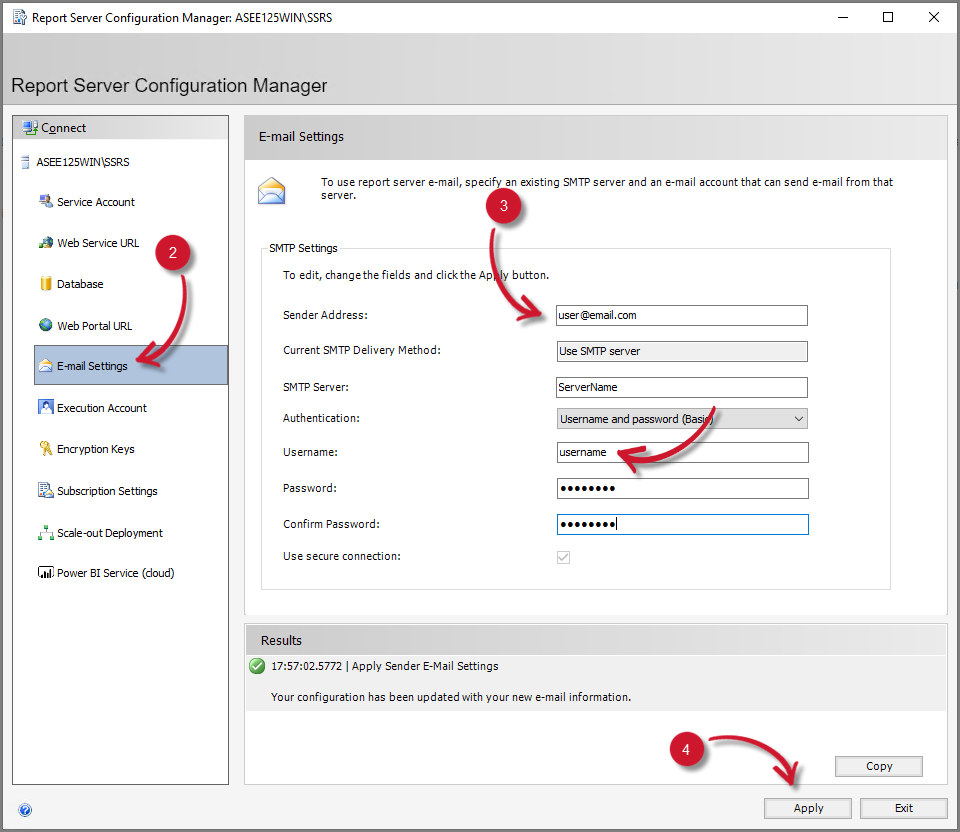
Configuring SMTP Email Settings
Administrators can configure the SMTP server details, sender information, and authentication settings for email delivery of reports in the SSRS in the Email Settings section of the Report Server Configuration Manager.
Open the
Report Server Configuration Manager. Access this by typing Report Server Configuration Manager in the Windows Search Box.Report Server Configuration Manager
Go to the E-mail Settings in the left pane.
 E-mail Settings
Provide the details for the Sender Address, SMTP Server (hostname), and the Authentication details.
Click Apply, then wait for a confirmation message indicating a successful configuration.
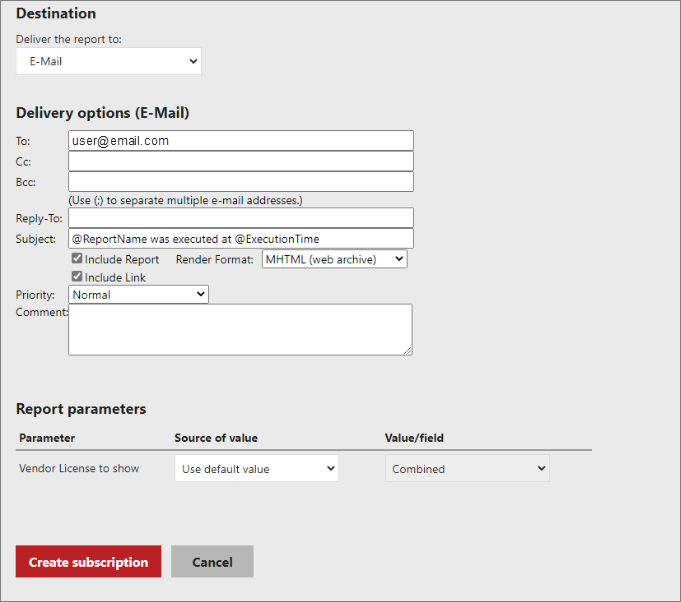
In Standard subscription, follow these instructions:
Specify an email address in the To, Cc, and Bcc fields. Separate multiple email addresses by using a semicolon (
;).Write a subject for the email report.
Choose whether to include a report with the selected render format or the SSRS report link. You can use both options – Include Report and Include Link for email report delivery.
Choose the order of email delivery: High priority is sent first, followed by Normal, then Low.
Write a body content to provide additional information to include along with the attached report.
 Email - Configuration
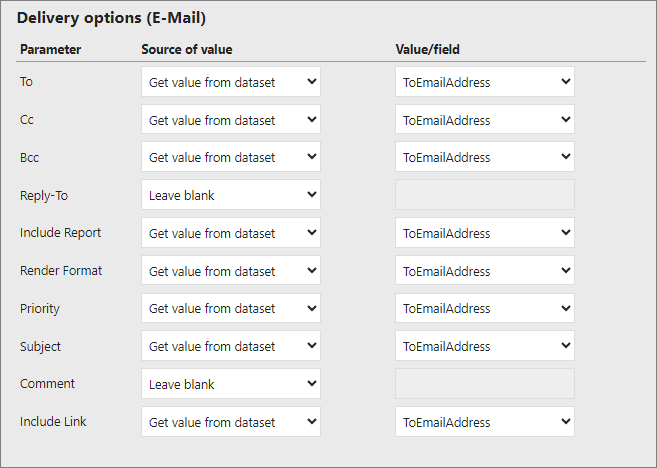
In Data-driven subscription, map the columns and their values with the report parameters. Follow these instructions:
To connect values from your database table, choose Get Value from dataset as the source of value.
Choose a Value/field from the dropdown.
You can leave the values of the Reply-To and Comment fields as is.
#
Recommended Reading
The following configuration is needed for the SSRS Subscription to work.
Using Reporting Services Console Application