We’re upgrading your documentation experience!
A new doc website is live at docs.openit.cloud — a temporary preview during our transition. This website is now in maintenance-only mode (only critical issues will be addressed).
Explore the new website and send us your feedback!
#
Connecting to Azure SQL Database
#
Requirements
To connect to the Azure SQL Database, make sure to have all the following before proceeding:
- Azure Subscription
- Azure SQL Server
- Azure SQL Database
- Server Login Credentials
- DBMANAGER Role
#
Server Login Creation Requirements
Create a Server Login with the DBMANAGER server role.
To create and manage your Azure SQL Database, you need to set up a server login with the dbmanager role.
Follow these instructions:
Create a Server Login by logging into your Azure SQL Server using SQL Server Management Studio (SSMS). Run the following SQL commands to create a new server login and assign it the
dbmanagerrole:
ExampleUSE [master] GO --Create Server-login CREATE LOGIN [openitsa] WITH PASSWORD = '0p3n!T$@'; --Create database user based on server-login in master database CREATE USER [openitsa] FOR LOGIN [openitsa]; -- Grant necessary permissions to the user ALTER ROLE dbmanager ADD MEMBER [openitsa];Make sure that the server login is created by expanding the Security > Logins in the Object Explorer.
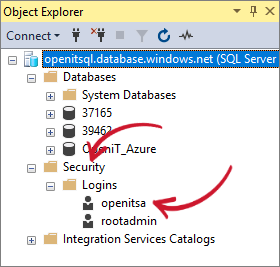 Server Login: Verify
If your database is pre-created without using the Analysis Server console application, please proceed to the next step; otherwise, end the instructions.
Create a Database User Based on a Server Login. To create a user in your specific database that corresponds to a server login, run the following command:
ExampleUSE [openitdatabase] GO CREATE USER [openitsa] FOR LOGIN [openitsa]; EXEC sp_addrolemember 'db_datawriter', 'openitsa'; EXEC sp_addrolemember 'db_datareader', 'openitsa';Make sure that the database login is created by expanding the <OpenitDatabase> > Security > Users.
#
When changing from On-prem to Azure SQL Server
Using the Analysis Server console application, run the command
SetAzureSQLCredentials. Use the instructions in the section SetAzureSQLCredentials in performing the command.Provide the Azure SQL Server Login Credentials. Save the changes.
Make sure to provide valid credentials.
Run the command
Installand set the SQL server and Database name. Use the instructions in the section Install - 2 in performing the command.Save the configuration.
Once all set, run the common commands to create and deploy the SQL database.
- CreateSql
Use the instructions in the section CreateSql as guide in performing the command. - DeploySql
Use the instructions in the section DeploySql as guide in performing the command.
Some of the commands may take time since they are connecting to an Azure SQL Server. You may immediately load and process the data in the database or wait for the next daily processing to execute.
- CreateSql
Access the Analysis Server web interface to check if the connection to the database is successful.